Microsoft Teams has become a cornerstone for remote collaboration, and ensuring that your audio settings are optimal is essential for effective communication. This article will explore how to test audio in Microsoft Teams.
Testing the audio and call settings in Microsoft Teams is essential for several reasons. You can identify and address issues like echo and background noise, providing a distraction-free meeting environment.
Moreover, when testing audio devices such as headphones or external microphones, you can rule out the possibility of audio mishaps during a meeting. With this understanding, let’s begin.
How to Test Microphone and Speakers in Teams Before Meeting
Whether using a headset, microphone, or the built-in audio on your device, conducting a pre-meeting audio check ensures you can participate seamlessly, minimizing disruptions and enhancing the overall meeting experience. Follow the below steps.
Step 1: Launch Microsoft Teams on your Windows or Mac and click the three-dots icon in the top-right corner.
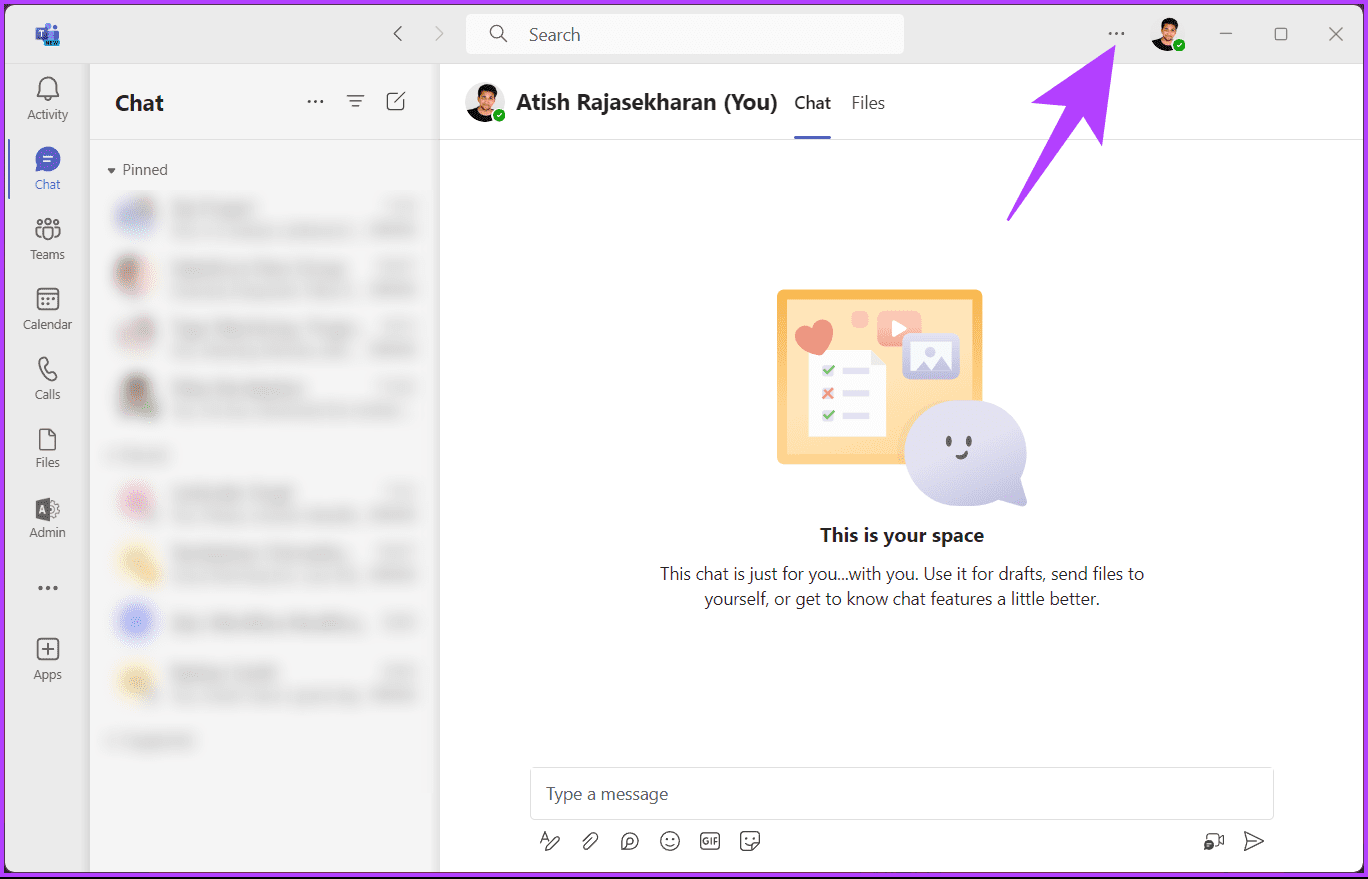
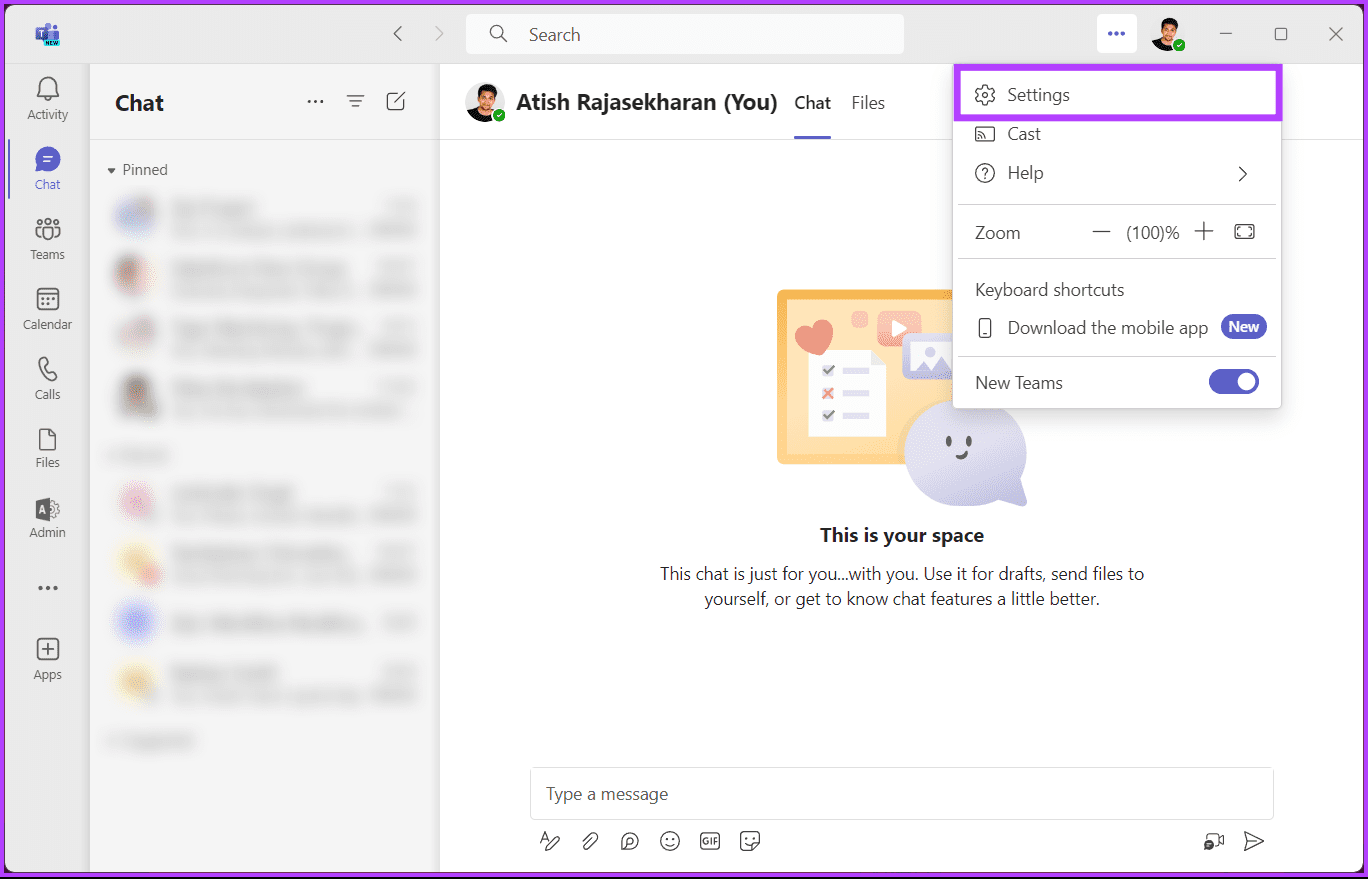
Step 2: From the drop-down menu, select Settings.
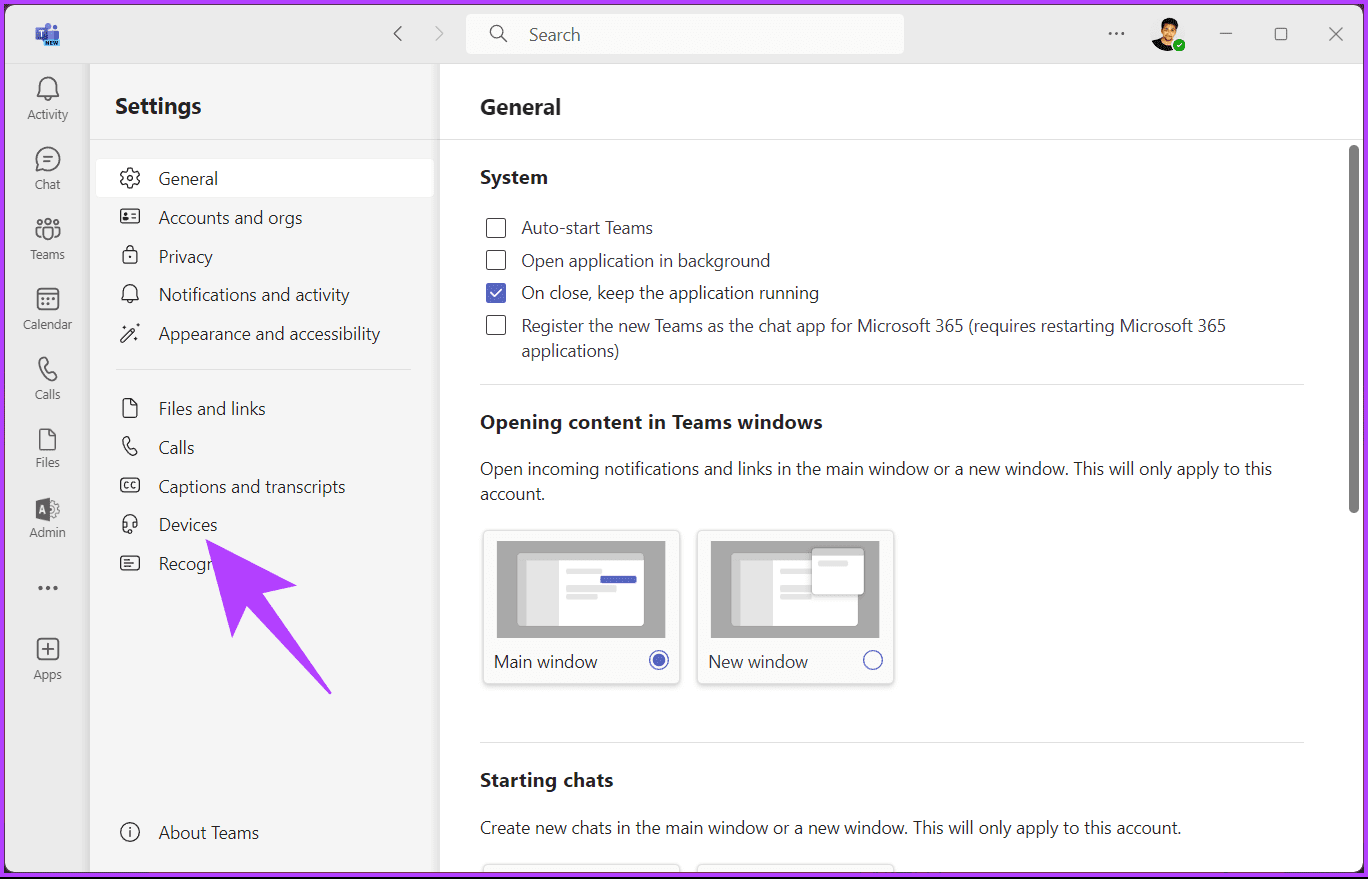
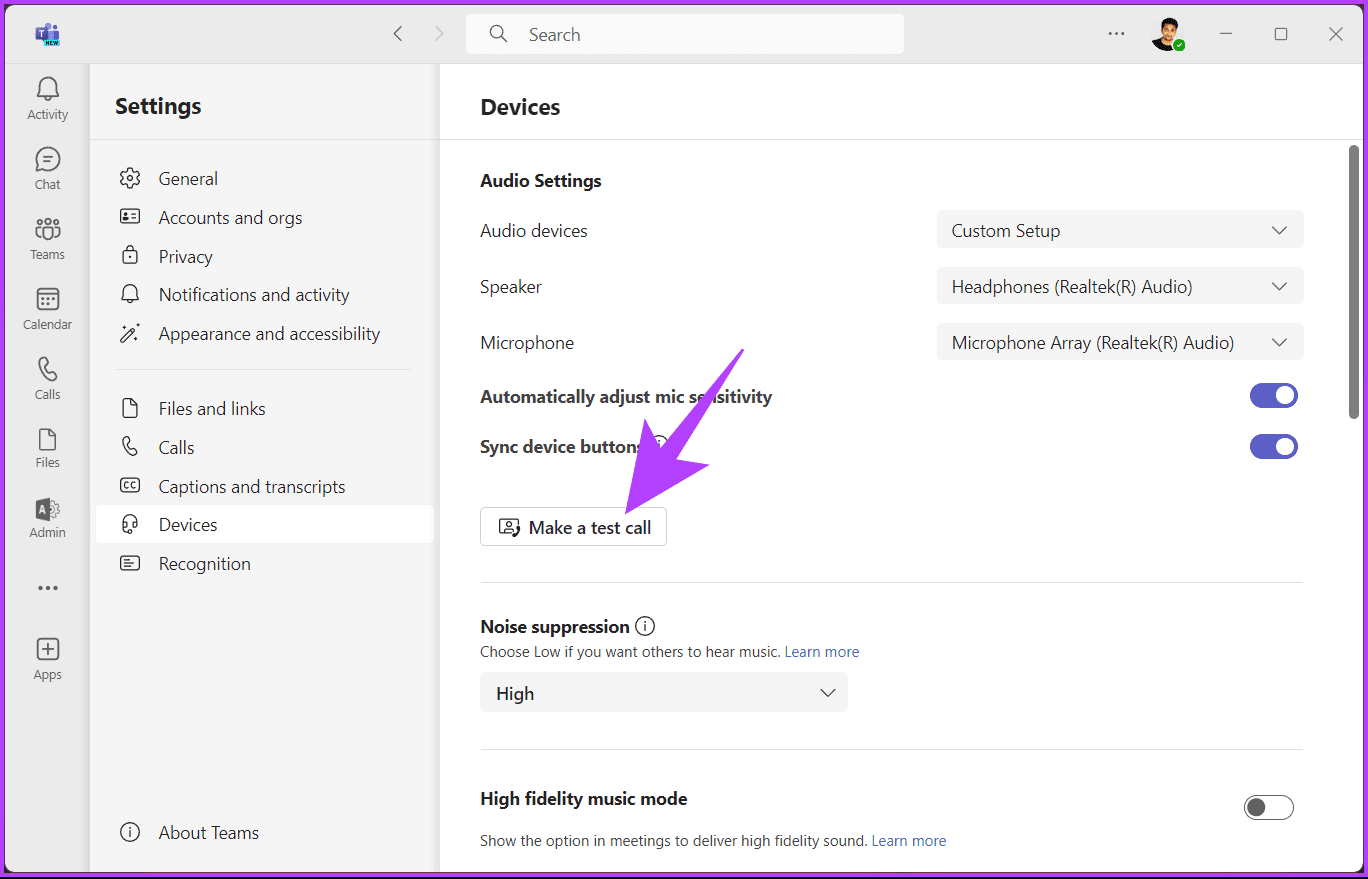
Step 3: Under Settings, go to Devices from the side pane.
Step 4: On the right pane, click the ‘Make a test call’ button under Audio Settings.
Note: Ensure your preferred microphone and speakers are selected before making a test call.
That’s it. Listen, follow the on-screen instructions, and monitor the output. Once the test call is complete, you will see a checkmark or crossmark next to your microphone, speaker, camera, and connected network, indicating whether the test succeeded or failed.
It is important to note that there’s no way to test calls in the Microsoft Teams mobile app while writing this article. That said, this was the case when you wanted to test calls before a meeting; what if you want to test calls during a meeting?
Also Read: How to schedule a meeting in Microsoft Teams
Test Sound in Microsoft Teams During Meeting
Microsoft Teams does not allow audio testing during meetings or ongoing calls. However, if you experience any sudden audio or video difficulties, you can quickly change the audio or video setting in Teams. Here’s how.
Note: For demonstration, we consider that you are already in a Teams meeting or call.
Step 1: From the top call controls icons, click on the More (three-dot icon) option.
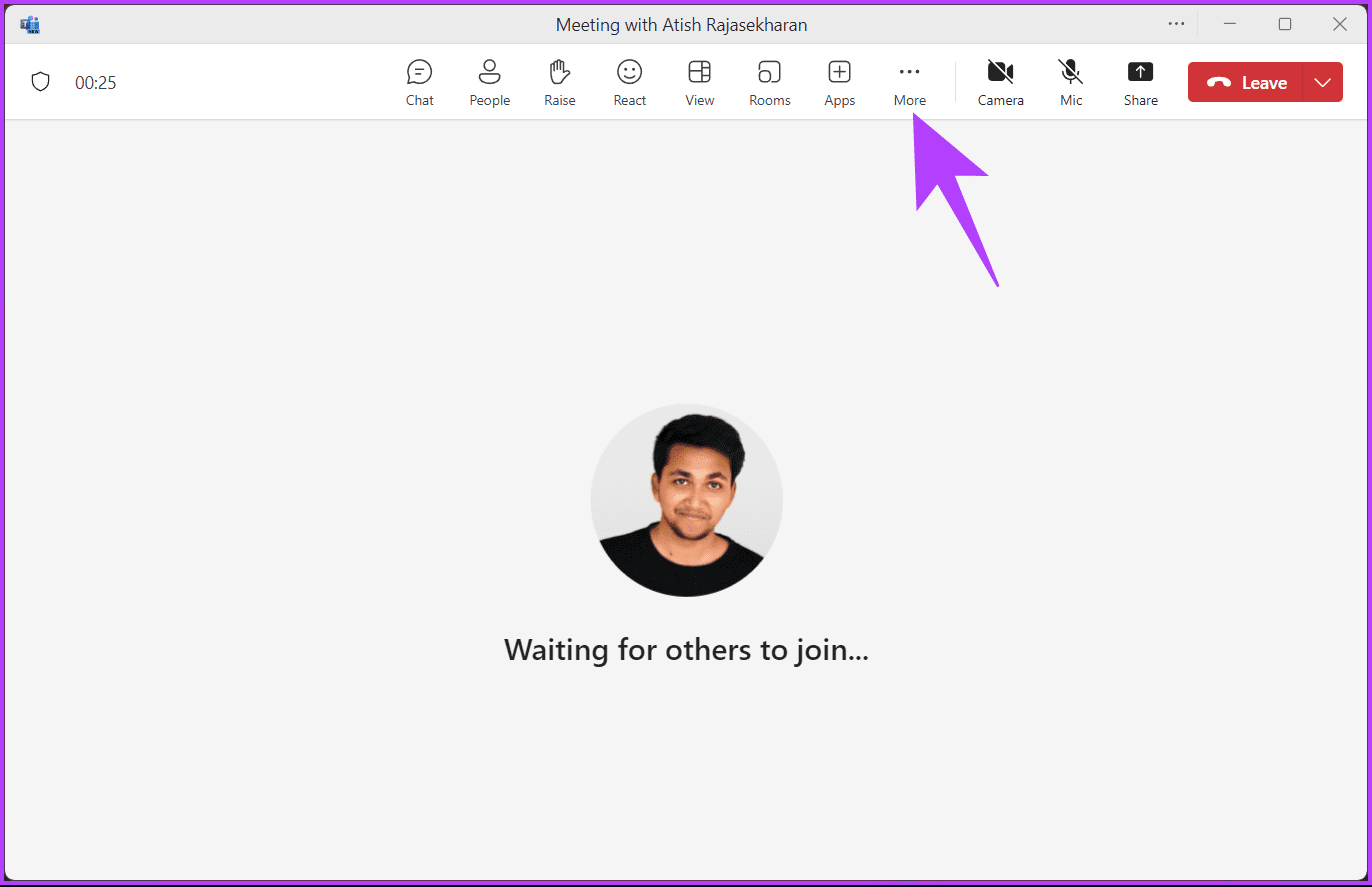
Step 2: Select Settings and choose Device settings from the drop-down menu.

The device settings pane on the right lets you change the input and output devices for an active Teams call or meeting, including the microphone, speakers, and camera.
Step 3: Click the chevron icon under Microphone in the Device settings side pane.

Step 4: Now, select the microphone you want to check or change. Once selected, you will see a visual indication confirming whether your voice is being picked up correctly.

You can switch between audio devices depending on what is available and suits your current needs. As mentioned earlier, this is highly recommended if you encounter sudden audio issues during your call.
If you want to make a test call in Microsoft Teams without joining a meeting, continue reading.
Make a Test Call in Microsoft Teams Without Joining a Meeting
Testing calls in Microsoft Teams without joining a meeting is simple. This allows you to assess and troubleshoot your audio settings within the Teams platform without the formality of joining an actual meeting. Follow the instructions below.
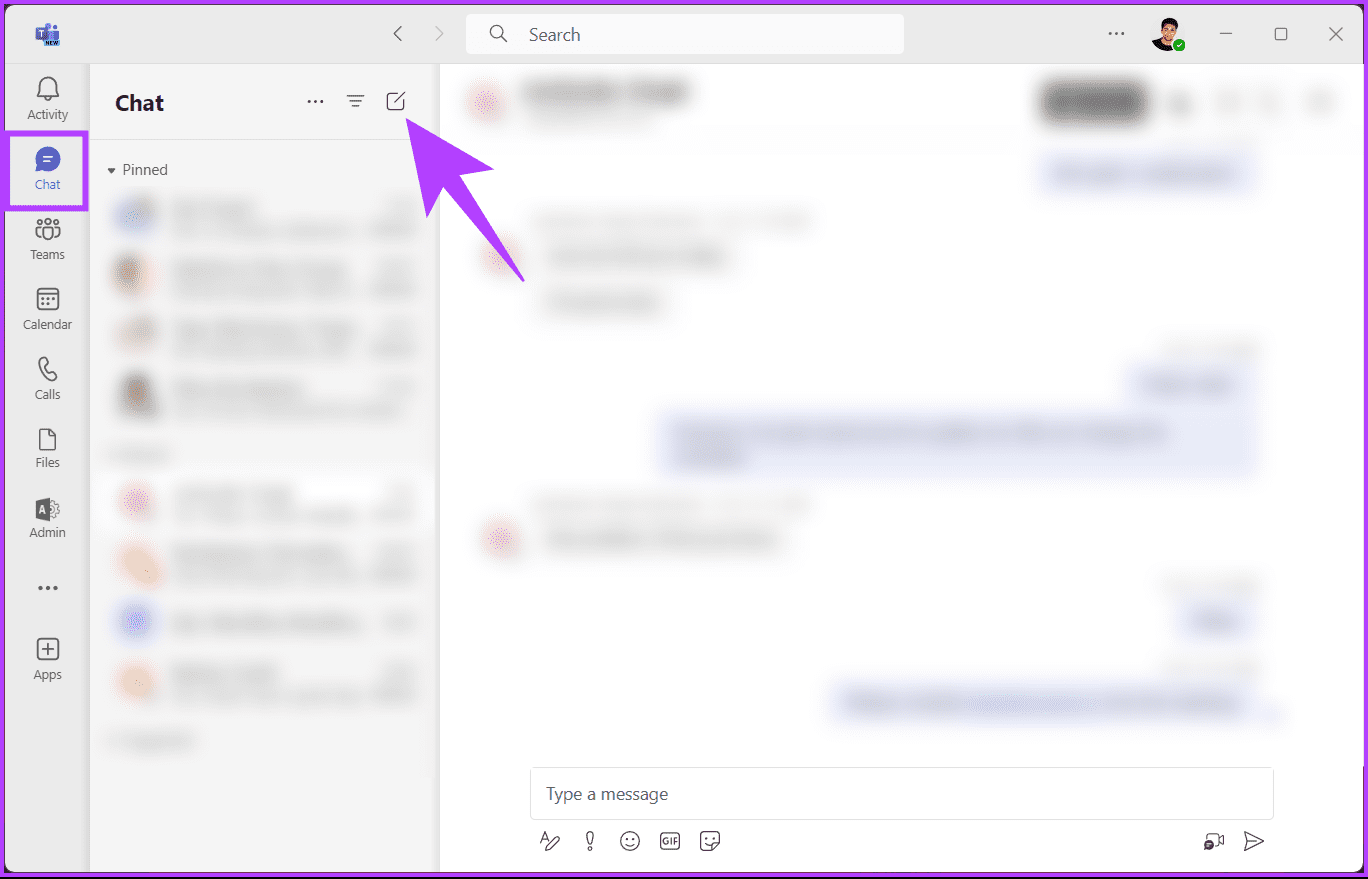
Step 1: Launch Microsoft Teams on your Windows or Mac and click on the Chat icon on the left.
Step 2: Click on the New chat icon at the top of the chat list.
Step 3: Now, type your name or email address in the To field and hit Enter.
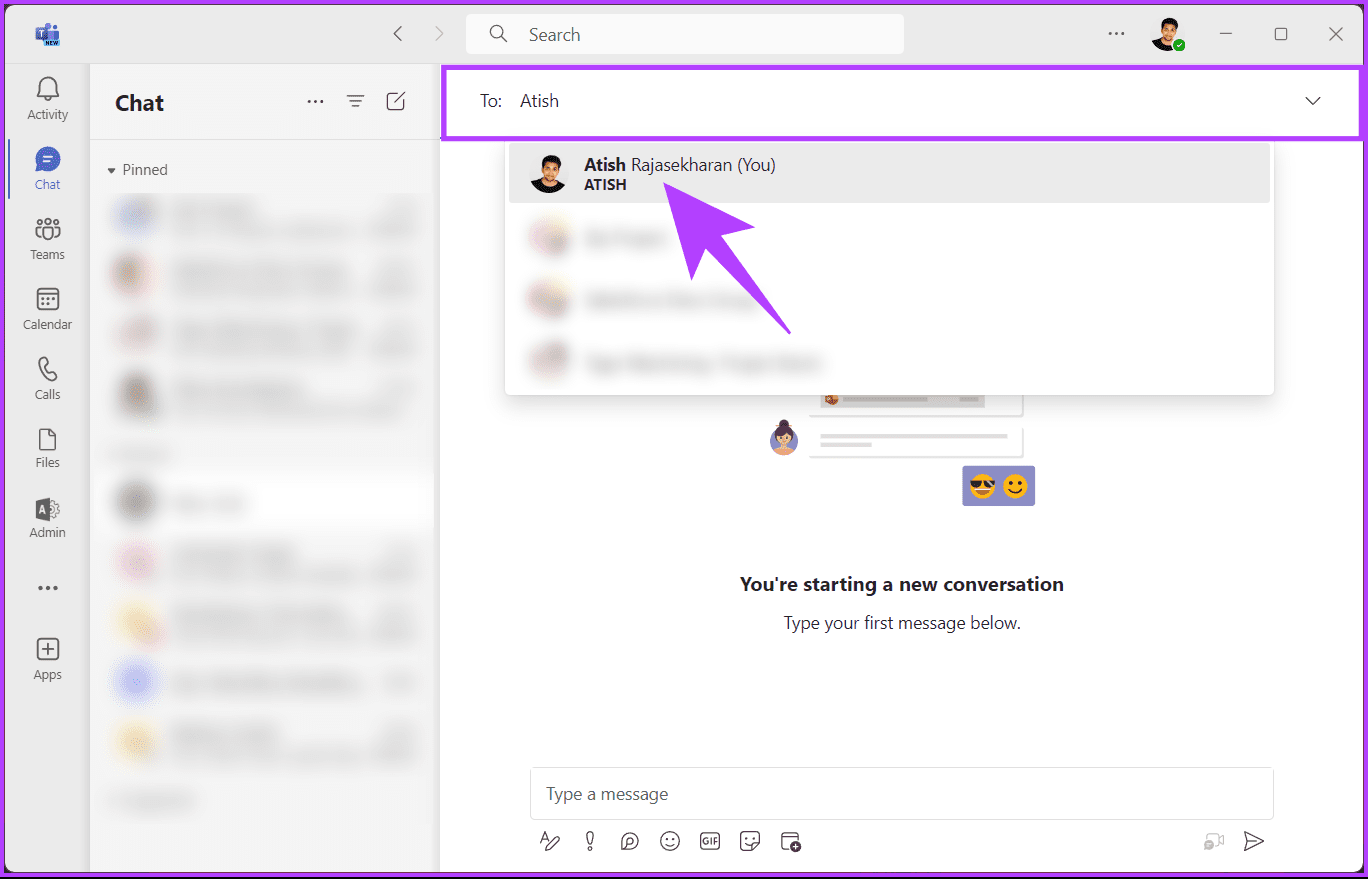
Step 4: Press the Record icon in the bottom right of your self-chat window.
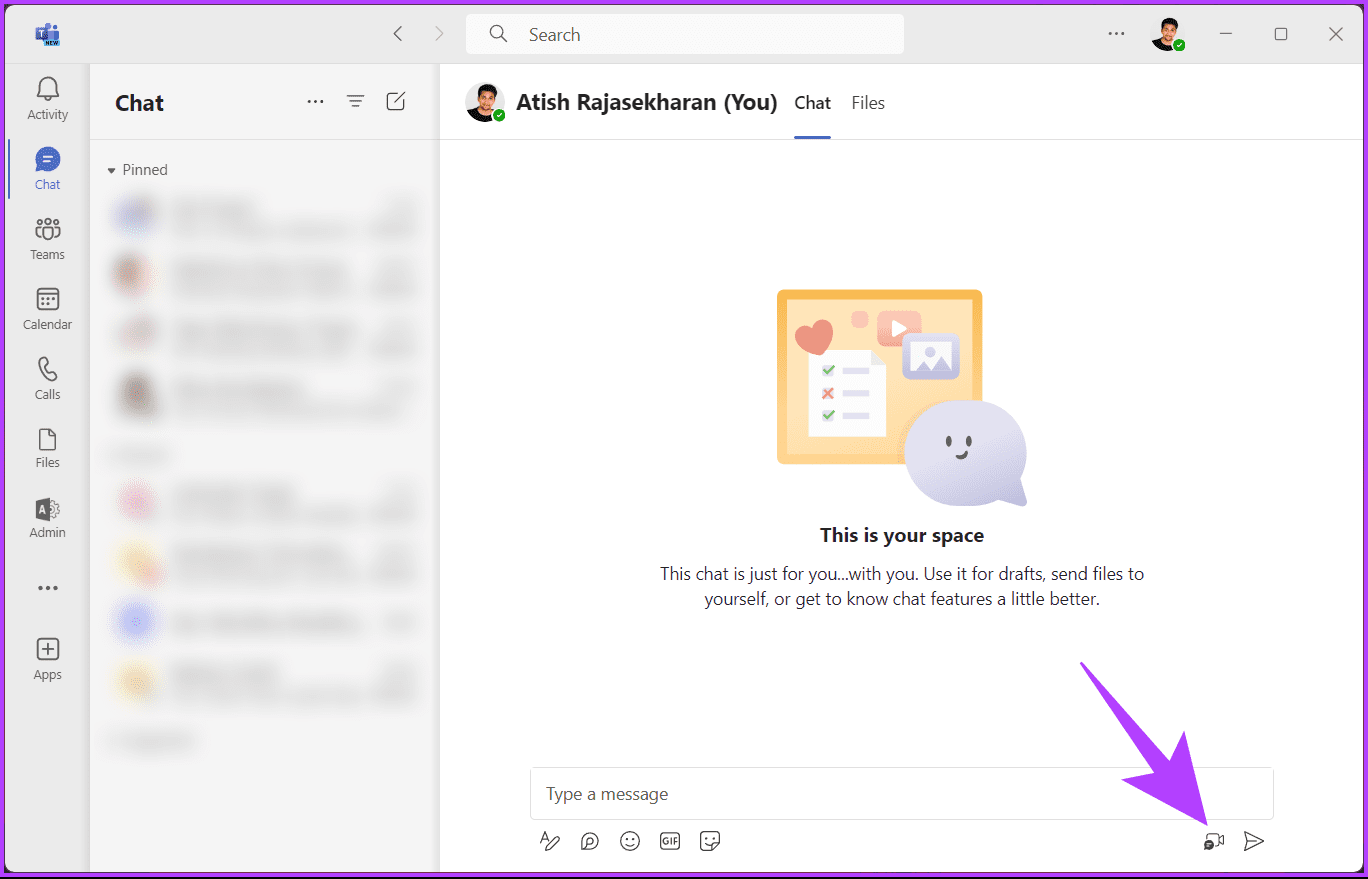
You will see and hear yourself. Now, make the necessary adjustments. Once done, close the self-meeting and go ahead and join the Teams call.
Also Read: How to keep Microsoft Teams status green all the time
Test Audio Before a Teams Meeting in Windows 11
Whether you’re a seasoned Teams user or getting started, this step-by-step guide will help adjust microphone settings to test speaker output, identify and resolve audio issues, and ensure a smooth virtual meeting experience with Windows 11. Follow the below-mentioned instructions.
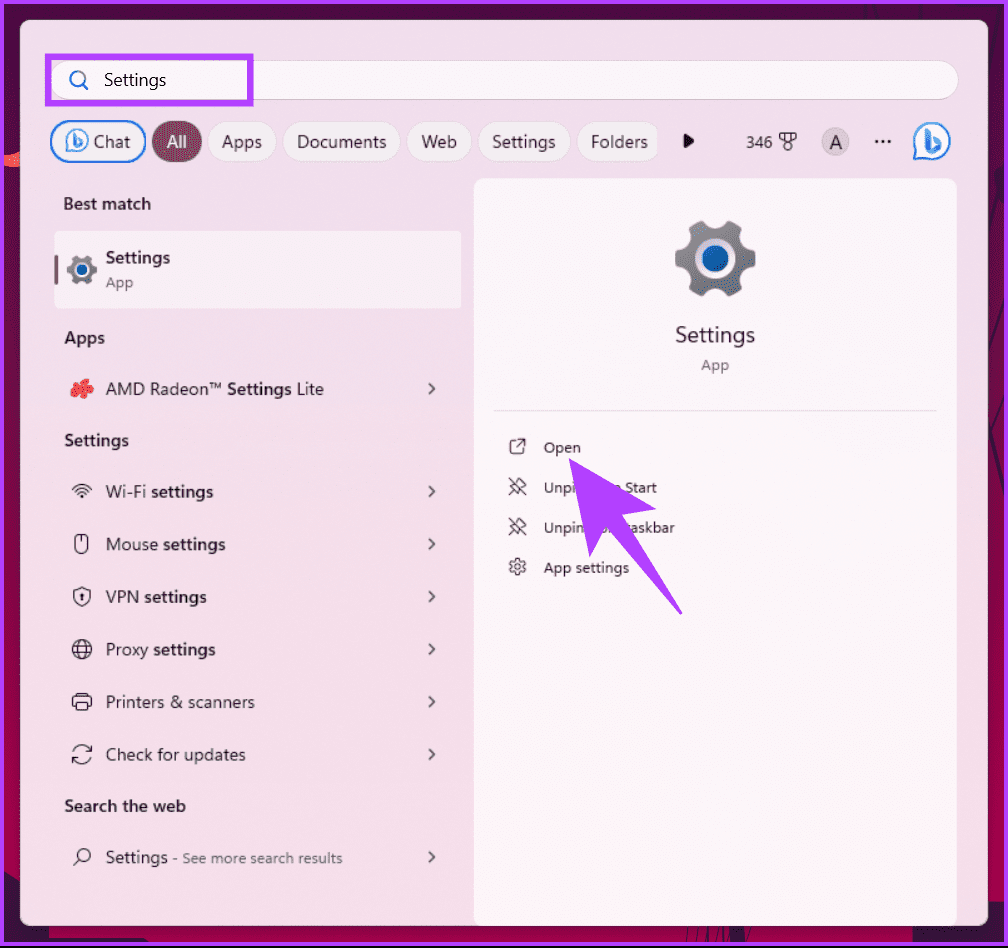
Step 1: Press the Windows key on your keyboard, type Settings, and click Open.
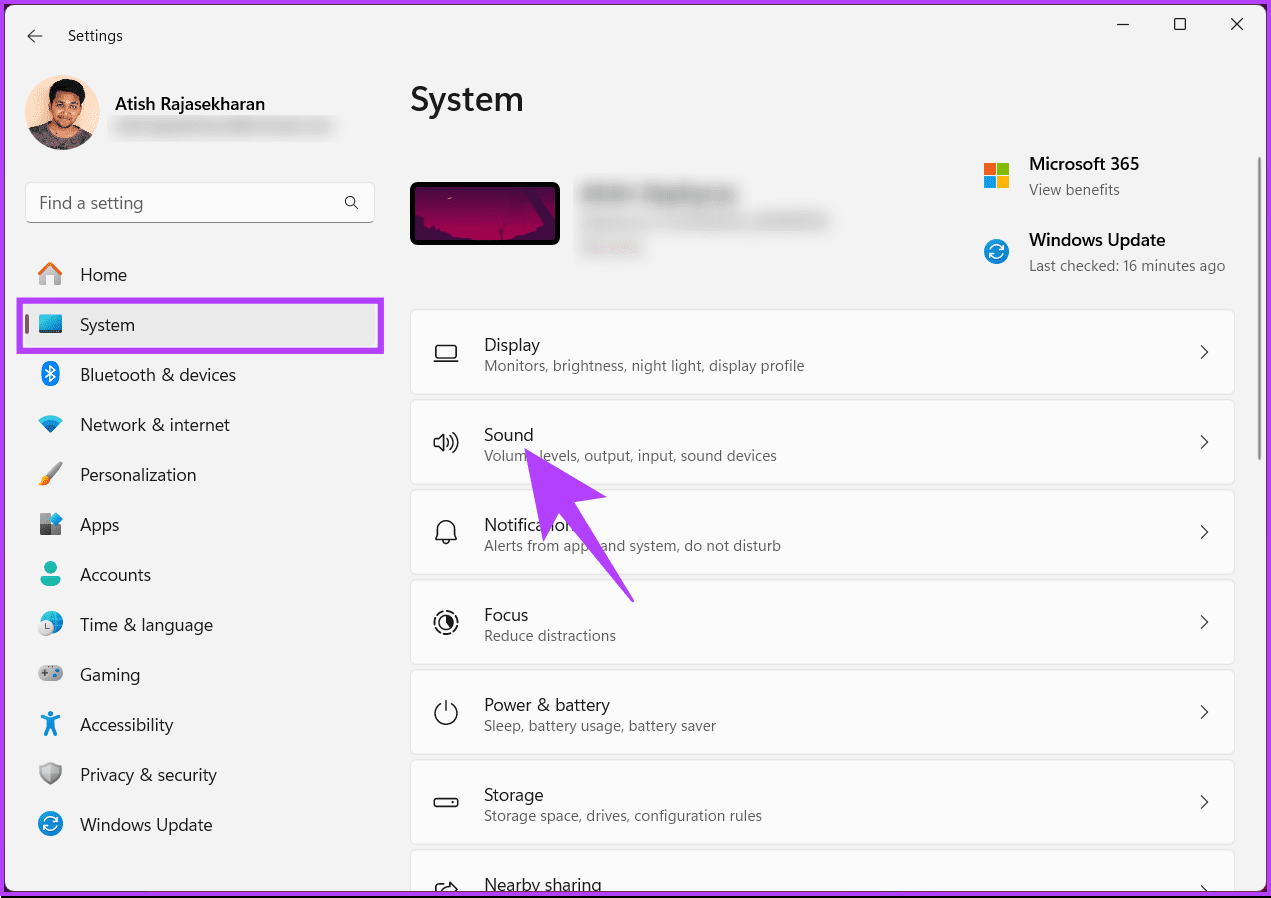
Step 2: Navigate to the System and choose Sound.
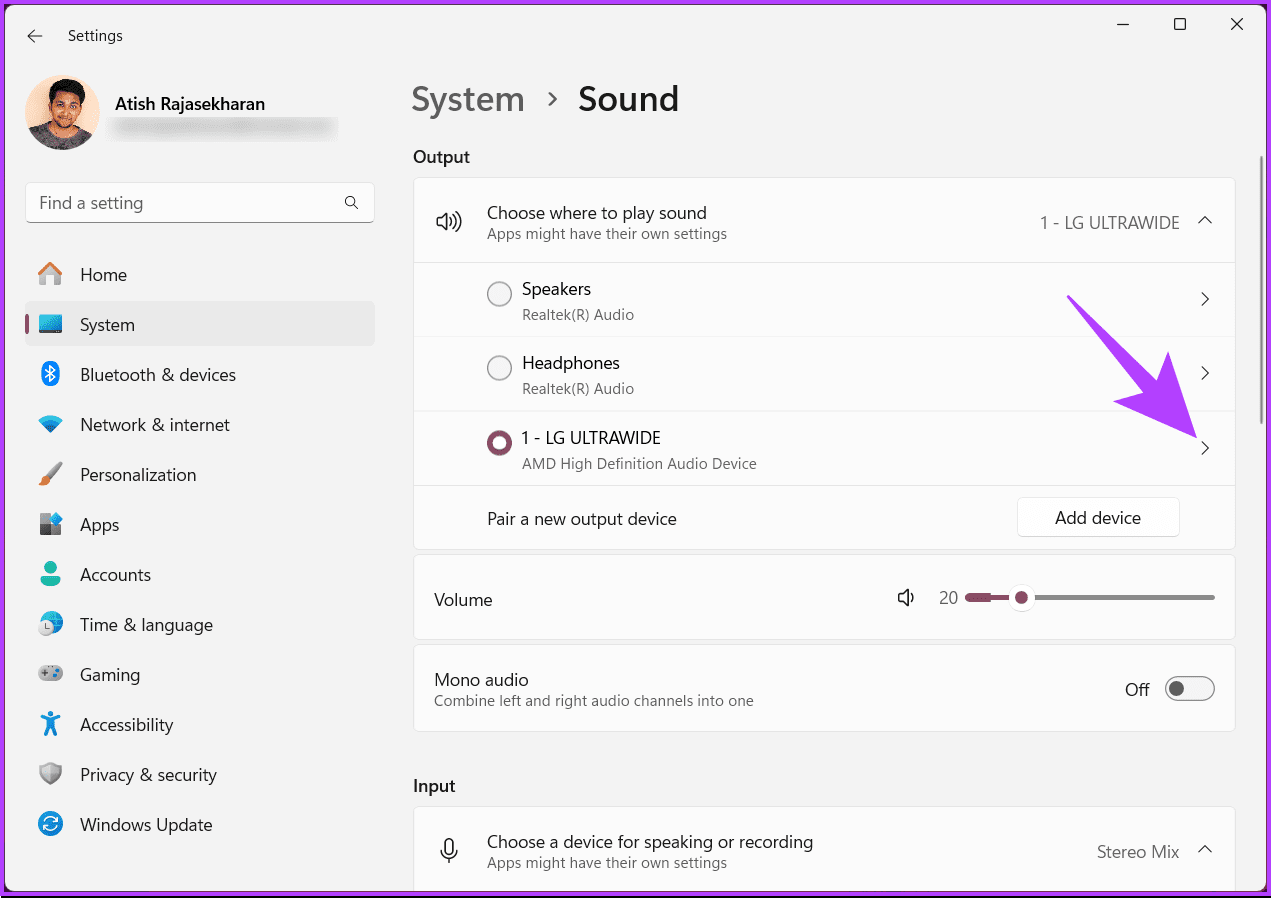
Step 3: Under the Output section, you will see speakers or headphones currently selected as the default output device. You can change them by clicking the radio button in front of the microphone or speaker of your choice.
Additionally, choose the output volume by dragging the slider.
Step 4: To test the speakers or headphones, select the Speaker of your choice.
Step 5: Under the Output settings section, click Test beside Format.
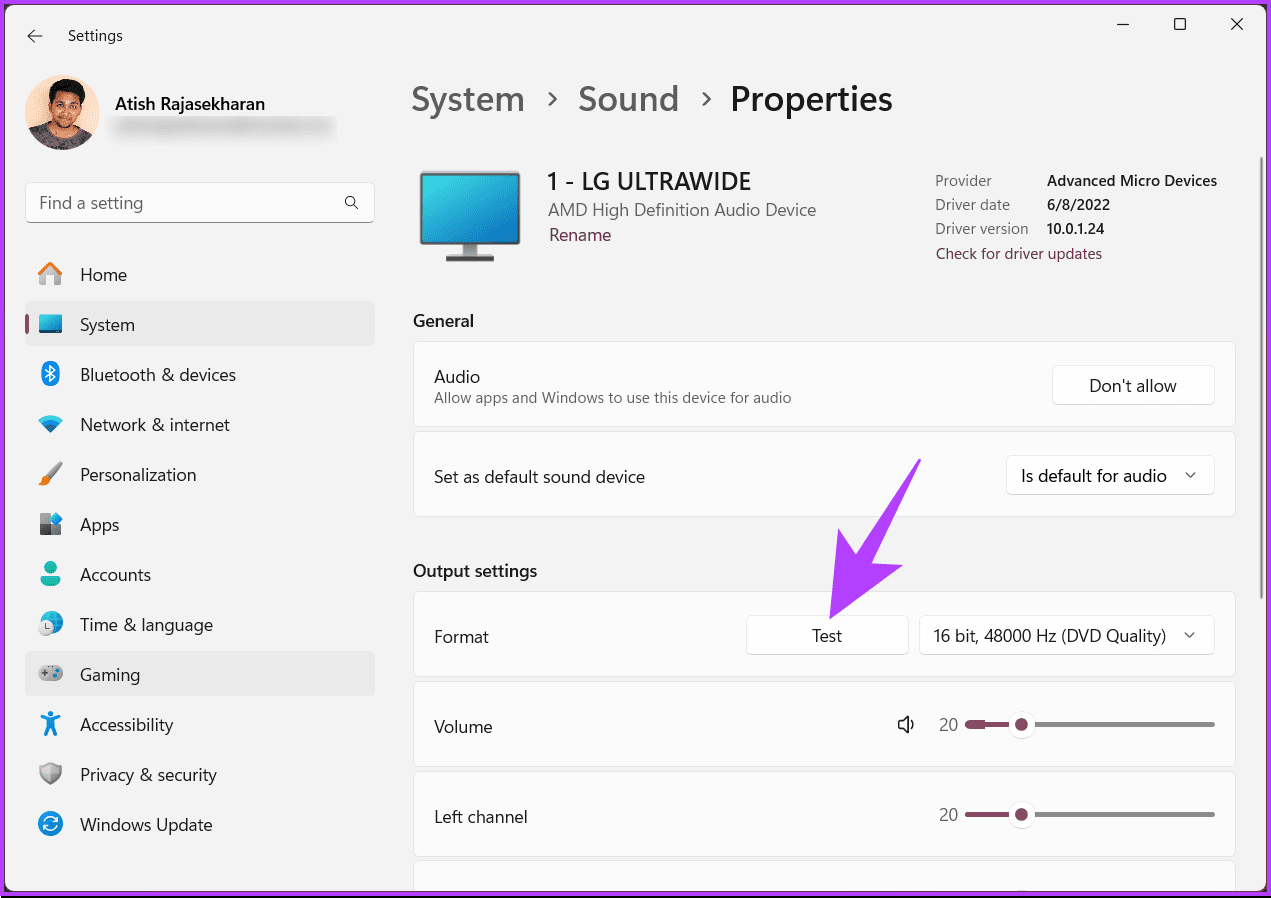
You will hear a sound playing. You can quickly fix it on Windows 11 or 10 if you don’t hear any sound. Moving on, if you face issues using a microphone, continue reading.
Step 6: Now, under the Input section, you will see the microphone currently selected as the default input device. Much like in the Output section, you can change the input device by clicking the microphone of your choice and changing the input volume.
Step 7: Now, click on the selected microphone to test the microphone.

Step 8: Under Properties, scroll down and click the Start test button under Input settings.
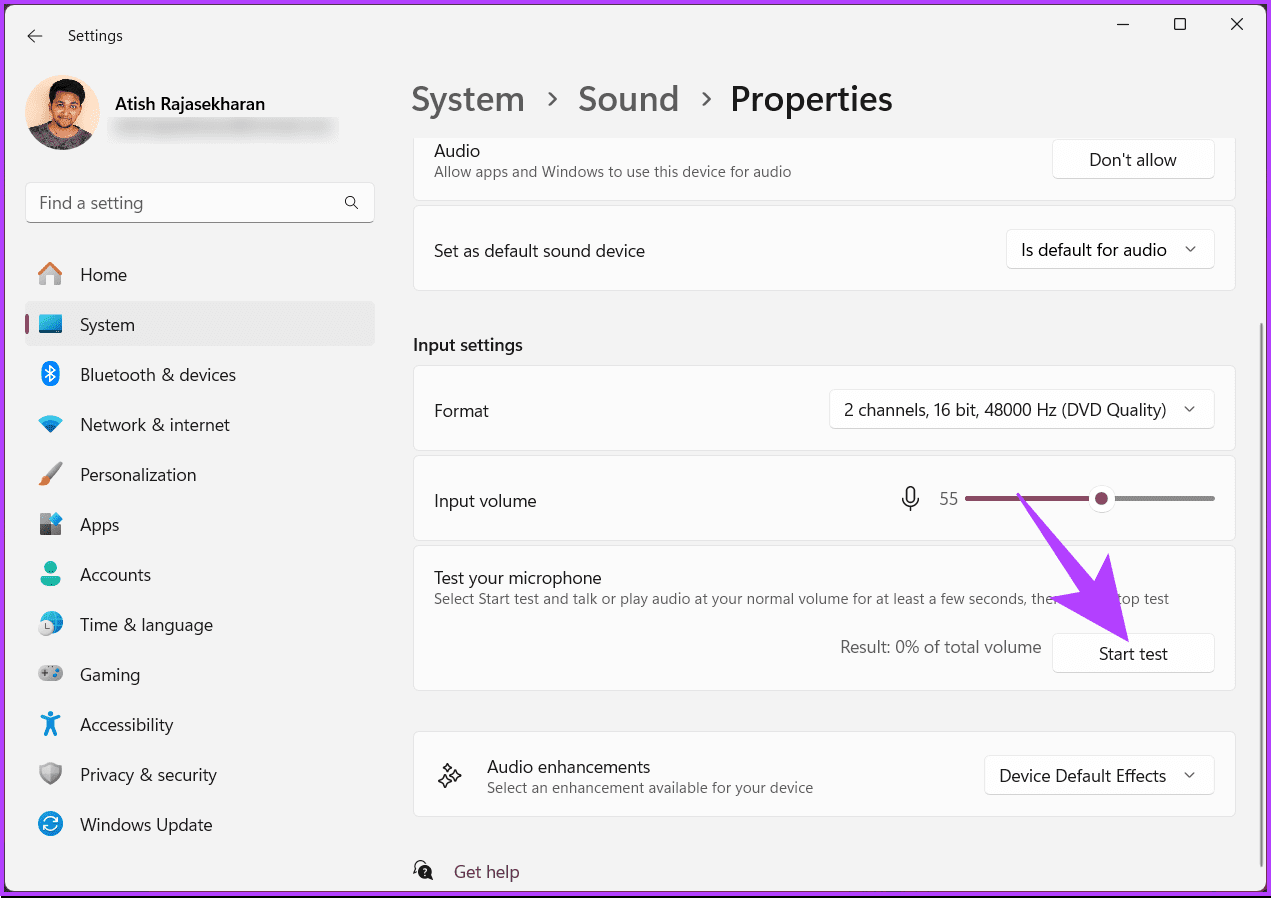
You will see a blue bar moving as you speak into your microphone. If your microphone isn’t working or your PC doesn’t detect the microphone on the headset, you can quickly fix it.
FAQs on Testing Audio in Microsoft Teams
It’s advisable to test your audio periodically, especially if you encounter issues or if there are changes to your computer or audio setup.
While there isn’t a specific feature for group audio testing, you can initiate a Teams meeting with colleagues to ensure that everyone’s audio is working collectively.
Test Your Audio Quality
Whether you’re focused on audio quality assurance, preventing echo or background noise, selecting suitable devices, or configuring personalized call settings, it is crucial to know how to test audio in Microsoft Teams. You may also want to read how to check someone’s calendar in Teams.
Was this helpful?
Last updated on 27 November, 2023
Read Next
 4 Fixes for Audio Not Working in Microsoft Teams on Windows 11
Common Fixes Reboot Windows - Open the Start Menu, click Power in the bottom right, and select Restart.
4 Fixes for Audio Not Working in Microsoft Teams on Windows 11
Common Fixes Reboot Windows - Open the Start Menu, click Power in the bottom right, and select Restart.
 Speedtest vs Fast: In-Depth Comparison of Two Internet Speed Test Providers
The present decade has seen data rates going down, with increased penetration of the internet.
Speedtest vs Fast: In-Depth Comparison of Two Internet Speed Test Providers
The present decade has seen data rates going down, with increased penetration of the internet.
 4 Best Sites to Test Typing Speed and Improve Accuracy
As a writer, I type a lot and been aiming type faster in the past few years.
4 Best Sites to Test Typing Speed and Improve Accuracy
As a writer, I type a lot and been aiming type faster in the past few years.
 5 Best Free AI Image Upscaler Apps and Tools: Test Results Included
We all love generating whacky new images with Dall-E or Midjourney - but how about using AI to improve the grainy, low-resolution images we already have?
5 Best Free AI Image Upscaler Apps and Tools: Test Results Included
We all love generating whacky new images with Dall-E or Midjourney - but how about using AI to improve the grainy, low-resolution images we already have?
 How to Mute and Unmute Participants in Microsoft Teams
Microsoft Teams has risen as a challenging competitor to Zoom, a video conferencing app.
How to Mute and Unmute Participants in Microsoft Teams
Microsoft Teams has risen as a challenging competitor to Zoom, a video conferencing app.
 How to Remove Microsoft Teams Meeting From Outlook Invite
Do you often find Teams meetings cluttering up your Outlook calendar?
How to Remove Microsoft Teams Meeting From Outlook Invite
Do you often find Teams meetings cluttering up your Outlook calendar?
 5 Ways to Keep Microsoft Teams Status Green All the Time
Microsoft Teams has become a staple for many businesses and organizations, especially in the remote work culture.
5 Ways to Keep Microsoft Teams Status Green All the Time
Microsoft Teams has become a staple for many businesses and organizations, especially in the remote work culture.
 8 Ways to Fix Microsoft Teams Black Screen Issues
Work productivity applications are indispensable in the post-COVID era.
8 Ways to Fix Microsoft Teams Black Screen Issues
Work productivity applications are indispensable in the post-COVID era.
The article above may contain affiliate links which help support Guiding Tech. The content remains unbiased and authentic and will never affect our editorial integrity.