Typing long messages can be an arduous task, thank the lord for audio messages. You can record long voice notes and share them with others in just a tap or two. And if you’re looking for the best way to send voice text from your iPhone, you are on the right page; just keep scrolling.
Apple has made subtle changes in the way you access and send audio messages in iOS 15, iOS 16, and iOS 17. You might realize that the voice message icon has disappeared from the Messages app. However, it’s just relocated under the iMessage App Drawer. So, let’s find it and learn how to learn how to send voice messages on iPhone.
How to Record and Send an Audio Message on iPhone in iOS 17
In iOS 16, the Audio message button of iOS 15 was replaced by the Dictation button. And while the change is maintained in iOS 17, the position or access point of the iMessage App Drawer is changed.
Instead of an App Store icon next to the text field, you now get a + icon that lists all default and third-party iMessage apps.
Step 1: Launch the Messages app and open any chat.
Step 2: Tap the + icon next to the text field.
Step 3: Here, look for Audio (its icon looks like sound waves) and tap it.
Note: You can swipe up or tap the More button to find the Audio icon.

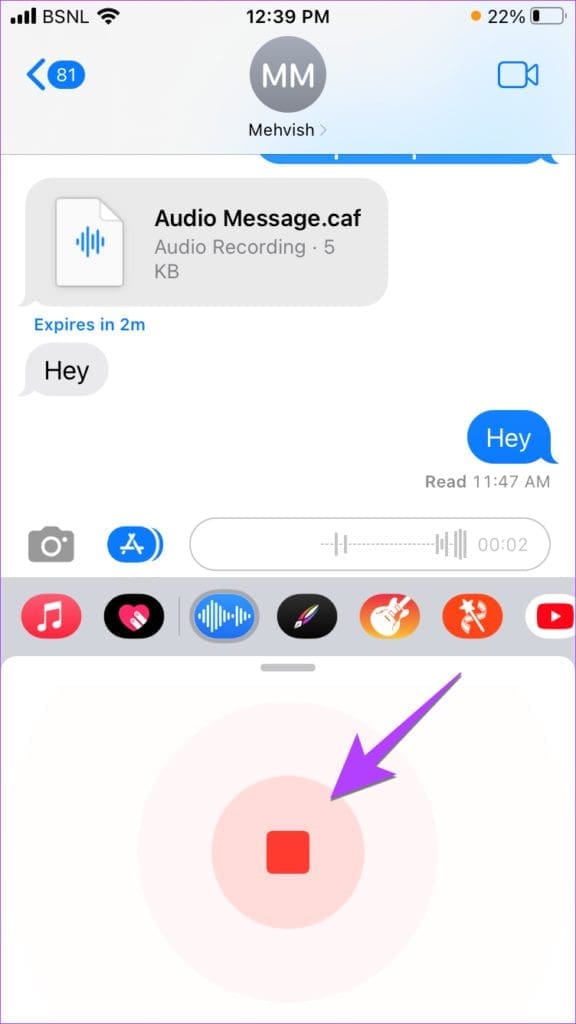
Step 4: You should start speaking immediately, as the voice message starts recording as soon as you tap the Audio icon.
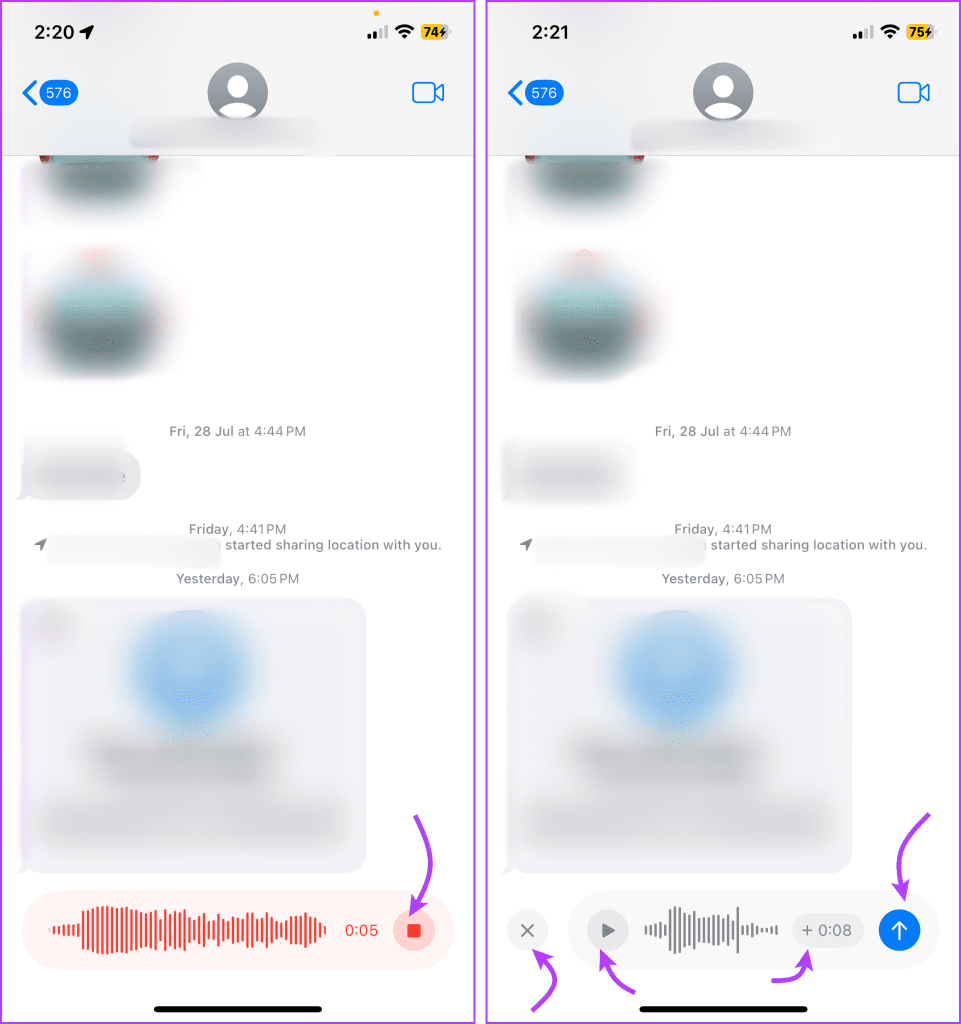
Step 5: Once done, tap the Stop button to finish recording.
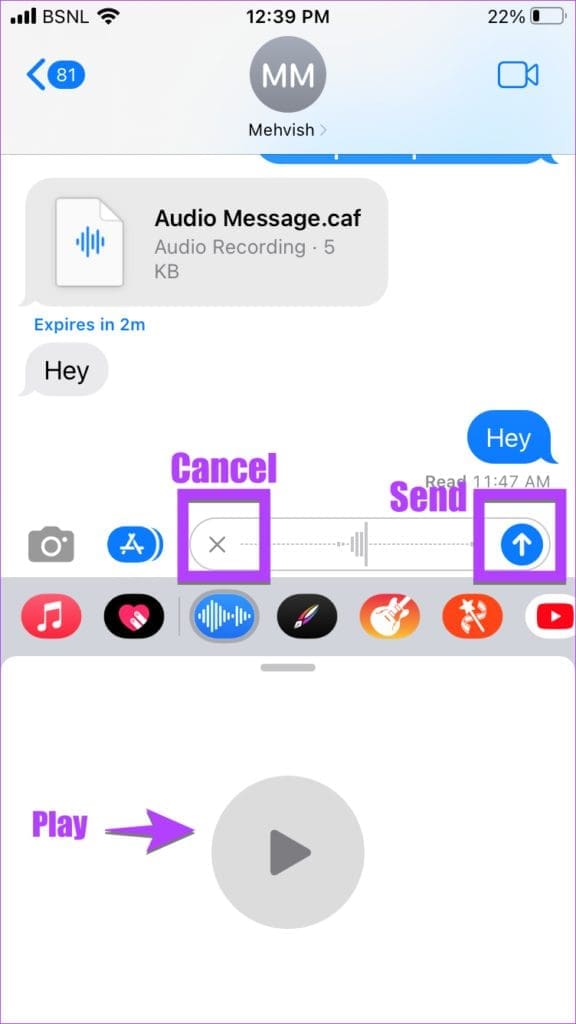
Step 6: Now, you can
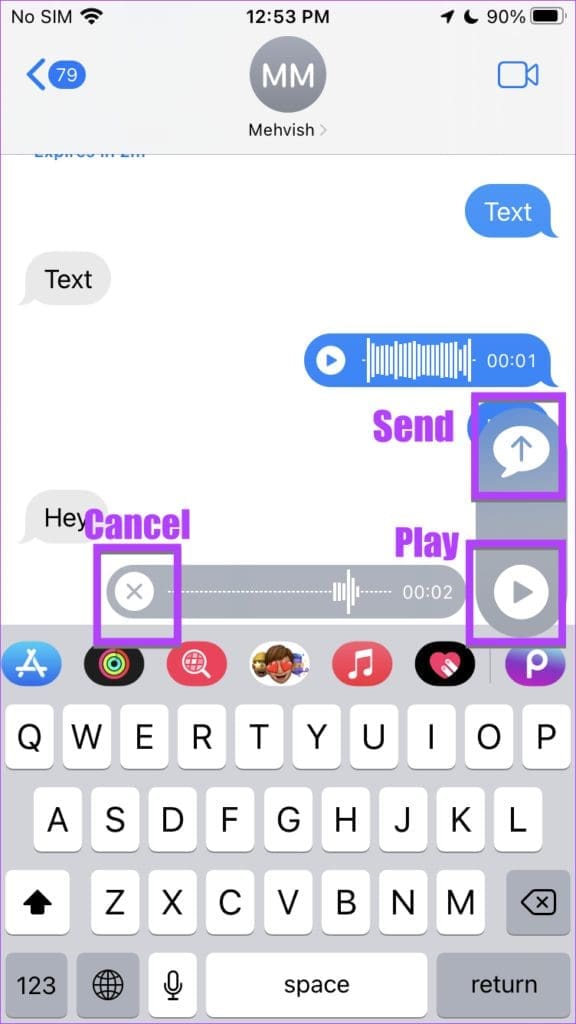
- Replay the recording – Tap the Play button.
- Add more to the recording – Tap the + button.
- Cancel/delete recording – Tap the X button.
- Send the recording – Tap the Send (up arrow) button.
Interestingly, iOS 17 remembers your last preference and auto shuffles between the Audio messages and the Dictation icon. So, after you’ve sent a voice note on iMessage to someone, the text field in the chat will show an Audio message icon, until you Dictate a text message.

Moreover, you can use the feature mentioned above to send voice messages even more quickly. Press and hold the Audio icon from the typing area and start recording the message. Tap Stop when done, then replay, edit, delete, or send the recording as you please.
Note: In addition to these changes, iOS 17 also incorporates a live transcription of the shared voice notes. You can observe the text under voice notes.
How to Send a Voice Message on iPhone in iOS 16
Step 1: Launch the Messages app → open any chat thread.
Step 2: If the iMessage app drawer is active, skip to the next step. Otherwise, tap the App Store (A icon) next to the typing area to get the app icons.
Step 3: Next, swipe left on the bar of icons to find and tap the Audio Message icon.

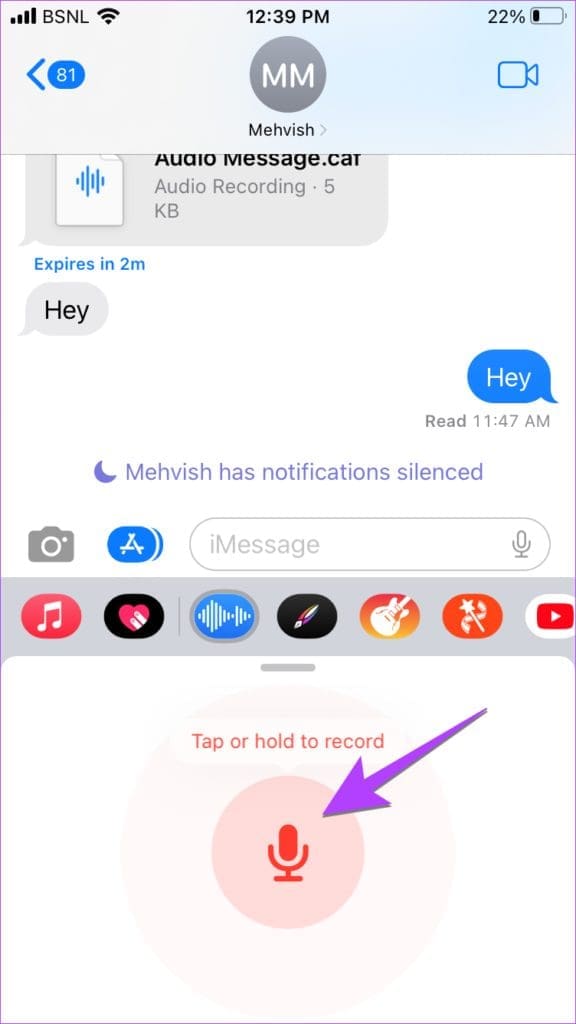
Step 4: Once you press the Audio icon, tap the Microphone icon to start recording your voice message.
Step 5: Tap the Stop (red square) button to stop recording.
Step 6: Press the Play button if you want to listen back to your recorded message before sending it.
Step 7: Tap the Send icon next to the typing area. Or, tap the X icon to discard the recording.
Alternatively, you can use long-press to send quick voice notes. Tap the Audio app icon from the iMessage app drawer, and long-press the Microphone icon to start recording. Keep holding while recording the voice note. When done, simply lift the finger to send the voice message.
In case you decide not to send the voice message while you are recording it, drag the finger away from the microphone in any direction. Then, lift your ringer to cancel the recording. Sadly, you cannot play back the recording before sending it in this method.
Tip: Learn how to send special effects like Pew Pew in iMessage.
Add or Change the Position of the Audio Message Icon
If you can’t find the Audio icon in the iMessage drawer or if it appears far away in the list of icons, you can move it ahead. Follow the steps below to learn how.
Step 1: Go to Messages → Open chat → Invoke App Drawer.
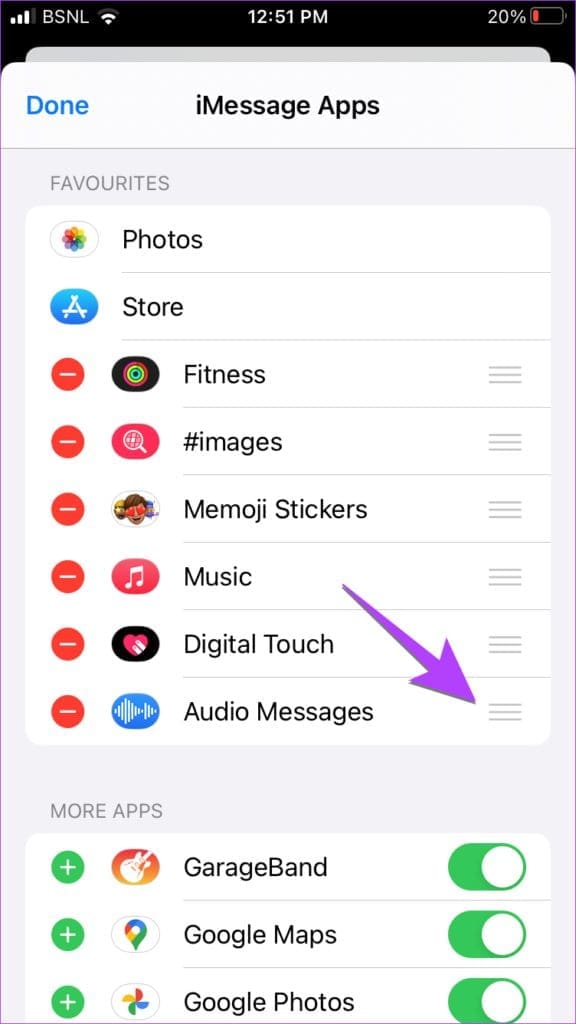
Step 2: Swipe left the apps and tap the three-dot icon at the end of the icons list.
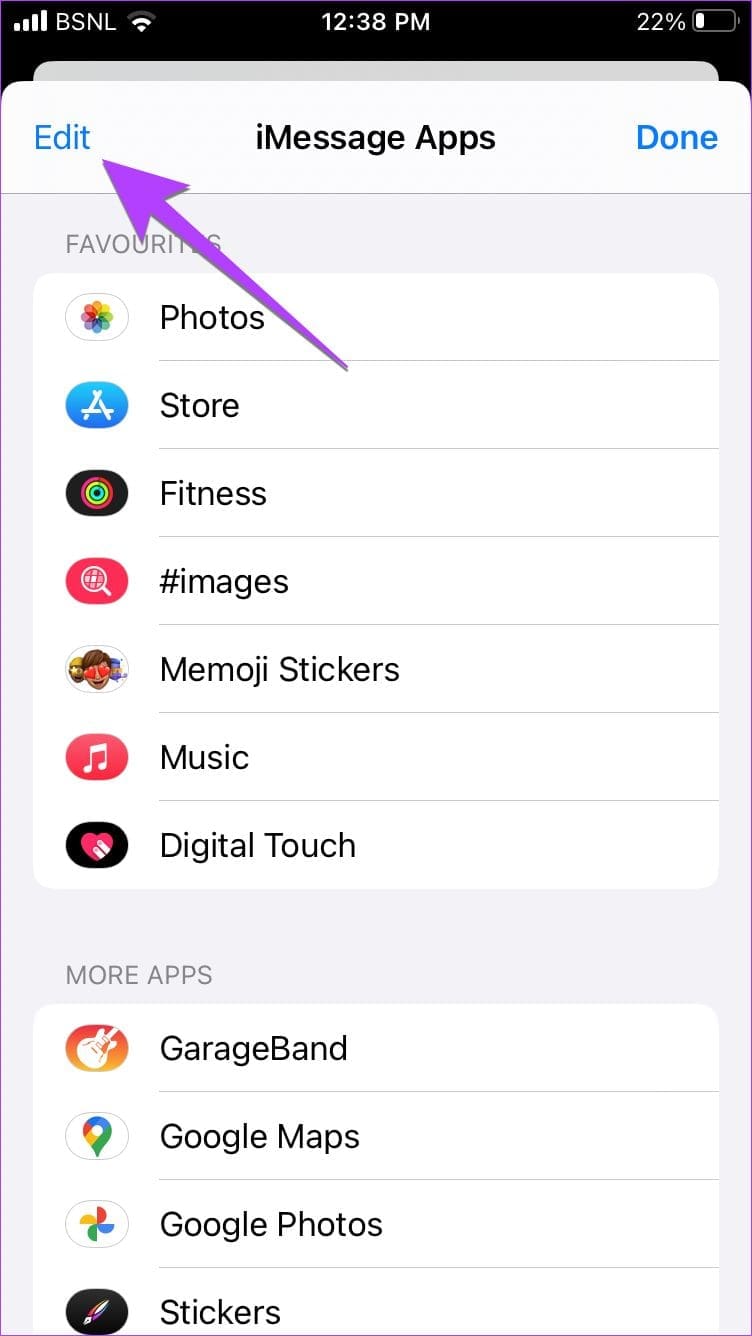
Step 3: Tap Edit from the top-right corner.

Step 5: Here, enable the toggle next to Audio messages to add it to the iMessage Drawer.
Step 6: Next, tap + next to it to add the icon to your Favorites.
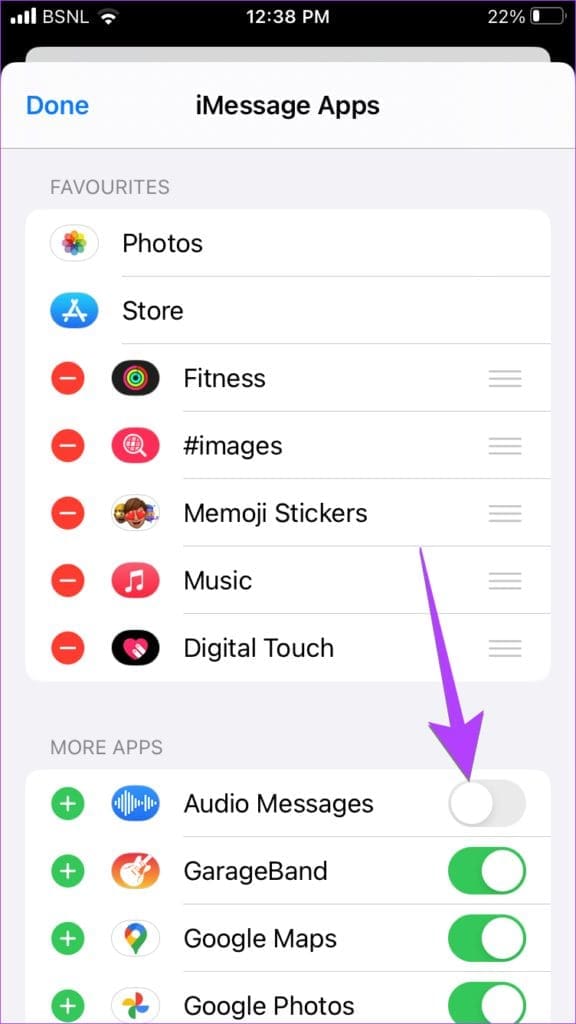

Step 7: Once in the Favorites section, touch and hold the three-bar icon next to Audio Messages and drag it to a desired position.
Step 8: Tap Done to confirm the changes
The Audio message icon will now appear at the beginning of app icons, thus making it easy to access.
How to Send an Audio Message in iOS 15 on iPhone
Step 1: Open the chat thread in iMessage where you want to send the voice note.
Step 2: Touch and hold the Audio (waves) icon next to the typing area to start recording the message. Keep holding until you want to record the voice note.
Step 3: Then, lift your finger and tap on the Play icon to preview the message before sending it. Or, press the X icon to cancel the voice message. If you are happy with the voice message, swipe up or tap on the Send icon to send the audio text.

Tips and Tricks for Leaving Voice Messages on iPhone
Save Audio Messages From iMessage
You can save sent or received voice messages from iMessage as Voice Memo. To do so, simply long-press or tap and hold the voice note and select ‘Save to Voice Memos’.
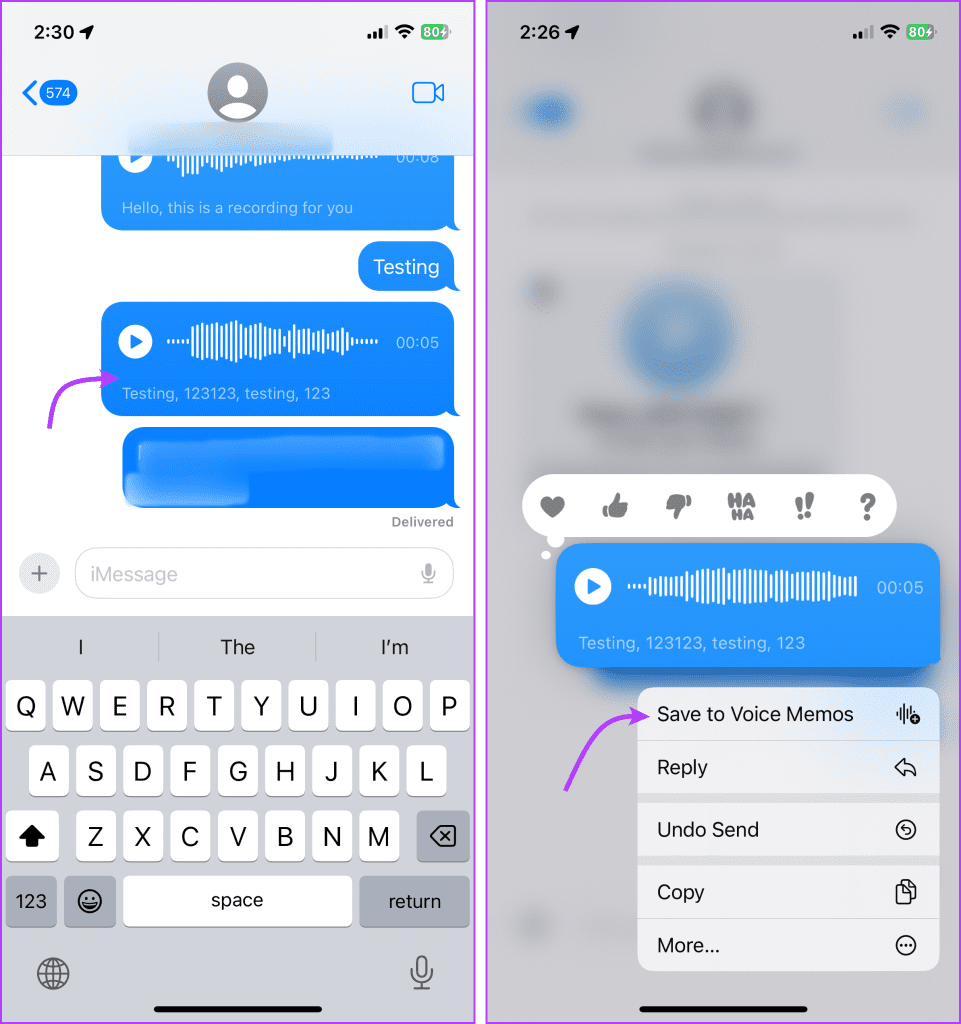
The audio message will be instantly saved, you can check it in Voice Memos app. Although you can’t set a name for the memo while saving it, you can rename it from the app later.
Undo Voice Messages on iPhone
The process is pretty similar to un-sending a text message, simply long-press the voice message to open the contextual menu → select Undo Send.
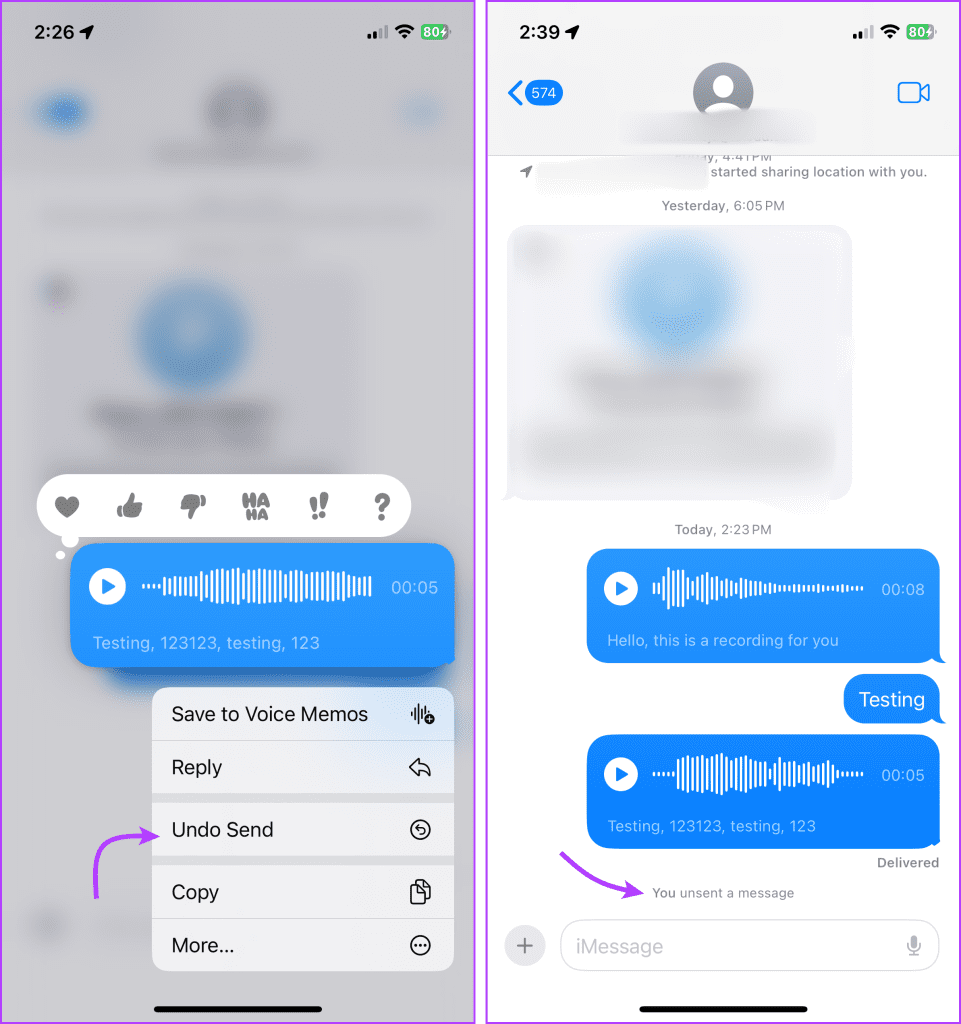
Notably, the rules are also the same as text messages, i.e., you can unsend a voice message within two minutes of sending it. Moreover, both you and the receiver can see that you’ve unsent a message.
Use Gestures to Listen or Reply to Voice Messages
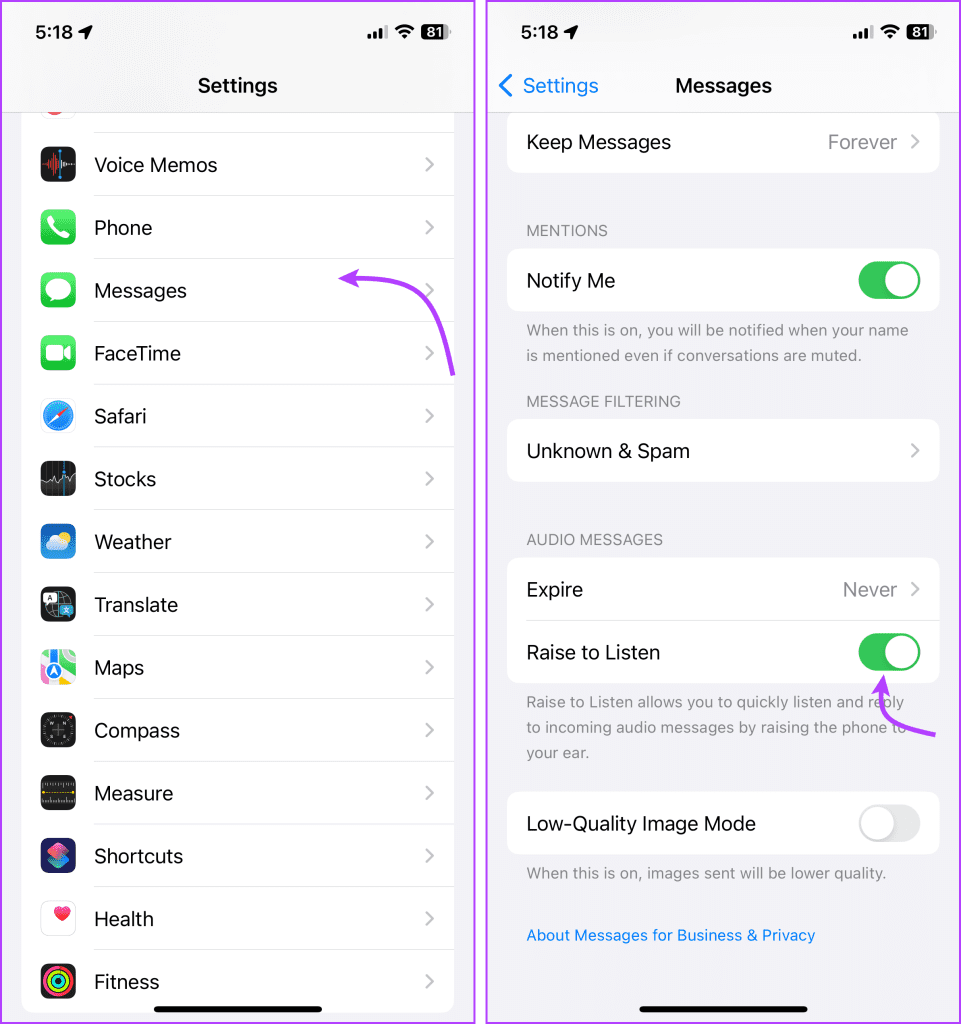
Voice Messages in iMessage support a special Raise to Listen feature, i.e., you can listen or reply to an audio message by raising the iPhone to your ear. So, when you receive a voice message, instead of pressing the play button, simply raise the phone to your year.
Additionally, if you want to reply with an audio message, lower it and then raise the phone to your ear again. Record your reply after the tone, once done lower the phone and tap Send.
Note: If the feature isn’t working on your phone or you want to disable it, go to Settings → Messages → toggle Raise to Listen on or off accordingly.
Change the Expiration Length of Voice Messages on iPhone
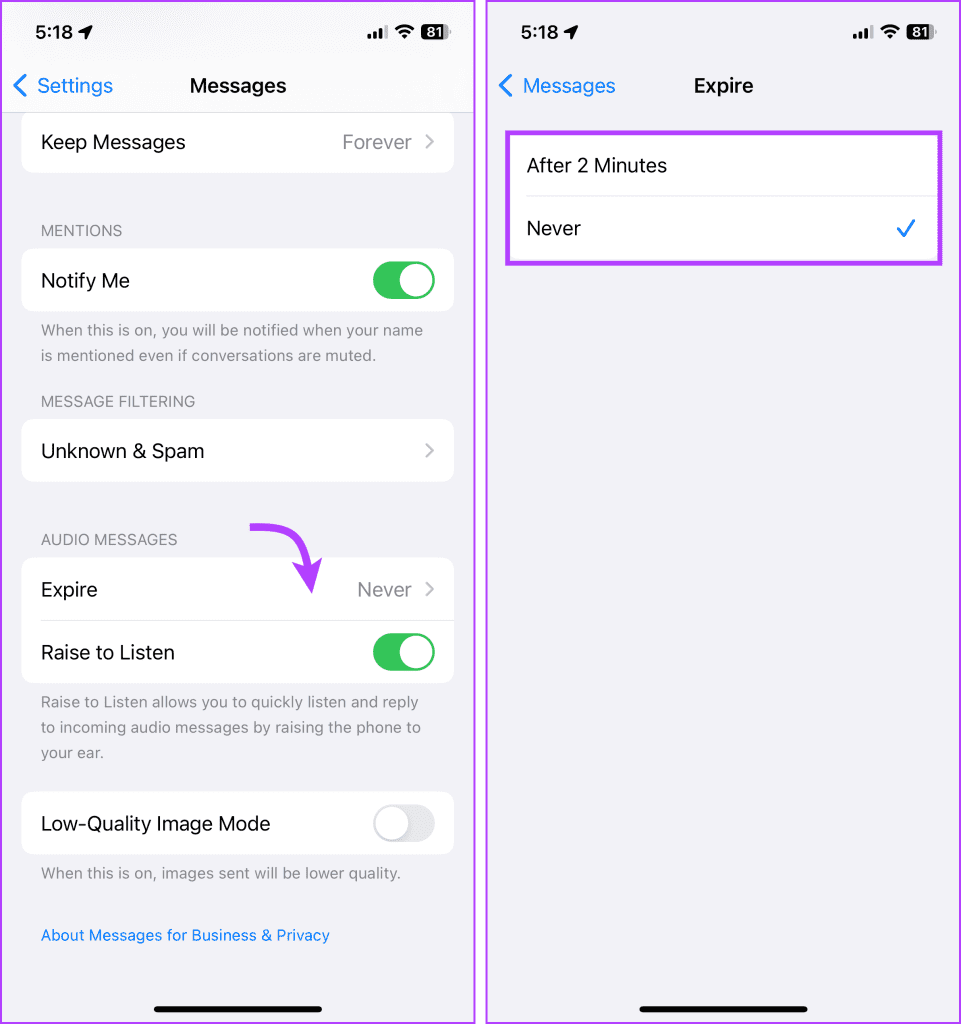
Similar to disappearing messages on WhatsApp, you can also send auto-deleting audio messages in iMessage. However, you can manage the setting while sending the message, you’ll have to enable/disable it from Settings every time.
To do so, go to Settings → Messages → scroll down to the Audio Messages section, tap Expire → select between After 2 Minutes or Never.
Send a Voice Message to Multiple Recipients
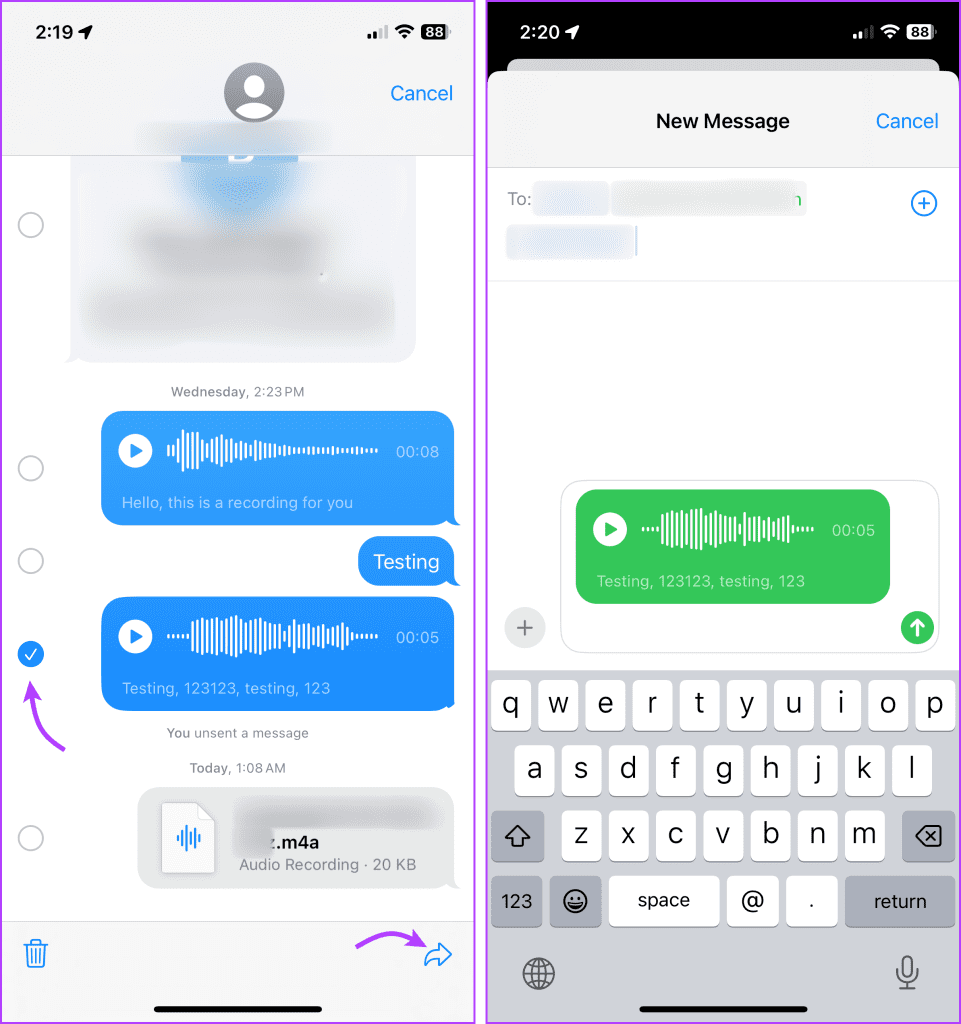
You can share the same voice message with multiple people without creating and sending a group text. First, send a voice message to any of the contacts. Next, press and hold the message and tap More.
Here, select one or more voice messages that you want to share. Tap the Forward button, select multiple recipients, and send it.
Additionally, you can also use Voice Memos to send voice messages to multiple recipients, follow the steps mentioned in the next section.
Create and Send Voice Notes on iMessage via Voice Memos
If you want to share a previously recorded memo or a saved audio message or for some reason can’t send an audio message, you can instead send Voice Memos. Although the Voice Memo is sent as an attachment and works a bit differently, for instance, it doesn’t offer the iOS 17’s transcribing feature.
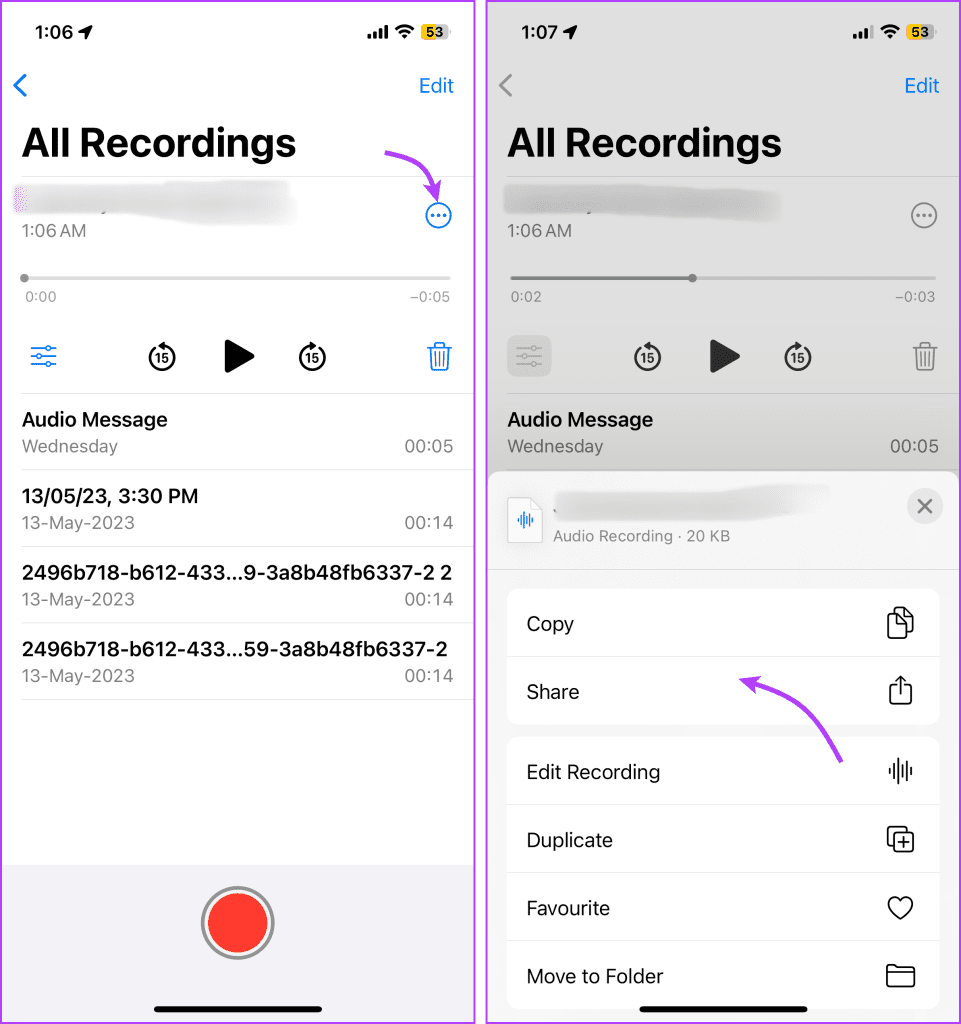
Step 1: Launch the Voice Memo app
Step 2: Tap the recording button to start recording and tap Stop when you’re done recording.
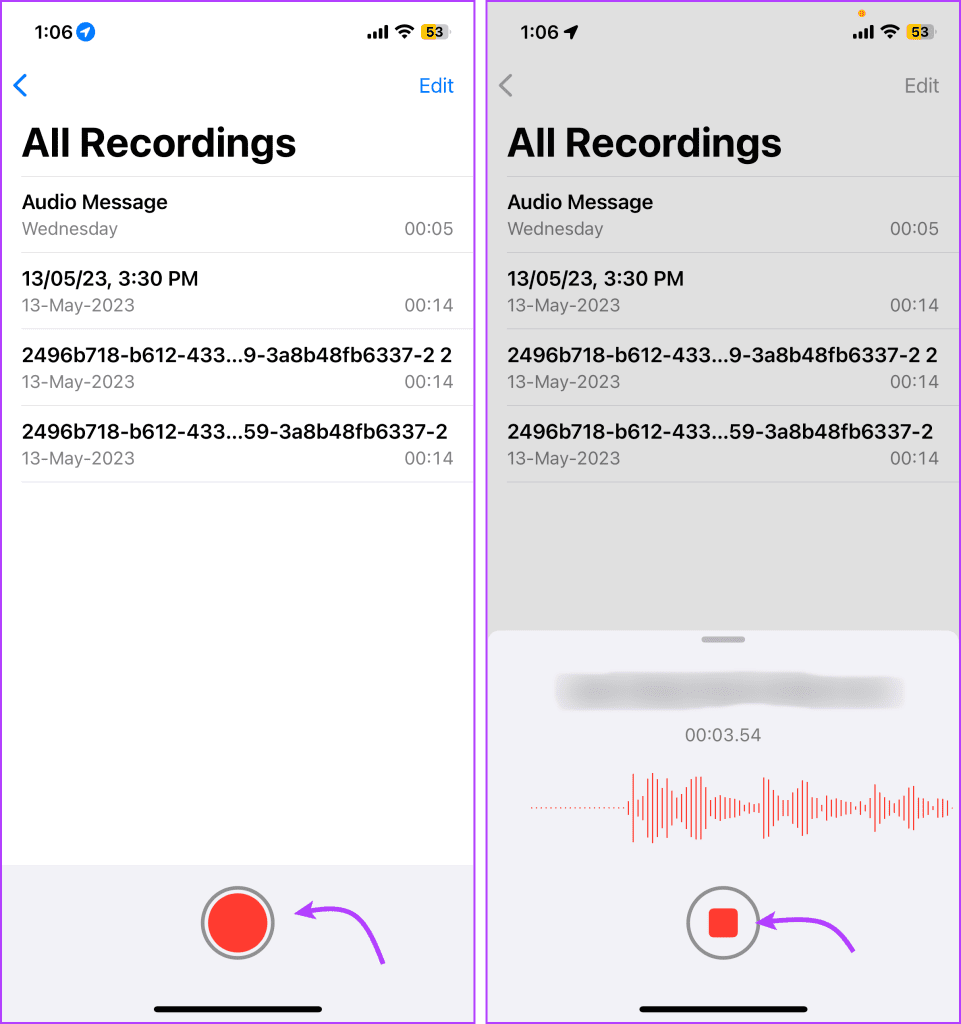
Step 3: The recording is automatically saved, tap it to replay, edit, and share it.
Step 4: To send Voice Memo, tap the three-dot icon and select Share.
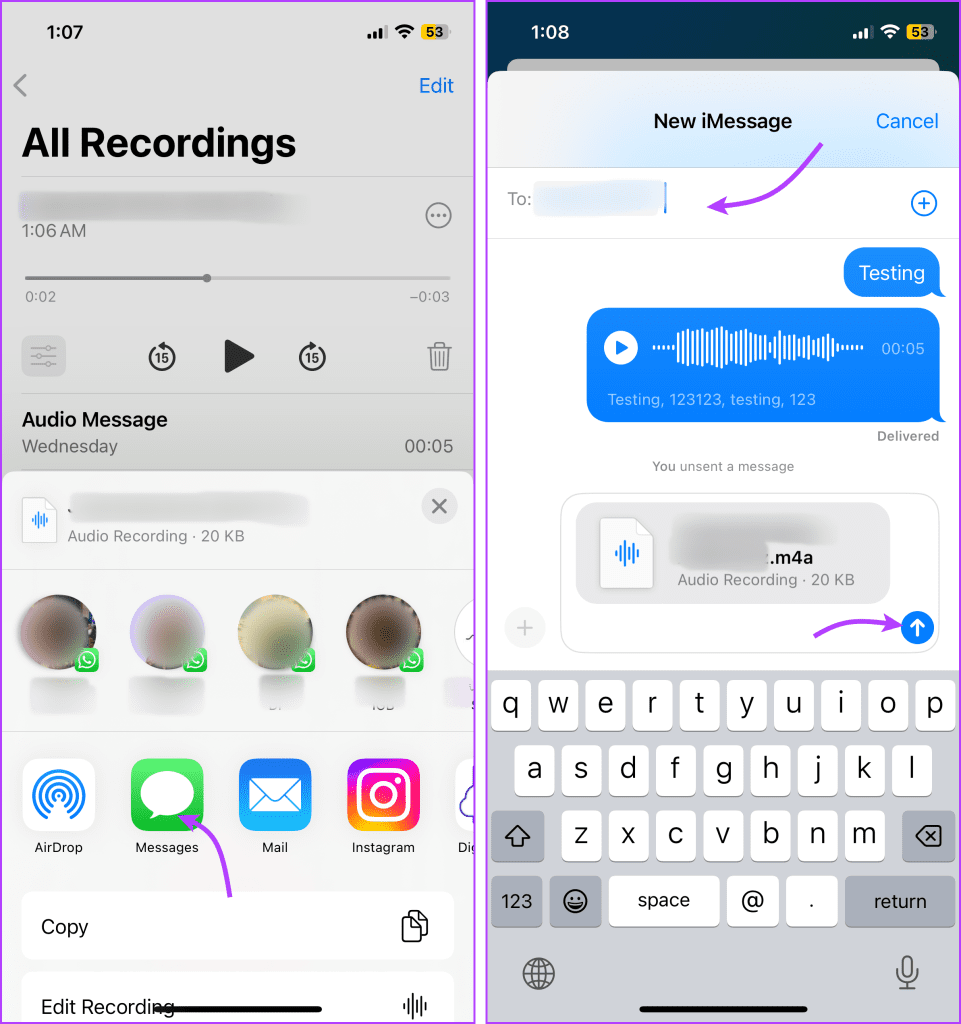
Step 5: Next up, select Messages from the option, choose a sender, and tap Send button.
How to Send Voice Messages on iPhone to Android
As the fight between the Green and the Blue Bubble continues, we can’t send an iMessage between iPhone and Android. However, you can send an audio message via MMS, WhatsApp, FaceBook, Instagram, Telegram, etc.
If you want to share the same voice messages sent via iMessage, simply save it to Voice Memos. Next, follow the instructions above and send the audio messages from iPhone to Android through a preferred app.
FAQs About Voice Message on iPhone
Yes, although the speed and stability of the network connection might affect the length and time taken to send the message.
As per Apple, you can record as long a voice message as you want. However, sending and receiving extremely long messages can be problematic and will depend on the network type and speed.
Yes, Apple uses end-to-end encryption to protect all media sent through iMessage, including photos, videos, files, and audio messages.
It depends on the settings you’ve selected. If you’ve chosen to auto-delete the audio message, it will expire 2 minutes after the receiver has listened to it. However, you can also choose not to auto-delete, by selecting never from the option.
If you are seeing this error, it’s probably because you are trying to send a voice message to a contact who doesn’t use iMessage. Or, the contact might have Sleep Focus enabled on their phone.
Send Voice Messages on iPhone With Ease
So, that’s how you can send voice messages on your iPhone. If, however, you are unable to send voice notes, there could be an issue with your iPhone’s microphone. Learn how to fix the microphone not working on iPhone. Or share in the article, directly record a voice memo and send it in any app.
Was this helpful?
Last updated on 21 August, 2023
Read Next
 How to Make iPhone Vibrate or Not Vibrate on Silent (iOS 17 Updated)
When you put your iPhone on silent mode, you will not hear a ringtone or other alert sounds.
How to Make iPhone Vibrate or Not Vibrate on Silent (iOS 17 Updated)
When you put your iPhone on silent mode, you will not hear a ringtone or other alert sounds.
 9 Ways to Fix iPhone Dictation Not Working [iOS 16 Updated]
Dictation is an interesting feature that converts speech or voice to text on your iPhone.
9 Ways to Fix iPhone Dictation Not Working [iOS 16 Updated]
Dictation is an interesting feature that converts speech or voice to text on your iPhone.
 How to Fix Live Activities Not Working on iPhone (iOS 16 Updated)
Live Activities was introduced with iOS 16 to display the most current data of apps on the Lock Screen of your iPhone.
How to Fix Live Activities Not Working on iPhone (iOS 16 Updated)
Live Activities was introduced with iOS 16 to display the most current data of apps on the Lock Screen of your iPhone.
 6 Best Fixes for WhatsApp Voice Message Playing at Low Volume on iPhone
With WhatsApp, it is easier to stay close to friends and family, thanks to its voice message feature.
6 Best Fixes for WhatsApp Voice Message Playing at Low Volume on iPhone
With WhatsApp, it is easier to stay close to friends and family, thanks to its voice message feature.
 How to Close Apps on Apple Watch (watchOS 10 Updated)
While watchOS 10 has many cool features, it has taken away the convenience of closing recently opened apps through the side button.
How to Close Apps on Apple Watch (watchOS 10 Updated)
While watchOS 10 has many cool features, it has taken away the convenience of closing recently opened apps through the side button.
 9 Best Fixes for ‘Cannot Send Audio Message At This Time’ Error on iPhone
After the release of iOS 16, you have to enable the option to send a voice message to your contacts.
9 Best Fixes for ‘Cannot Send Audio Message At This Time’ Error on iPhone
After the release of iOS 16, you have to enable the option to send a voice message to your contacts.
 How to Send Pictures in Email or Text Message on Android or iPhone
Sharing photos from your Android or iPhone is a common activity.
How to Send Pictures in Email or Text Message on Android or iPhone
Sharing photos from your Android or iPhone is a common activity.
 How to Force Send Text Message Instead of iMessage to a Contact
Let's see how to force send a text message instead of iMessage to a contact on your iPhone and iPad.
How to Force Send Text Message Instead of iMessage to a Contact
Let's see how to force send a text message instead of iMessage to a contact on your iPhone and iPad.
The article above may contain affiliate links which help support Guiding Tech. The content remains unbiased and authentic and will never affect our editorial integrity.