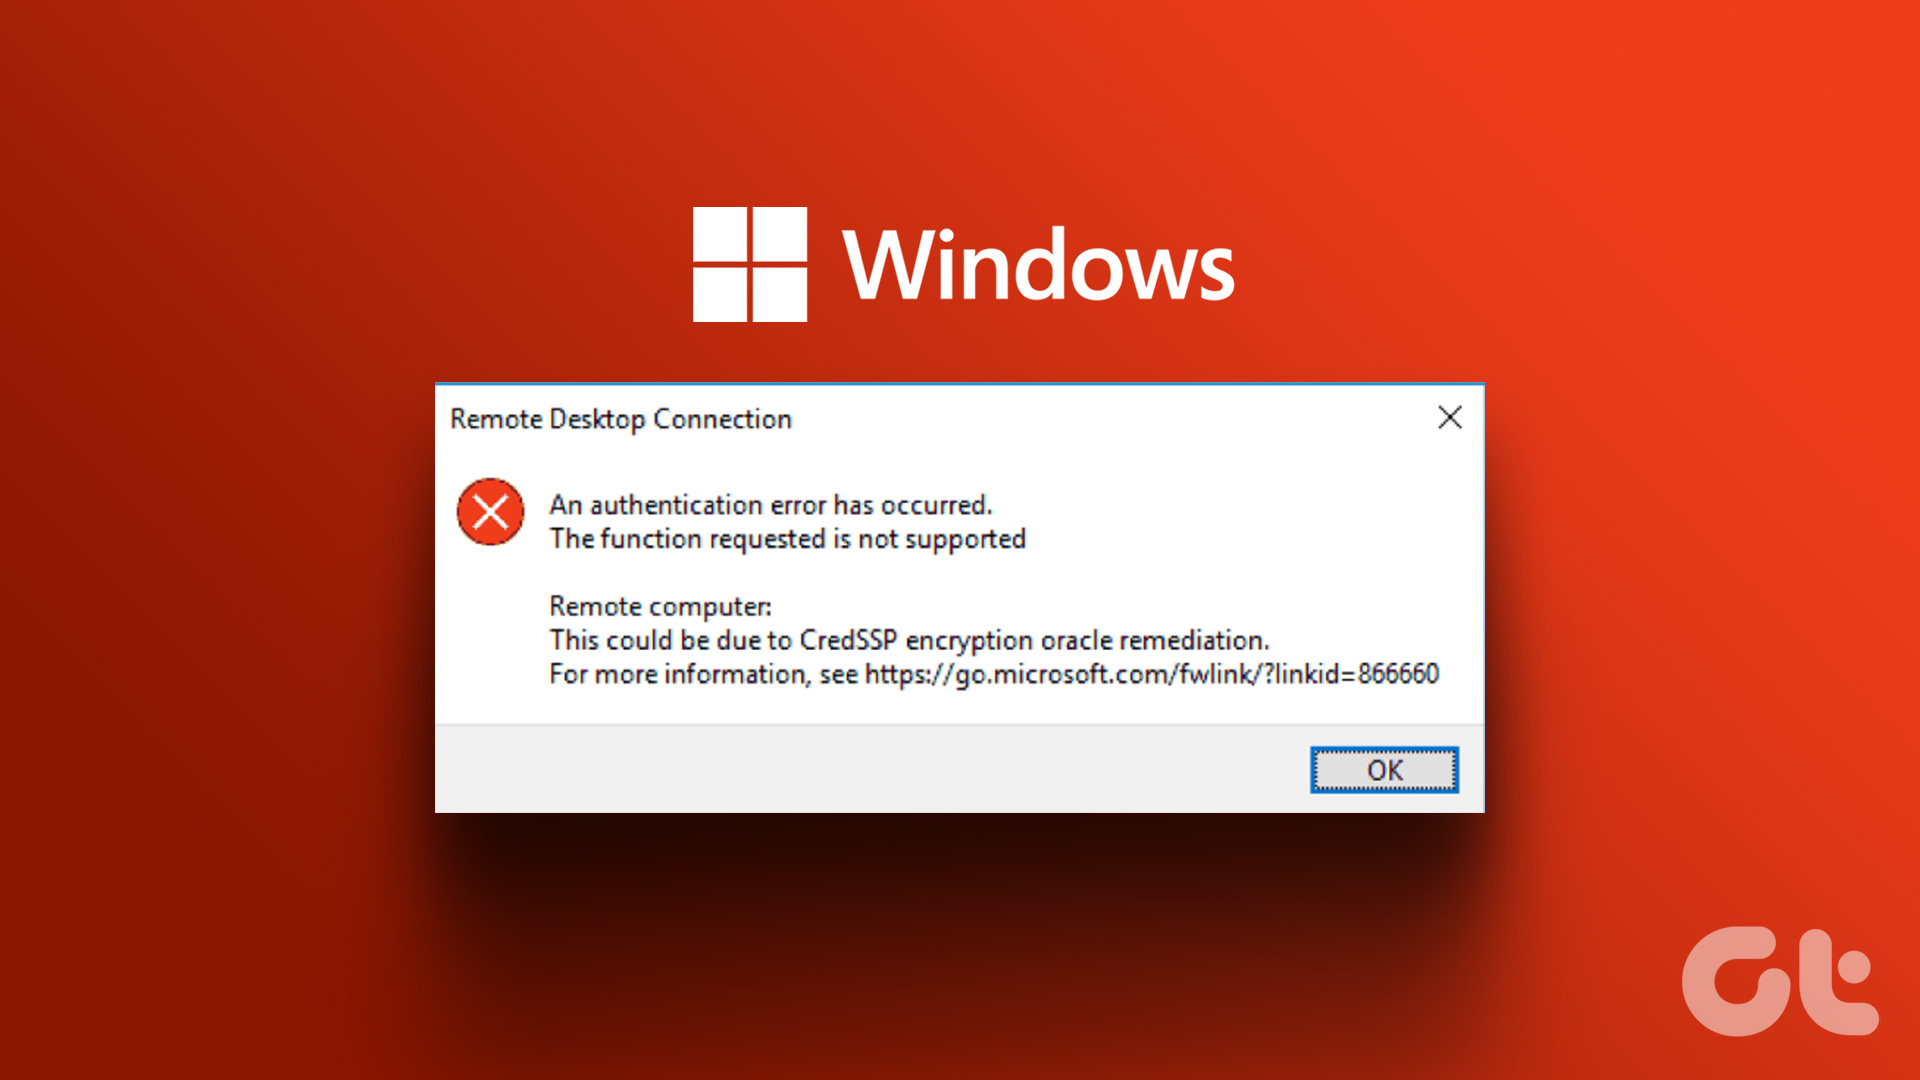
If you are trying to use Remote Desktop on your Windows 11 PC and are encountering an authentication error, you are not alone. One of the most common errors is ‘An Authentication Error has occurred, the Function Requested Is Not Supported.’ If you’re seeing the same error, In this article, we will guide you through 7 ways to fix the Remote Desktop authentication error on Windows 11.
However, what causes this authentication issue? Issues such as incorrect login credentials, network connectivity issues, Remote Desktop services not running, Remote Desktop not being enabled, Security software blocking Remote Desktop, incorrect Remote Desktop Protocol (RDP) file configuration, and so on are responsible for this error. Here’s how to fix it.
Note: The Remote Desktop runs only on Windows 11 Pro and Enterprise versions. There’s no official way to operate Remote Desktop on Windows 11 Home Edition.
1. Check Remote if the Desktop Is Enabled
The Remote Desktop authentication error often occurs because your Windows 11 PC cannot establish a remote connection without the Remote Desktop feature enabled. However, enabling the feature is simple. Follow along.
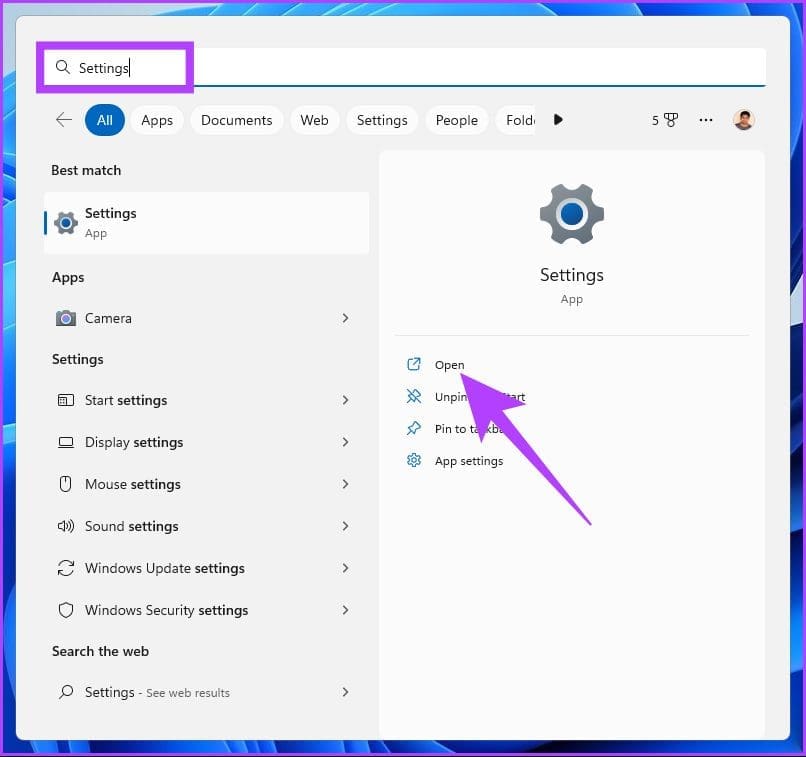
Step 1: Press the Windows key on your keyboard, type Settings, and click Open or Enter.
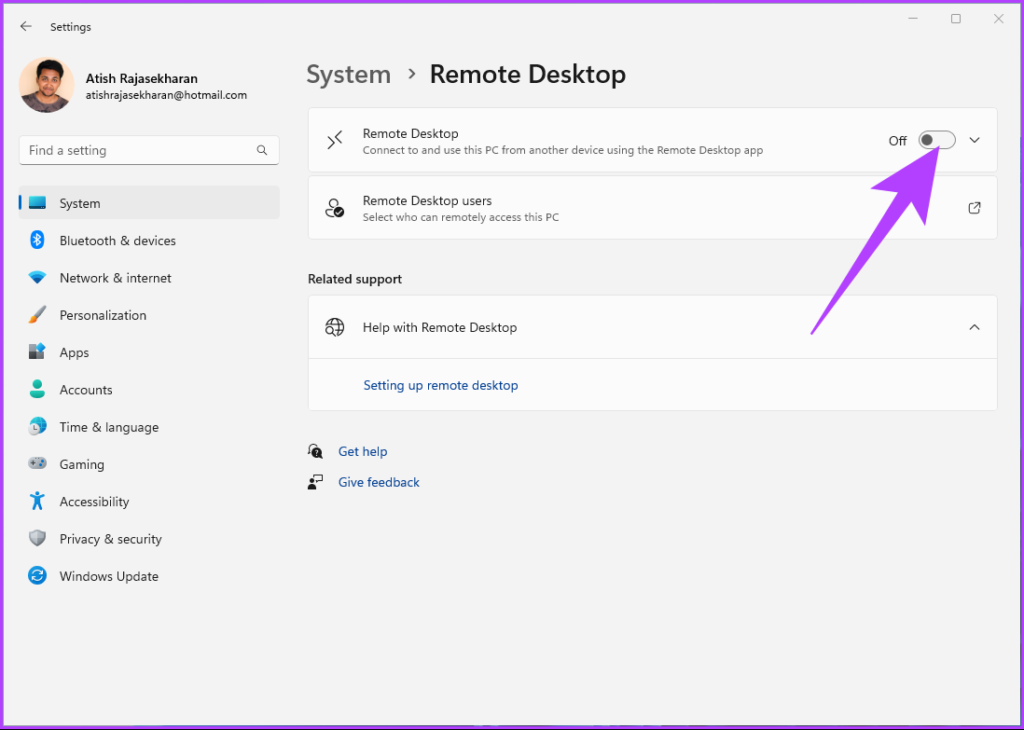
Step 2: Under System, scroll down and click on Remote Desktop.

Step 3: Toggle on the Remote Desktop button.
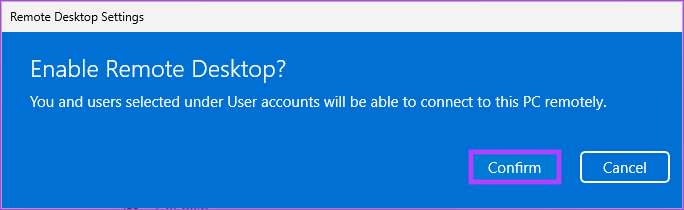
Step 4: In the ‘Enable Desktop Settings’ prompt, click Confirm.
That’s it. You have enabled the Remote Desktop feature. Now, try connecting again, and you shouldn’t face any problems. If you do, move to the next method.
2. Check Remote Desktop Account Credentials
The Remote Desktop is enabled but you’re still getting the authentication error? Your Remote Desktop account password may have expired, or you may be entering an incorrect remote desktop account username or password.
You will need to create a new password if the password is expired. It is similar to creating a new password for your Windows 11 PC. Once created, try using it to establish a Remote Desktop connection. If you are still unable to connect, the next method may help.
3. Disable Windows 11 Firewall to Enable Remote Desktop
Sometimes, the Firewall blocks out Remote Desktop connections, causing RDP internal error. All you need to do is to disable the Windows Firewall and reinitiate the Remote Desktop connection. Follow the below-mentioned steps.
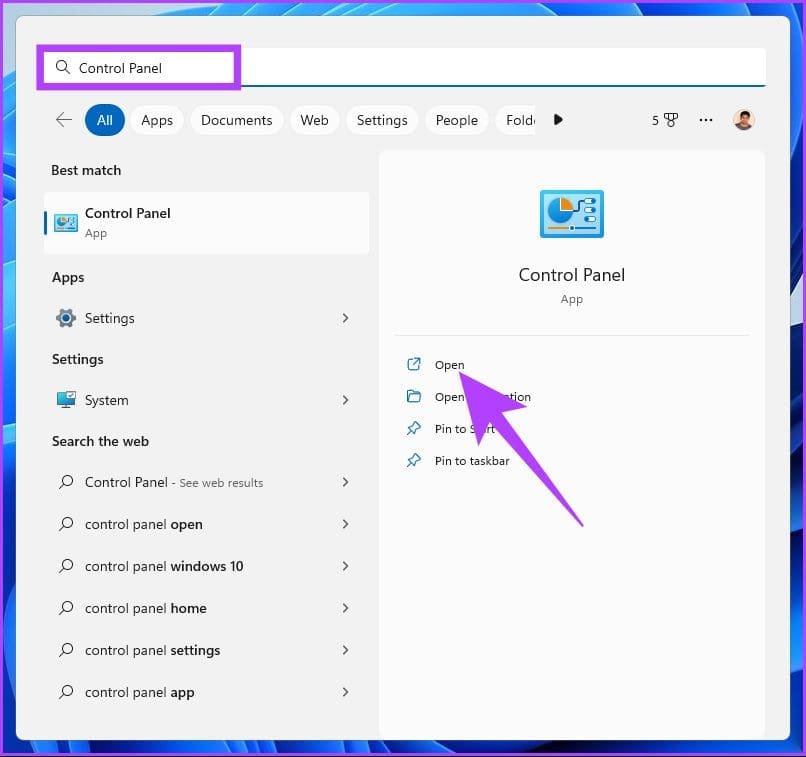
Step 1: Press the Windows key on your keyboard, type Control Panel, and click Open.
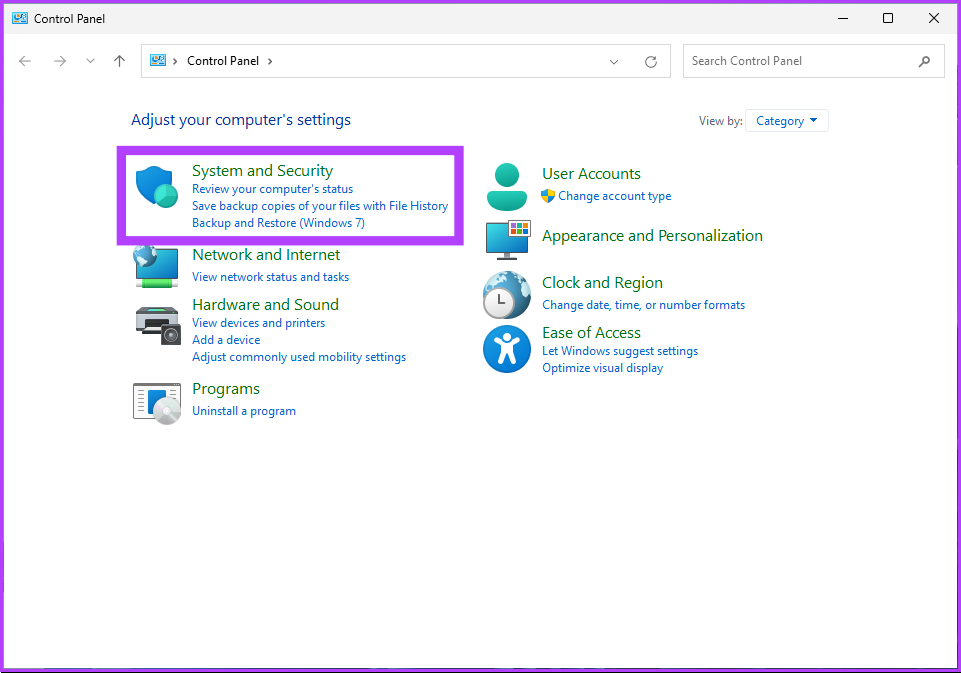
Step 2: Go to System and Security options.
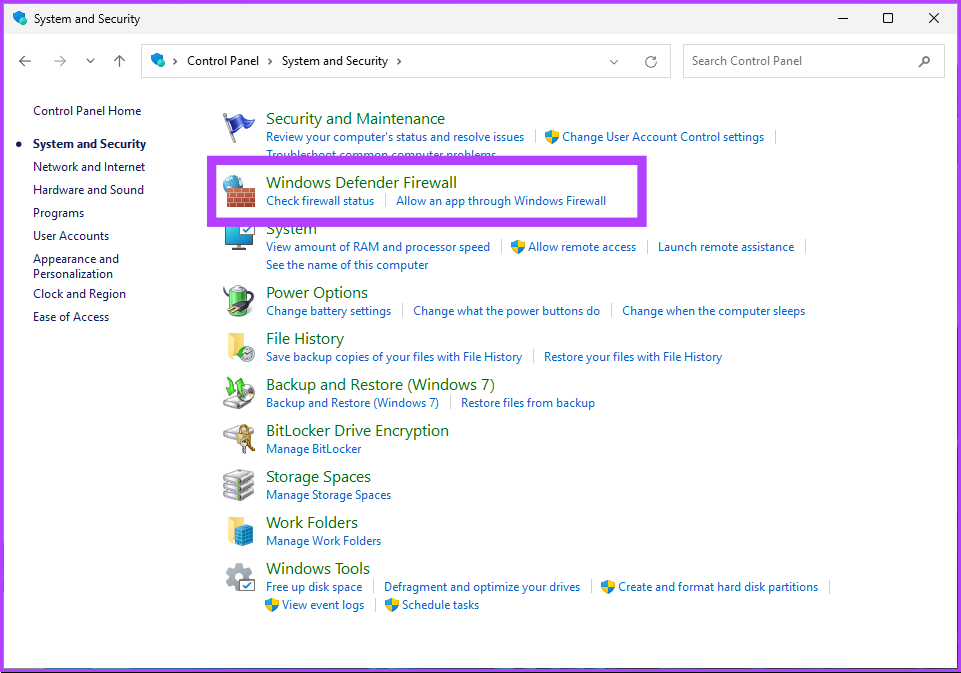
Step 3: Click on the Windows Defender Firewall options.
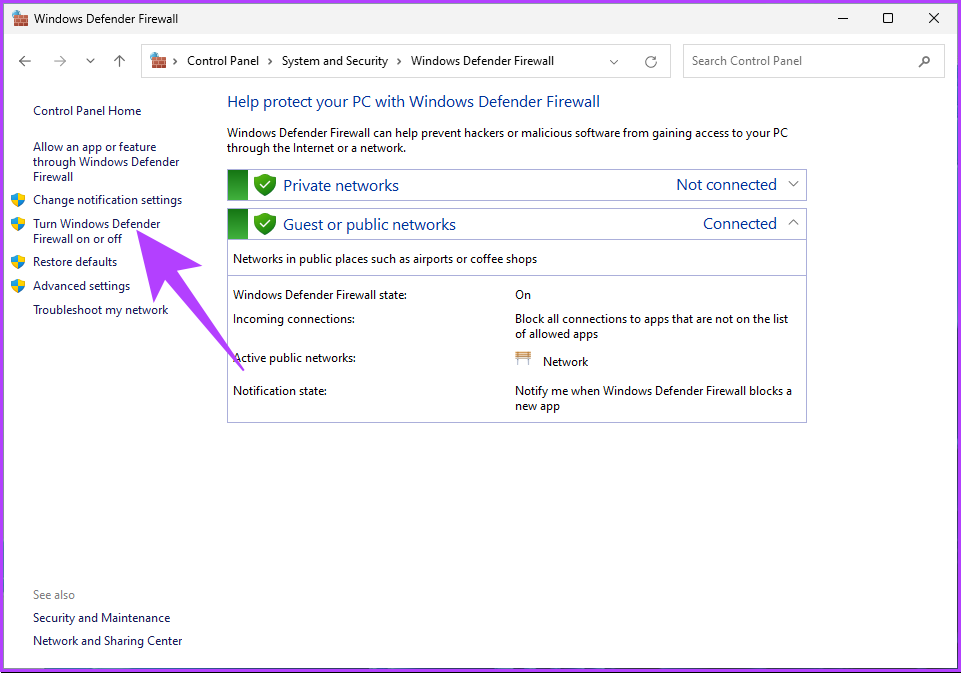
Step 4: In the left pane, click on the ‘Turn Windows Defender Firewall on or off’ option.
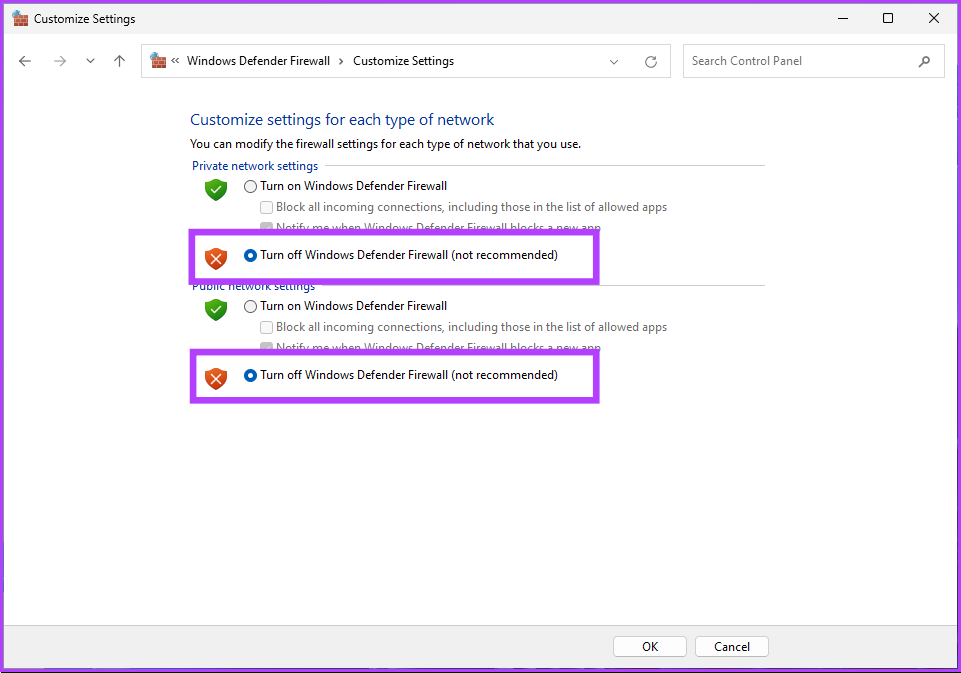
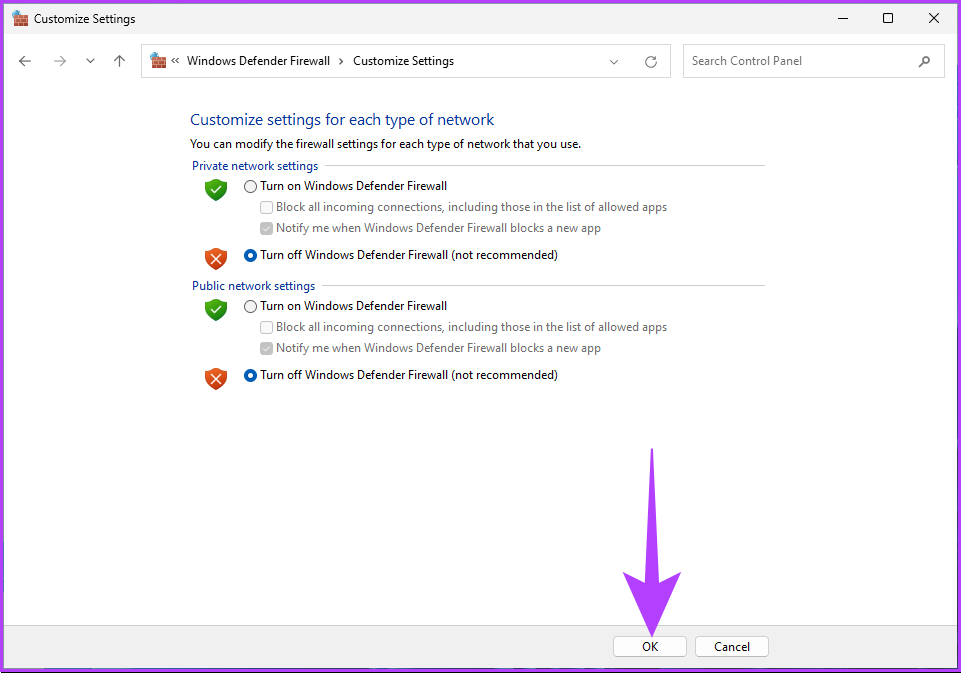
Step 5: Now, under ‘Customize settings for each type of network,’ in Private network settings and Publick network settings, choose the ‘Turn off Windows Defender Firewall (not recommended)’ option
Step 6: Click on OK to apply the changes.
With this, you should be able to connect Remote Desktop without any issues, but if the issue persists, move to the next method.
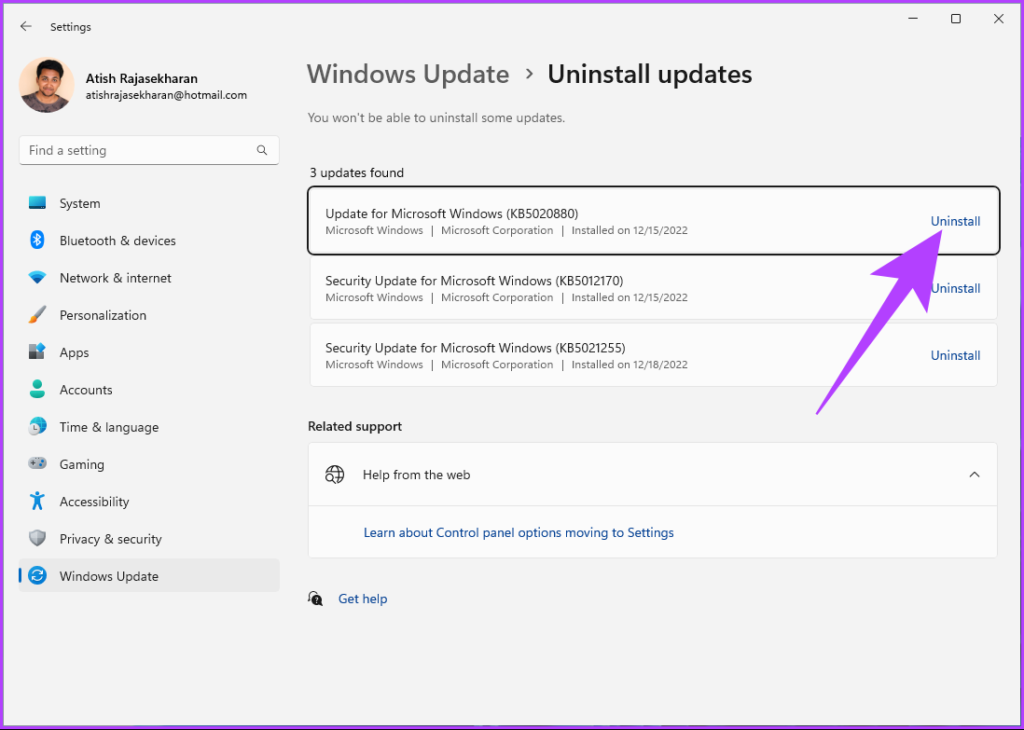
4. Uninstall the Latest Windows Updates
Sometimes it is the Windows update that causes the RDP authentication error. So, if you have recently updated your Windows PC, roll back the update to resolve the error. Follow the steps below.
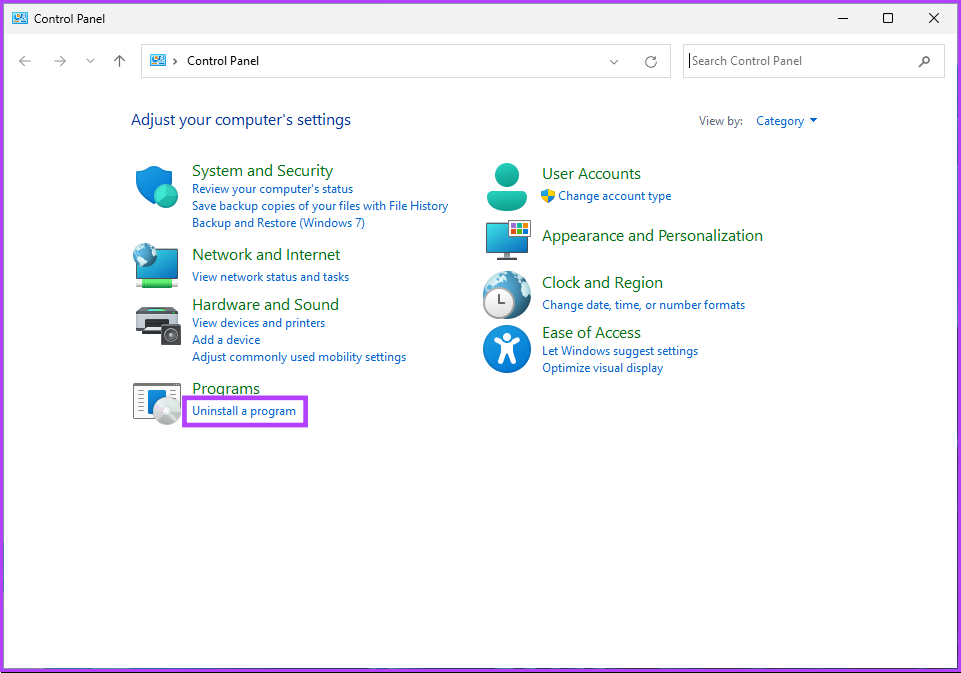
Step 1: Press the Windows key on your keyboard, type Control Panel, and click Open.
Step 2: Under Programs, go to ‘Uninstall a program.’
Step 3: From the left pane, go to ‘View installed updates.’

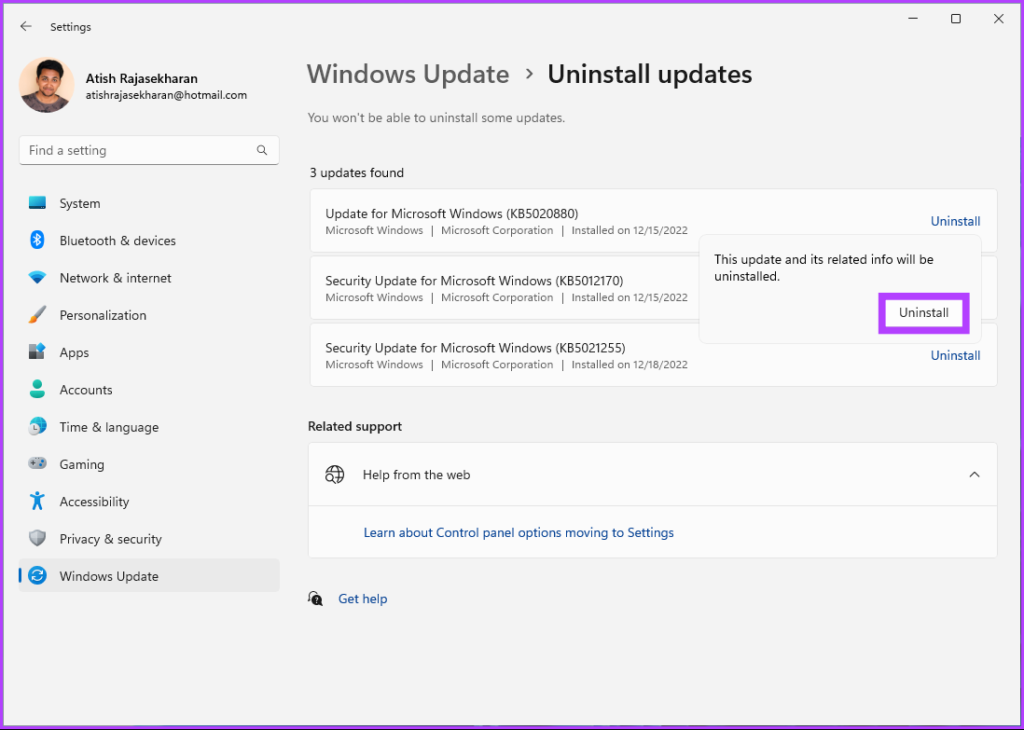
Step 4: Find the most recent Feature update from the installed updates list. Select the update and click Uninstall.
Step 5: In the prompt, click Uninstall to confirm.
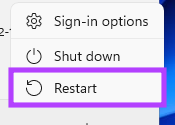
Step 6: Finally, restart your Windows PC.
There you go. Once your PC reboots, you will have fixed the RDP authentication error. If you are still facing the issue, go to the next method.
5. Turn off Network Level Authentication on RDP Server
When a client attempts to connect remotely, the Network Level Authentication (NLA) acts as a security feature that authenticates itself before a full connection is established. Sometimes, this can cause the remote desktop connection authentication error.
You will need to disable the NLA to get rid of this error. Follow the below-mentioned steps.
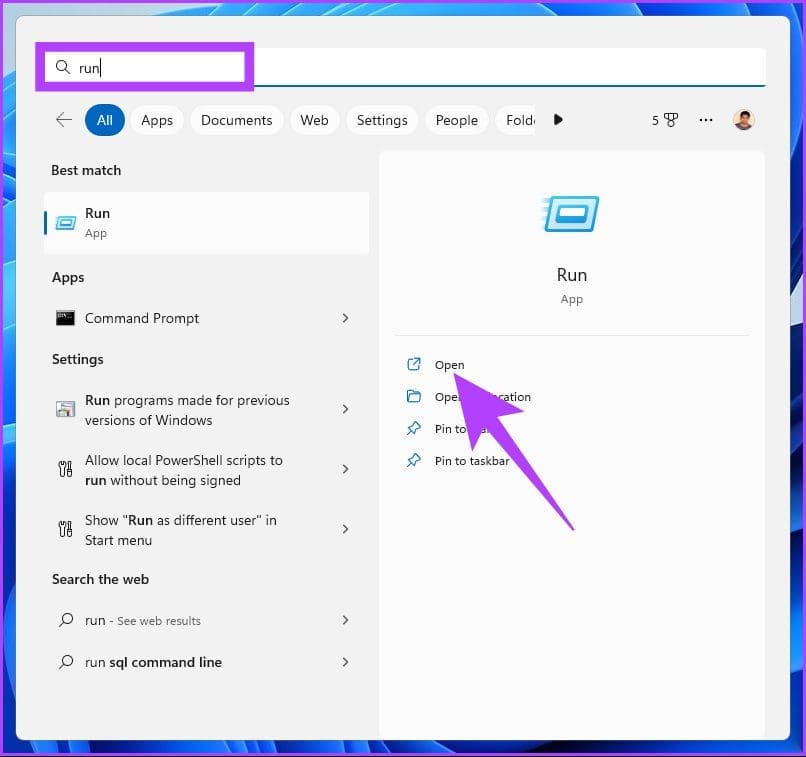
Step 1: Press the Windows key on your keyboard, type Run, and click Open.
Note: Alternatively, you can press ‘Windows key + R’ to open the Run command window.
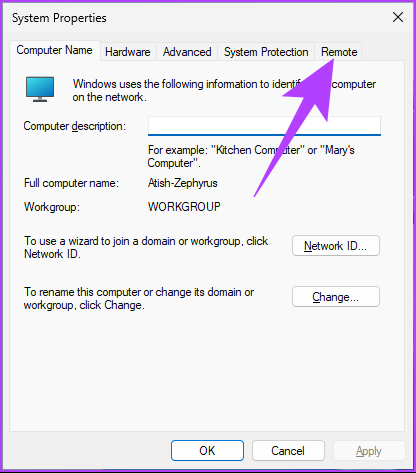
Step 2: Type the below command and click OK. This will open the System Properties window.
sysdm.cpl

Step 3: Go to the Remote tab.
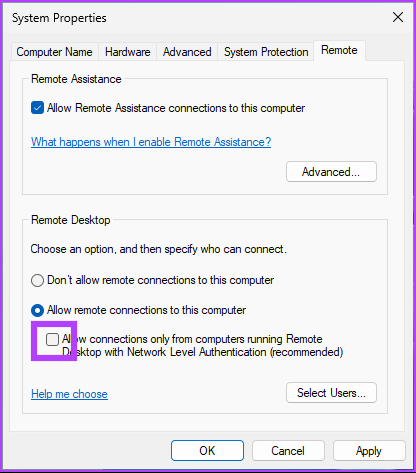
Step 4: Under Remote Desktop, check the ‘Allow remote connections to this computer’ option.

Step 5: Uncheck the ‘Allow connections only from computers running Remote Desktop with Network Level Authentication (recommended)’ option.
Step 6: Click on Apply and then OK to save changes.
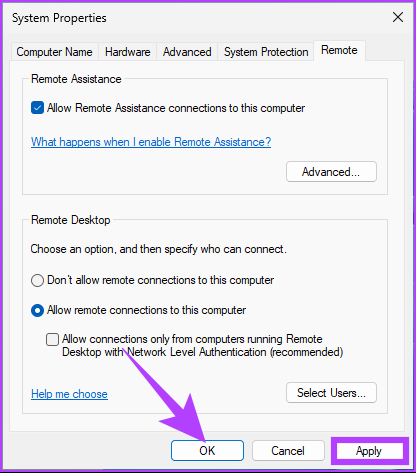
You must reboot your computer to ensure the changes are in place. Once your PC comes up, try to establish the Remote Desktop connection, and you should be good to go.
If this method didn’t resolve the remote desktop connection, an ‘internal error has occurred,’ jump to the next method.
6. Change Registry Settings to Enable Remote Desktop Authentication
This method may look complicated but is fairly simple to follow and execute. However, because we will be using Registry Editor, we strongly advise you to back up the Windows Registry before proceeding with the steps below.
Step 1: Press the Windows key on your keyboard, type Registry Editor, and click ‘Run as administrator.’
Note: You can also press ‘Windows key + R’ to open the Run command box, type regedit.exe, and click OK to open Registry Editor.

In the prompt, select Yes.
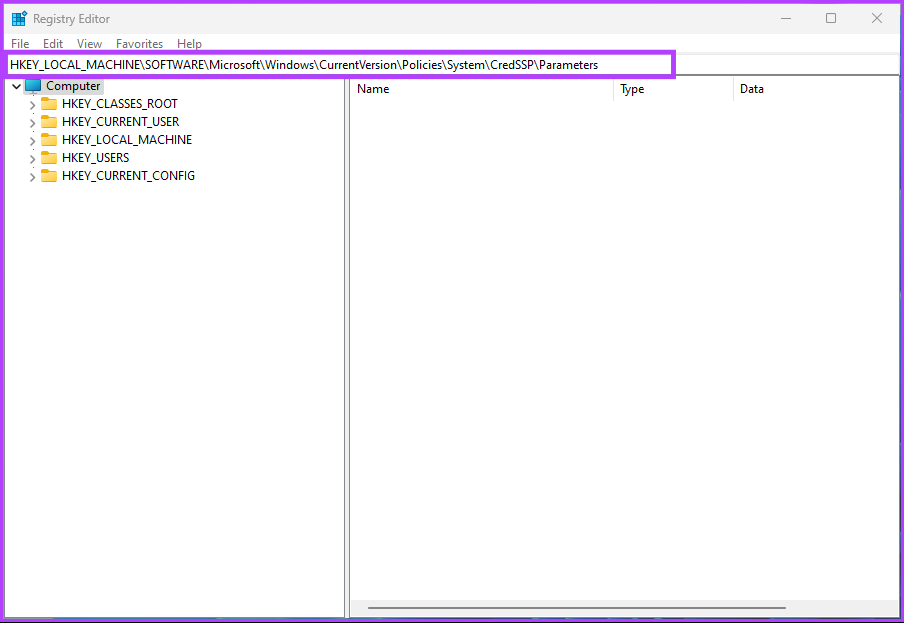
Step 2: In the top address bar, enter the below-mentioned address.
HKEY_LOCAL_MACHINE\SOFTWARE\Microsoft\Windows\CurrentVersion\Policies\System\CredSSP\Parameters
Note: You can manually navigate to the section too.
Step 3: Under the System folder, right-click, select New, and choose ‘DWORD (32-bit) Value.’
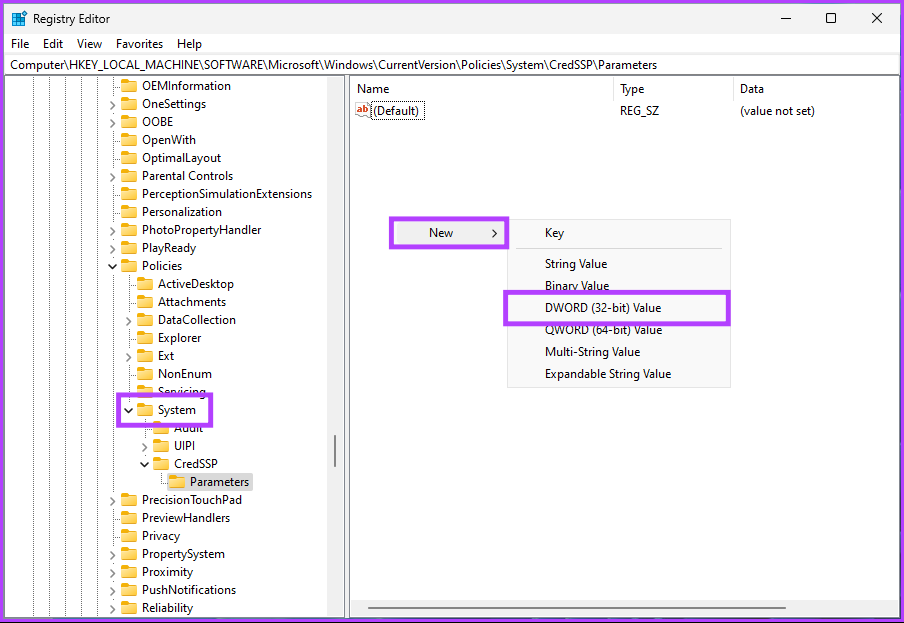
Step 4: Type DisableTaskMgr in the name field.

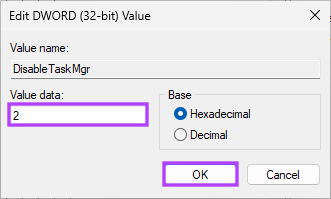
Step 5: Double-click the new value, type 2 in the Value Data field, and press OK.
Finally, reboot the system to implement the changes. And that’s it! When the system boots back, try connecting to Remote Desktop again; you shouldn’t see the ‘An authentication error has occurred’ prompt. If you are still facing the error, move to the last resort.
7. Enable Encryption Oracle Remediation Using Group Policy Editor
The Group Policy Editor helps you control Windows and its permissions. This also helps fix RDP authentication errors. Follow the steps below.
Note: Group Policy Editor is only available for Windows 11 Pro and Enterprise versions. You can skip this method if you are on Windows 11 Home Edition.
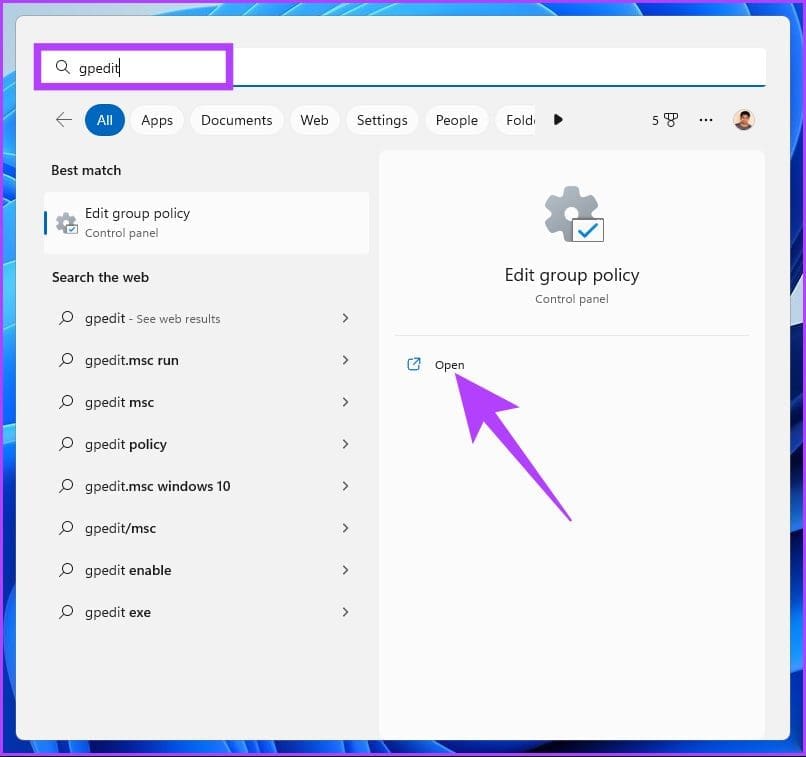
Step 1: Press the Windows keys on your keyboard, type gpedit, and click Open.
Note: You can also press ‘Windows key + R’ to open the Run command box, type gpedit.msc, and click OK.
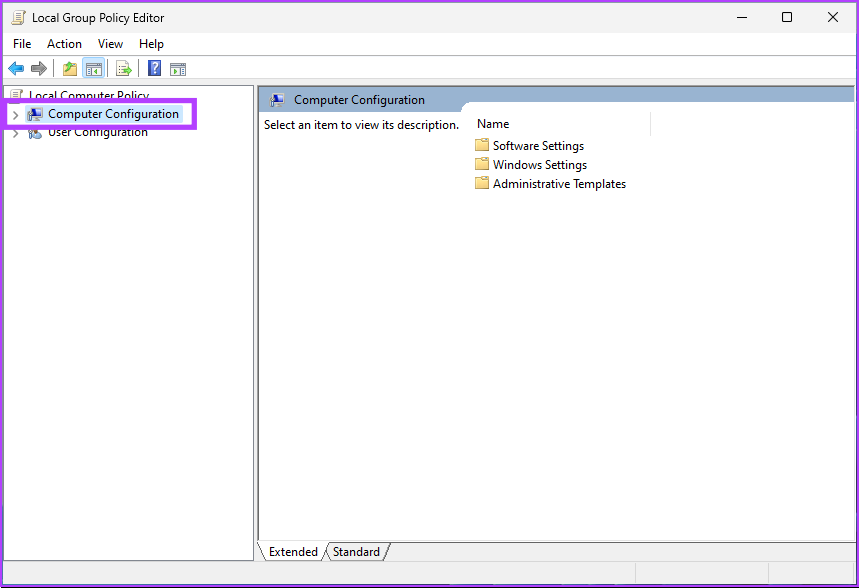
Step 2: In the left pane, under ‘Local Computer Policy,’ select Computer Configuration.
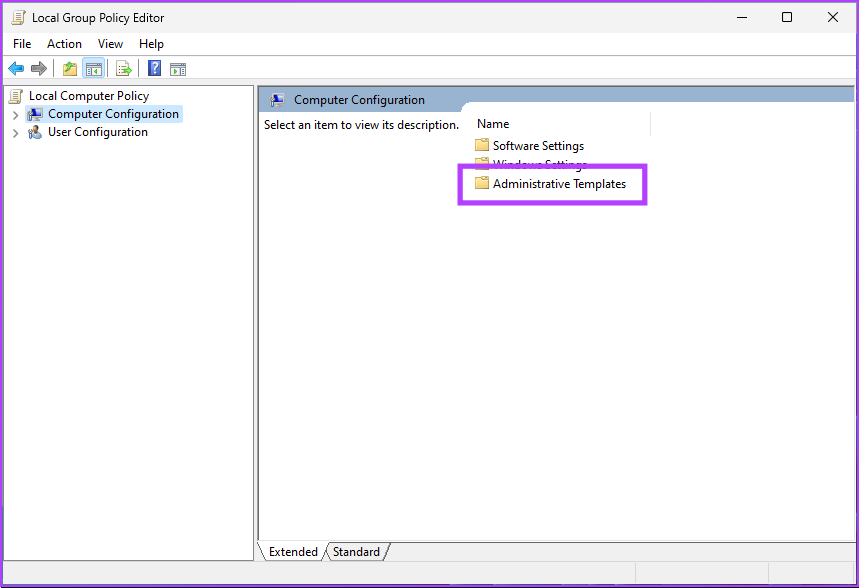
Step 3: In the right pane, double-click on Administrative Templates.
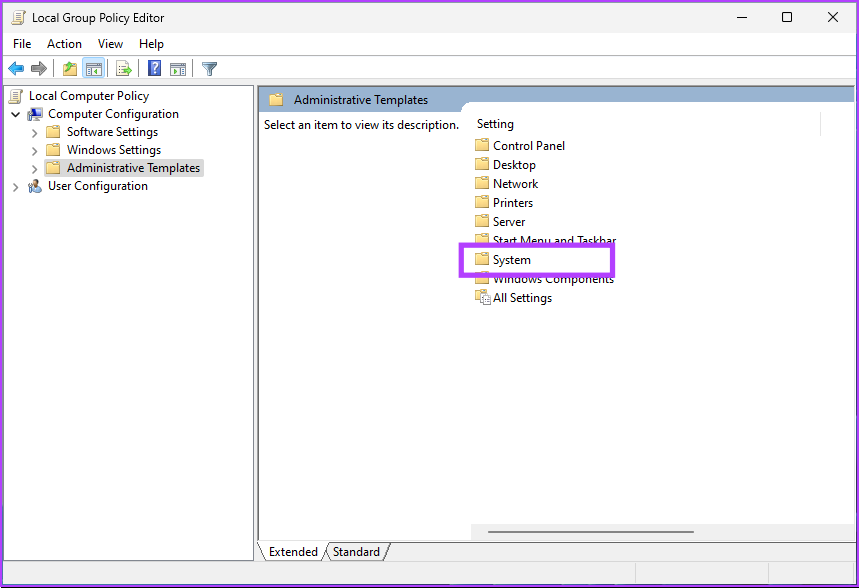
Step 4: Select the System option.
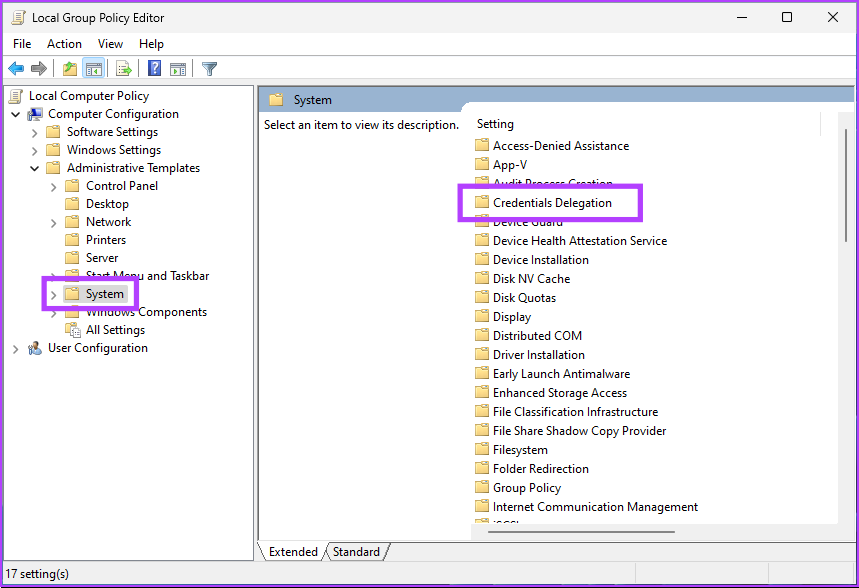
Step 5: Under the System option, find and click Credentials Delegation.
Step 6: In the Credentials Delegation, go to ‘Encryption Oracle Remediation’ on the right, and double-click on it.
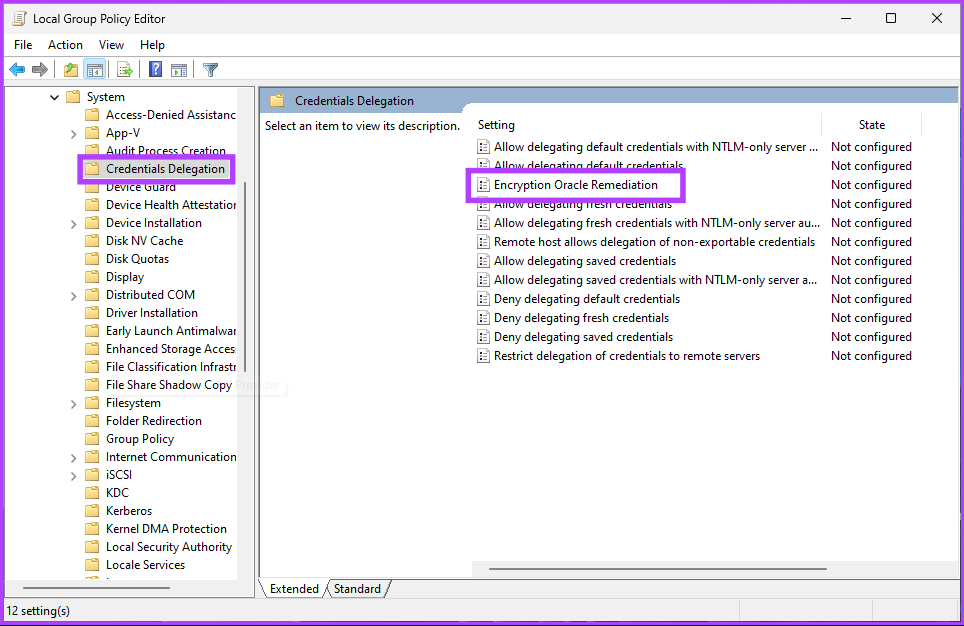
Step 7: Under the ‘Encryption Oracle Remediation’ window, select the Enabled option. Finally, click on Apply and then OK.

Step 8: Close all the open Windows. Press the Windows key on your keyboard, type Command Prompt, and click ‘Run as administrator.’
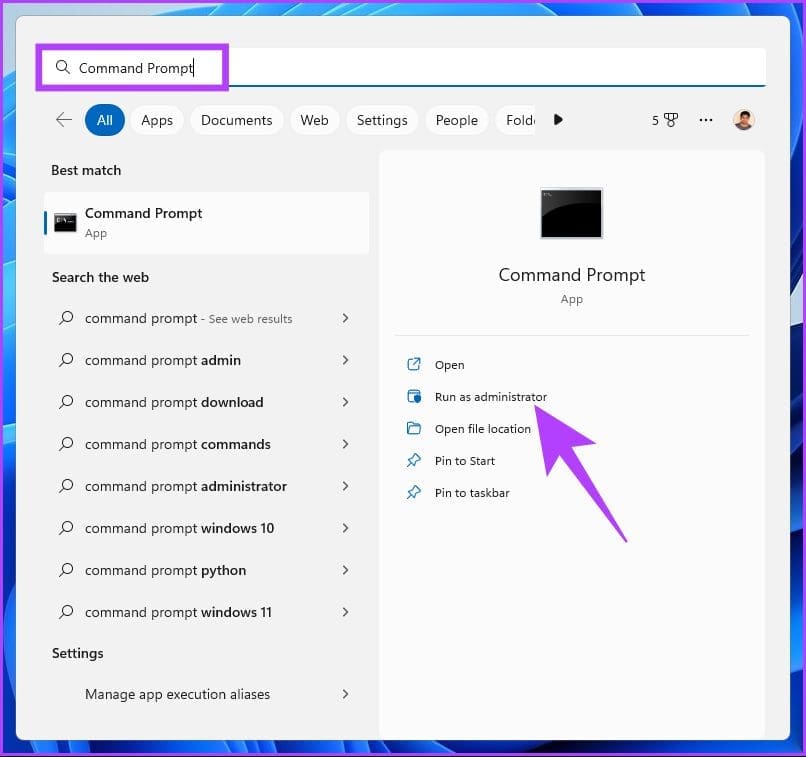
Step 8: Type the below command and press Enter.
gpupdate /force
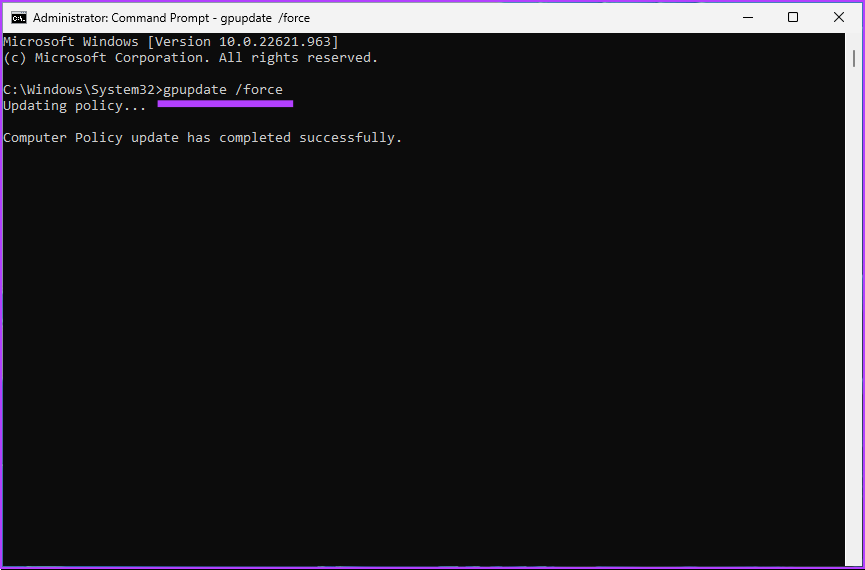
There you go. Now, all you need to do is reboot Windows. And once it boots back up, you will never face the authentication error again. If you have any queries, check out the FAQ section below.
FAQs on Remote Desktop Authentication Error
Yes, the Remote Desktop Protocol (RDP) is compatible with Windows 11. RDP is a protocol made by Microsoft that lets users connect to and control a Windows computer from another device. It is included in all versions of Windows, including Windows 11.
Remote Desktop Protocol (RDP) uses password-based authentication to verify the identity of a user trying to connect to a remote computer. You are asked for the remote computer’s username and password.
Take Your PC Remote Hassle-Free
Getting rid of the Remote Desktop authentication error on Windows 11 won’t be too challenging if you follow the steps in the article. Now that you know how to fix authentication errors, you may also want to know how to fix the black screen error on Remote Desktop. We hope this article helps you eliminate the authentication error once and for all.
Was this helpful?
Last updated on 28 December, 2022
Read Next
 5 Fixes for Remote Desktop Copy-Paste Not Working on Windows
Are you experiencing issues with copy-paste functionality not functioning as intended in your Windows Remote Desktop sessions?
5 Fixes for Remote Desktop Copy-Paste Not Working on Windows
Are you experiencing issues with copy-paste functionality not functioning as intended in your Windows Remote Desktop sessions?
 How to Set Up and Use Google Chrome Remote Desktop on Windows 11
Chrome Remote Desktop is a free tool from Google that allows you to connect to a remote computer over the internet.
How to Set Up and Use Google Chrome Remote Desktop on Windows 11
Chrome Remote Desktop is a free tool from Google that allows you to connect to a remote computer over the internet.
 Top 5 Ways to Fix Chrome Remote Desktop Not Working on Windows 11
Google's Chrome Remote Desktop is an extremely handy tool that lets you connect to a computer remotely.
Top 5 Ways to Fix Chrome Remote Desktop Not Working on Windows 11
Google's Chrome Remote Desktop is an extremely handy tool that lets you connect to a computer remotely.
 8 Quick Ways to Open Remote Desktop Connection Tool in Windows 11
AnyDesk and Teamviewer are the two popular apps to remotely connect to and control a computer.
8 Quick Ways to Open Remote Desktop Connection Tool in Windows 11
AnyDesk and Teamviewer are the two popular apps to remotely connect to and control a computer.
 How to Ctrl + Alt + Del in Remote Desktop on Windows
Method 1: Use Ctrl + Alt + End on the Keyboard It's simple - you can use the Ctrl + Alt + End on your Windows Remote Desktop session instead
How to Ctrl + Alt + Del in Remote Desktop on Windows
Method 1: Use Ctrl + Alt + End on the Keyboard It's simple - you can use the Ctrl + Alt + End on your Windows Remote Desktop session instead
 How to Enable Two Factor Authentication on Steam
All PC gamers love Steam for spending hundreds of dollars for buying and downloading games on their computer.
How to Enable Two Factor Authentication on Steam
All PC gamers love Steam for spending hundreds of dollars for buying and downloading games on their computer.
 How To Enable Remote Desktop or RDP in VMware – Guiding Tech
There are multiple methods of connecting to a virtual machine in VMware.
How To Enable Remote Desktop or RDP in VMware – Guiding Tech
There are multiple methods of connecting to a virtual machine in VMware.
 Top 3 Windows 10 Apps to Generate 2-Factor Authentication Codes
Two-factor authentication (2FA) is a method of bumping up user account security by requiring two means of identity verification.Typically when you're logging into your account, you will have to provide
Top 3 Windows 10 Apps to Generate 2-Factor Authentication Codes
Two-factor authentication (2FA) is a method of bumping up user account security by requiring two means of identity verification.Typically when you're logging into your account, you will have to provide
The article above may contain affiliate links which help support Guiding Tech. The content remains unbiased and authentic and will never affect our editorial integrity.