Windows 11 offers various optional features that you can install. Usually, these features get installed without issues, but sometimes they fail. This error can be frustrating, especially when the feature seems crucial for your workflow. In this article, we will guide you on how to fix optional features missing or not installing errors on Windows 11.

It’s very easy to install optional features on Windows. But sometimes, the installation might fail due to corruption in the important system files or the Windows Update components. The issue will also likely occur if the metered connection is enabled on your computer.
If you’ve already restarted your computer and ruled out temporary bugs and glitches, it’s time to dive into advanced troubleshooting. Let’s begin.
1. Disable Metered Connection
Windows has a metered connection feature that reduces data consumption and helps save on internet bills. This feature is helpful to everyone on a limited internet data usage plan. But like most Windows features, it also has its downside.
To save data, the metered connection can stop your computer from downloading files required to install the optional feature. So, you’ll need to disable a metered connection if you are on an unlimited data plan and want hassle-free installation of Windows updates and optional features.
Here’s how you can disable a metered connection on Windows 11. Note that you’ll need administrator rights on Windows 11.
Step 1: Firstly, press the ‘Windows + I’ keys shortcut to open the Settings app.
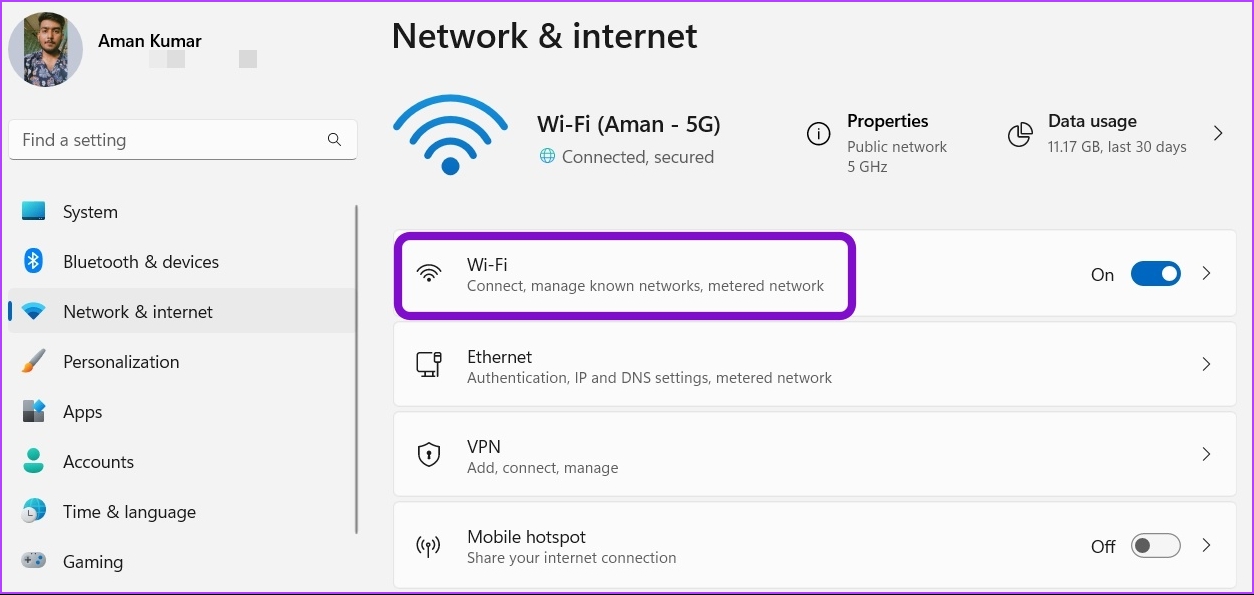
Step 2: Click the ‘Network & internet’ option from the left sidebar.

Step 3: Click on Wi-Fi on the right pane and select the Wi-Fi connection you use.
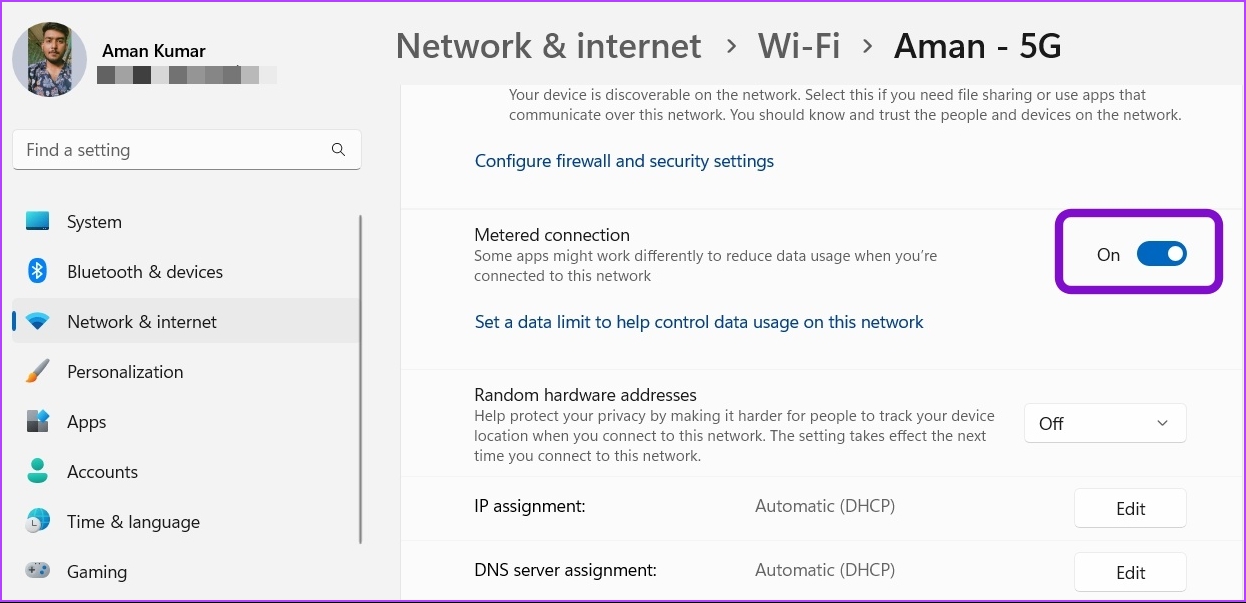
Step 4: Finally, scroll down and turn off the toggle next to the Metered connection option.
That’s it. Now, go back and check if the optional features install failed error is resolved. If not, check out the next fix.
Also Read: How to clear DirectX Shader Cache on Windows 11
2. Run the SFC and DISM Scan
At times, Windows 11 will fail to install optional features due to corruption in the system files. The System File Checker (SFC) scan is a built-in Windows utility that helps you find and repair damaged system files on your computer automatically. Ensure that you’re using an Administrator account and follow the below steps to run an SFC scan.
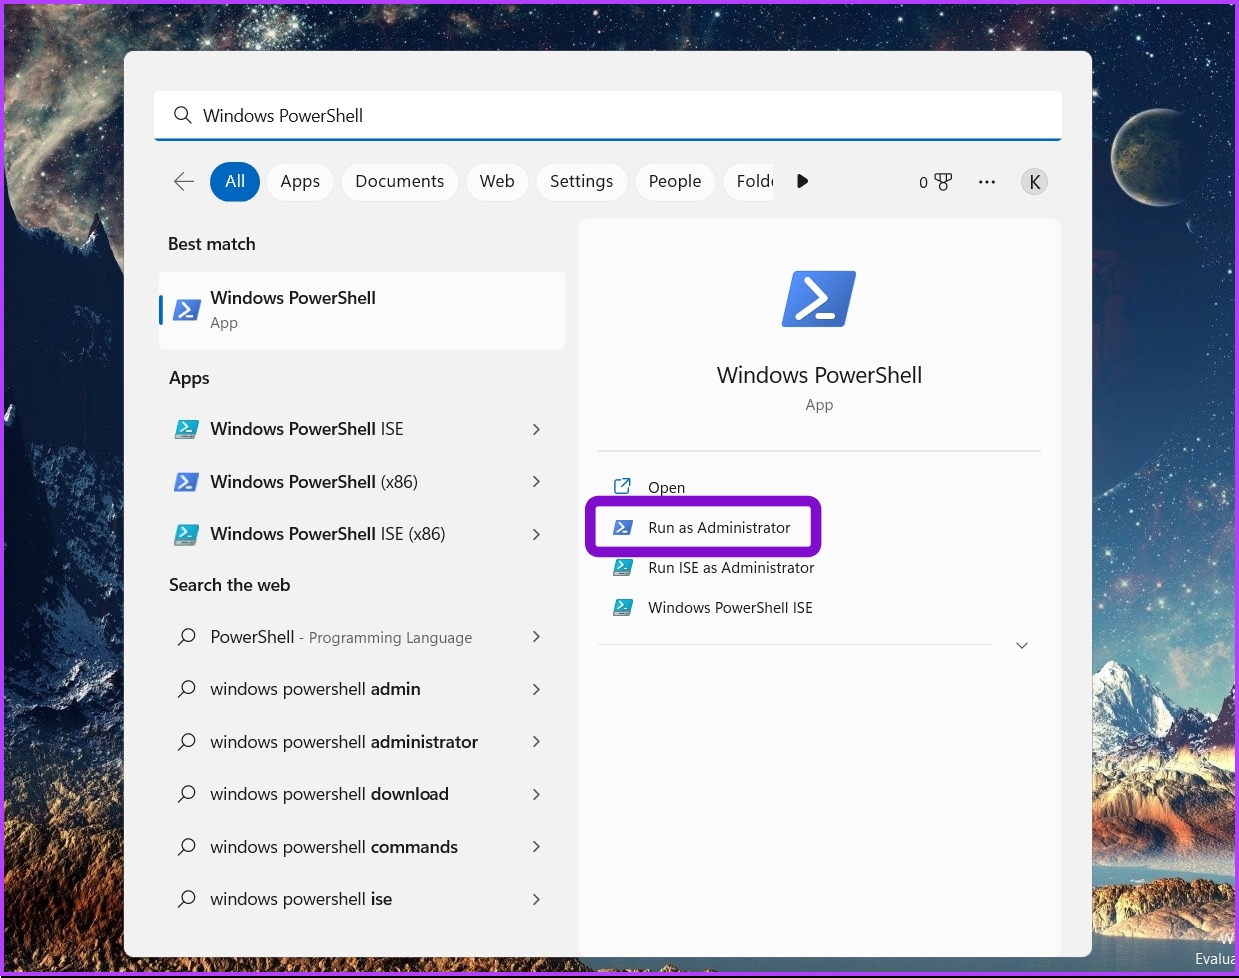
Step 1: Press the ‘Windows + S’ hotkeys to open the Search menu. Then, type Windows PowerShell in the search bar, and choose Run as administrator from the right pane.
Step 2: Click Yes on the User Account Prompt pop-up.
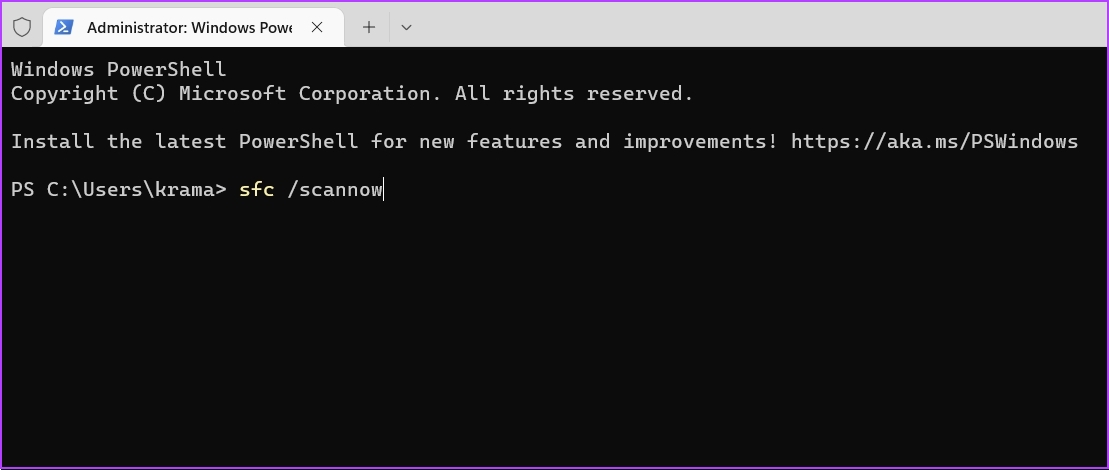
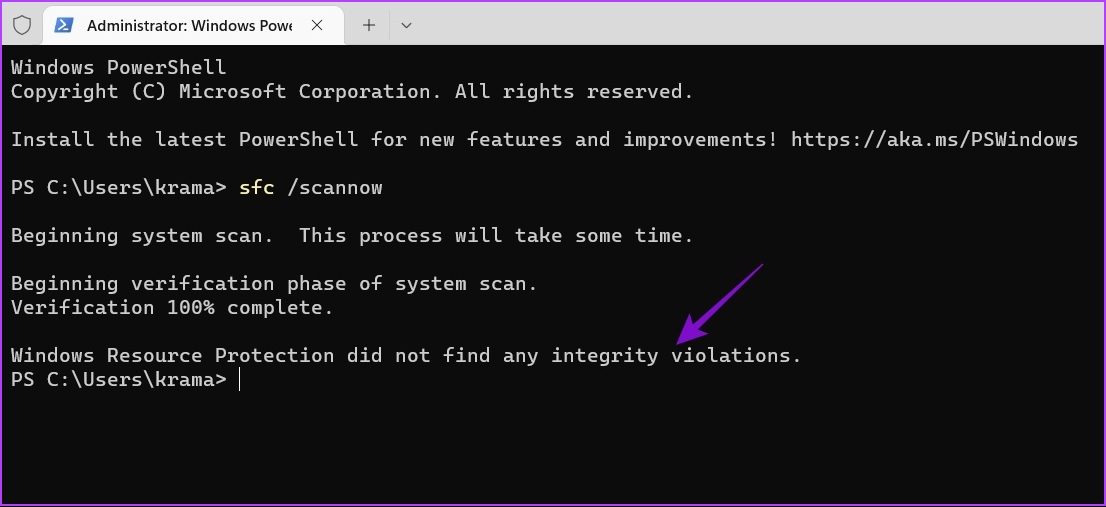
Step 3: Type the following command in the console and press Enter.
sfc /scannow
The scanning process may take some time. After it completes, a message will appear indicating whether the scan found any problems and could repair them.
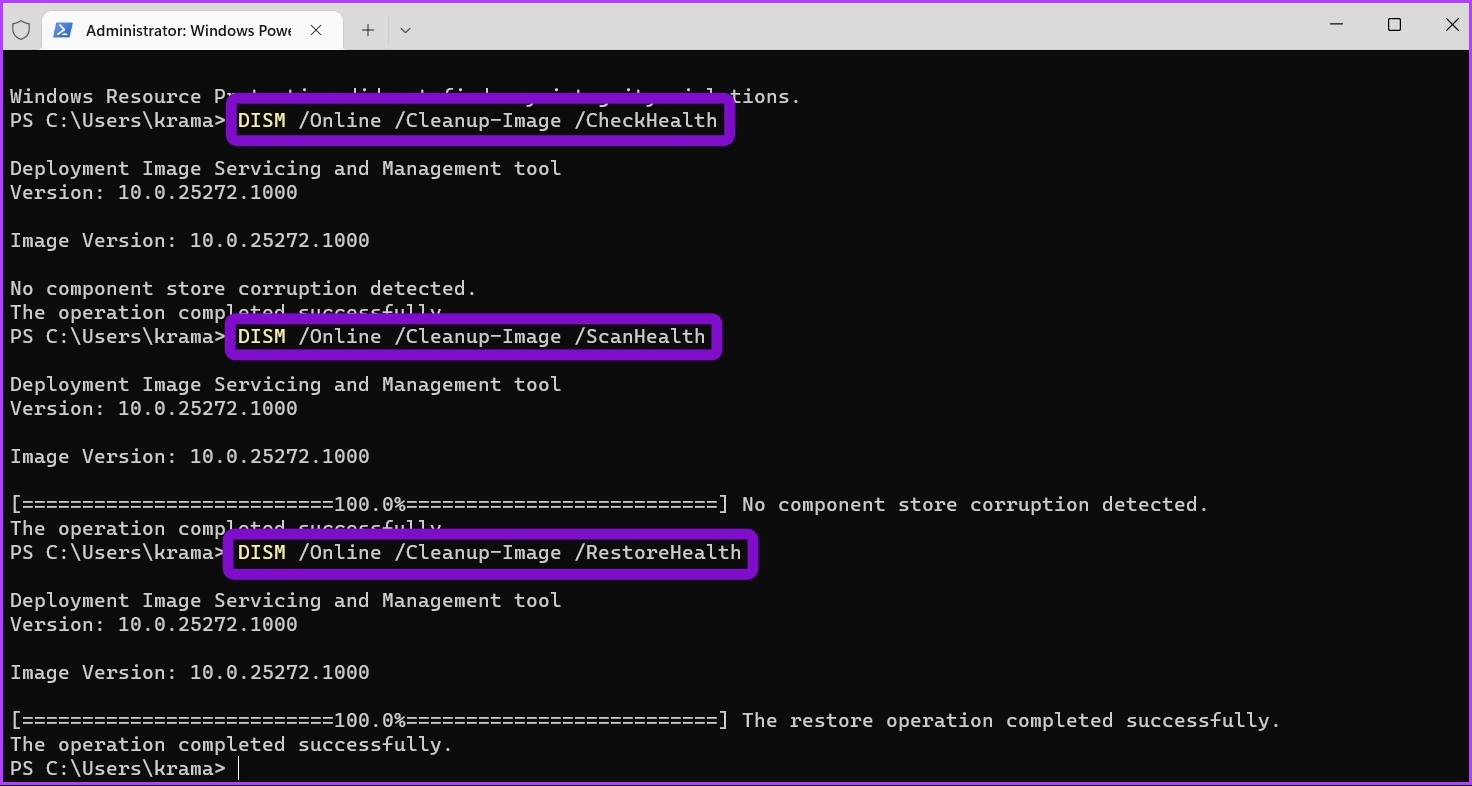
If running the SFC scan wasn’t helpful, consider running the Deployment Image Servicing and Management (DISM) scan. It is another Windows utility that scans for potential issues in the Windows OS that can impact its functioning and attempts to repair corrupt files when your computer is connected to a working network.
To run the DISM scan, open the Windows PowerShell with administrative rights again, run the following commands one by one, and press Enter after each command:
DISM /Online /Cleanup-Image /CheckHealth
DISM /Online /Cleanup-Image /ScanHealth
DISM /Online /Cleanup-Image /RestoreHealth
Finally, restart your computer and try to download the optional features again. If this method didn’t help, maybe the next fix will, continue reading.
3. Use the Windows Update Troubleshooter
Windows offers various troubleshooters that can be helpful in different situations. You can use the Windows Update troubleshooter to eliminate optional features not showing issues. Here’s how to use it.
Step 1: Open the Settings app and choose System from the left sidebar.
Step 2: Select the Troubleshoot option in the right pane.
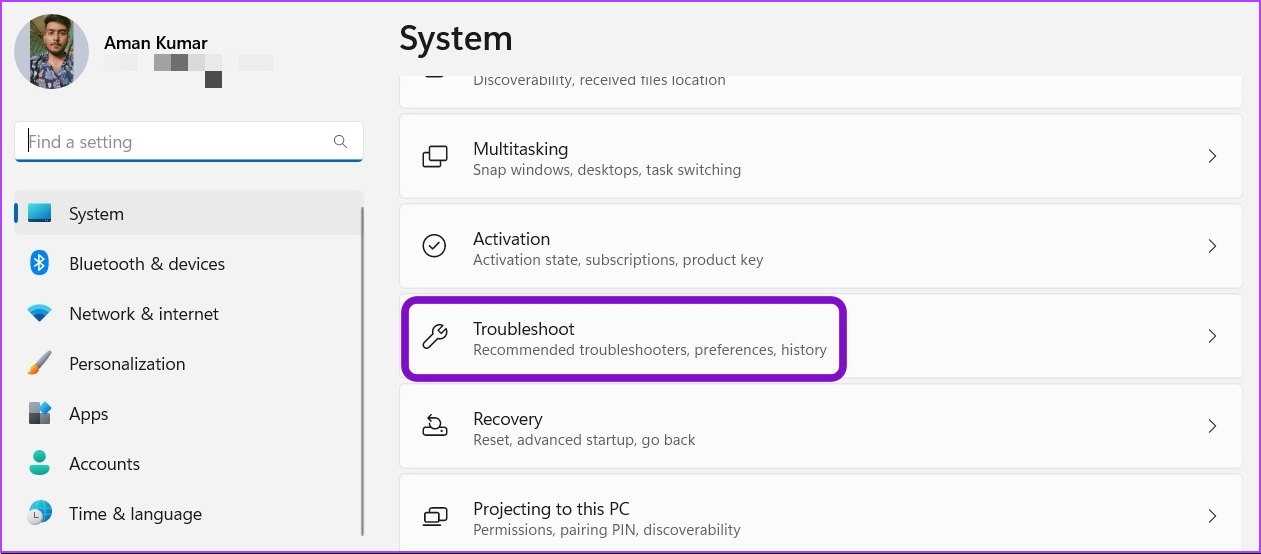
Step 3: Choose Other troubleshooters.
Step 4: Click the Run button next to Windows Update.

The Windows Update troubleshooter will appear and start looking for issues. If it finds any, it will automatically fix them without much user input. If this method didn’t help, move on to the next one.
Also Read: How to enable or disable Smart App Control in Windows 11
4. Temporarily Disable the Security Program
The default security program can sometimes consider the optional features as malware and stop them from installing. If you’re sure the feature is safe for your computer, you can disable the security program and allow the installation.
If you’re using Windows Security as the default security app, here are the steps to disable it.
Step 1: Firstly, press the ‘Windows + S’ keys to open the Search menu. Then, type Windows Security in the search bar, and press Enter.

Step 3: Choose ‘Virus & threat protection’ from the left sidebar.

Step 4: Choose Manage settings.

Step 5: Turn off the toggle under ‘Real-time protection.’

Step 6: Finally, click Yes on the User Account Control window that pops up.
That will disable Windows Security until you restart your computer and activate it again. Try to install the optional features again and check if the problem persists. This should fix the optional features couldn’t install error, if it doesn’t, check out the next fix.
To disable a third-party security application on your computer, right-click on its icon in the system tray area and choose the Disable option.
5. Restart the Windows Module Installer Service
There are certain services that must be enabled and running in the background if you want to install Windows updates and optional features on your computer. These services are the Windows Update Service, the Background Intelligent Transfer Service, and the Windows Modules Installer Service.
To check and change the status of those services, follow the steps below.
Step 1: Firstly, in the Windows Search menu, type Services and press Enter.
Step 2: Scroll down to the Windows Update service and double-click on it.
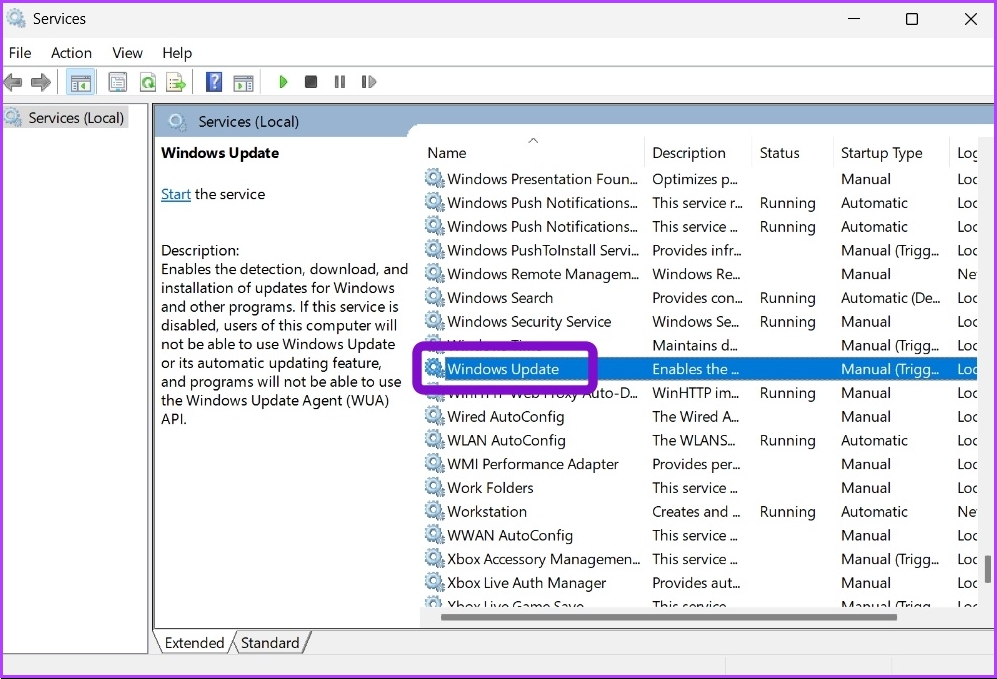
Step 3: In the Windows Update Properties window, use the drop-down next to Startup type and select Automatic. Then, click the Start button under Service status.

Step 4: Finally, click Apply and then OK to save the changes.
Next, repeat the above steps for Background Intelligent Transfer Service and Windows Modules Installer Service to set their Startup type to Automatic. Check our post if Services is not opening on Windows 11.
Are you still facing the issue? There’s probably corruption in the Windows update components that is causing a problem.
6. Reset the Windows Update Components
You can reset the Windows update components, which will stop the Windows update services and flush the content of the SoftwareDistribution and catroot2 folders. After that, restart the Windows update services.
Note that it won’t delete any data, but only the partially downloaded update files on the Windows PC. But don’t worry. After you reset Windows Update components, the service will download fresh and complete new copies of the files to install them on your Windows computer.
To reset the Windows update components, follow the below instructions.
Step 1: Firstly, open the Search menu, type Windows PowerShell in the search bar, and select the Run as administrator option in the right pane.
Step 2: In the PowerShell window with administrative privileges, run the following commands one by one and press Enter after each command
net stop wuauserv
net stop cryptSvc
net stop bits
net stop msiserver
ren C:\Windows\SoftwareDistribution SoftwareDistribution.old
ren C:\Windows\System32\catroot2 catroot2.old
net start wuauserv
net start cryptSvc
net start bits
net start msiserver

After that, you may want to run Windows Updates from the Settings app. This should resolve the optional features couldn’t install error, if it didn’t, move on to the next fix.
7. Disable Hide Windows Features
Sometimes, the optional features section might be hidden, preventing you from seeing and installing available features. In this case, you must check and disable ‘Hide “Windows Feature”.’ Follow the below-mentioned steps.
Note: For this method, we will use the Local Group Policy Editor. So, it is important to note that the Local Group Policy Editor is only available on Windows 11 Professional, Enterprise, and Education editions. If your PC runs Windows Home, this method will not work; move to the next fix.
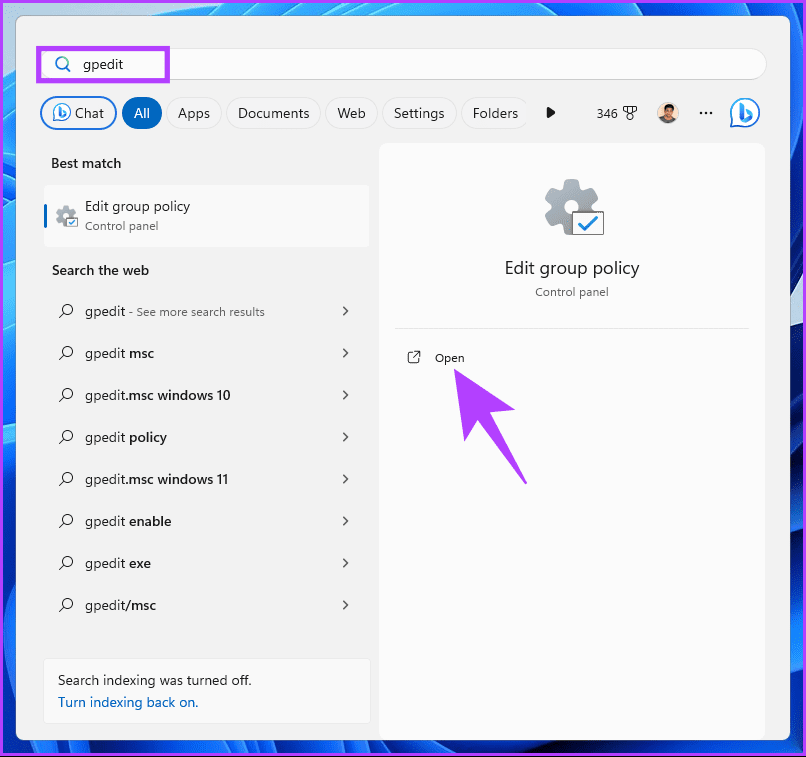
Step 1: Firstly, press the Windows keys on your keyboard. Then, type gpedit.msc, and click Open.
Note: Press the Windows + R keys to open the Run dialog box, type gpedit.msc, and click OK.
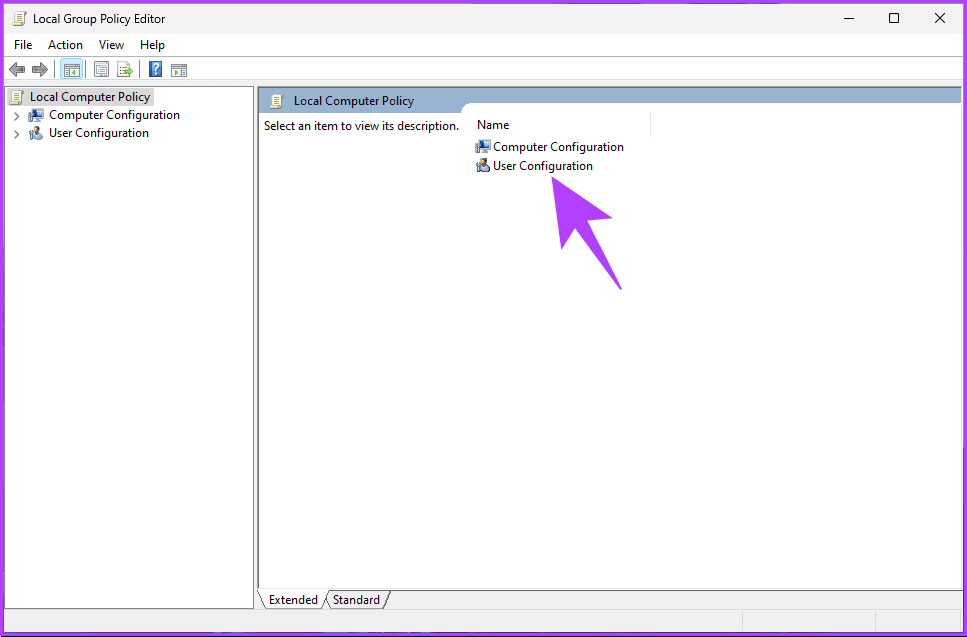
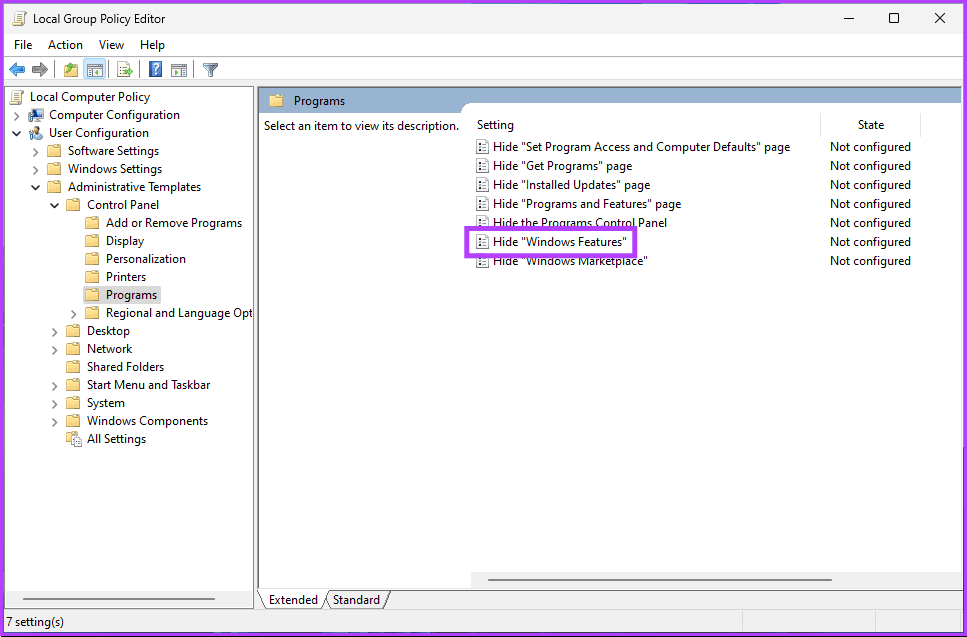
Step 2: In the left pane, select User Configuration under ‘Local Computer Policy’.
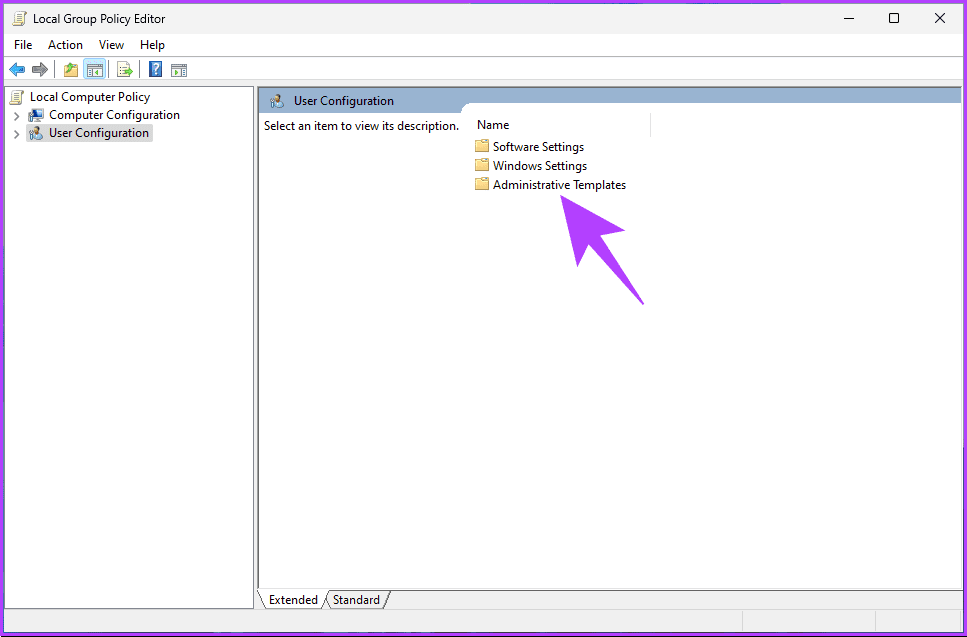
Step 3: In the right pane, double-click on Administrative Templates.
Step 4: Select the Control Panel option.

Step 5: Under the Control Panel option, navigate to Programs.
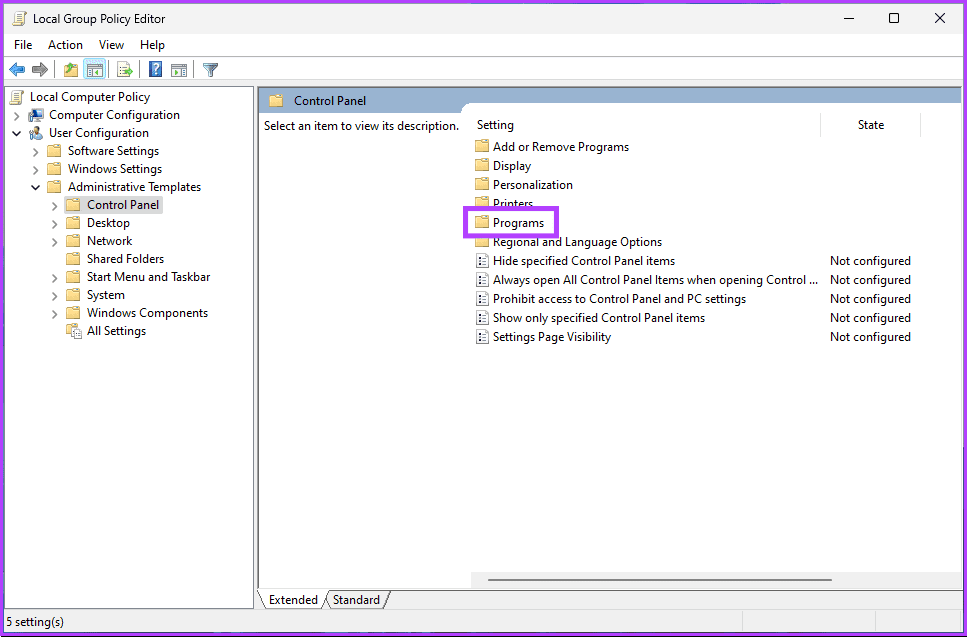
Step 6: Now, double-click on ‘Hide “Windows Features”.’
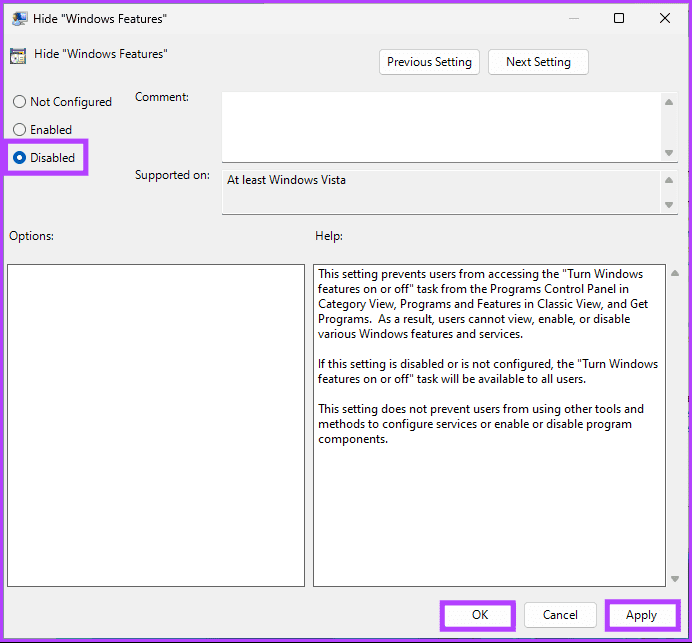
Step 7: Finally, choose the Disabled option. Finally, click on Apply, followed by OK.
That’s it. Now, exit the Group Policy Editor and check if the optional features issue has been resolved. If not, check out the next fix.
8. Restore Windows Features Using PowerShell
PowerShell offers an alternative way to fix and restore optional features not showing errors. We will be using the appropriate cmdlets to restore missing or non-installable features on your Windows 11 system. Follow the below steps.
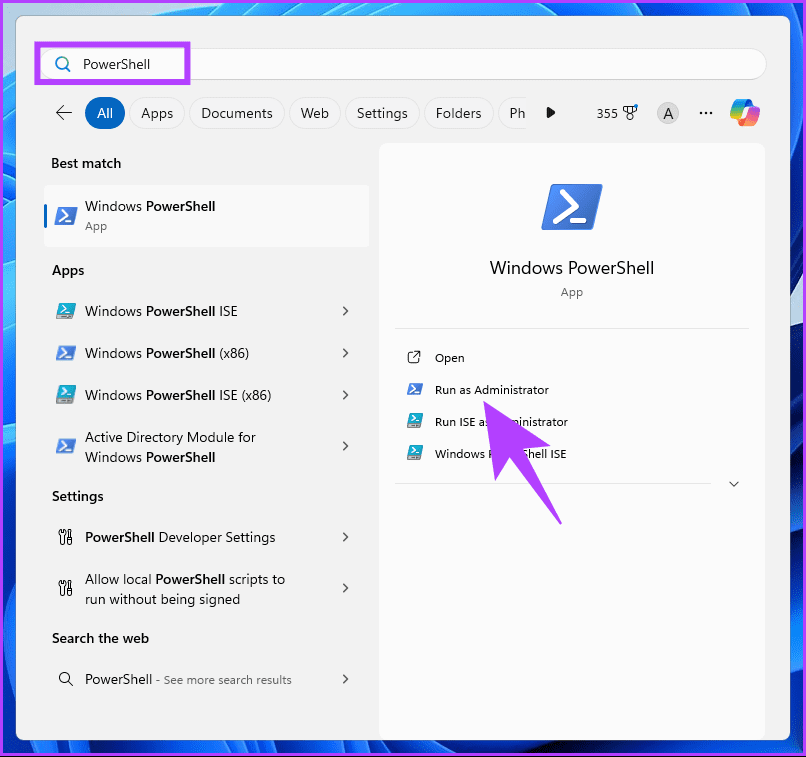
Step 1: Press the Windows key on your keyboard. Then, type PowerShell and click ‘Run as administrator.’
Step 2: Type the below command and hit Enter.
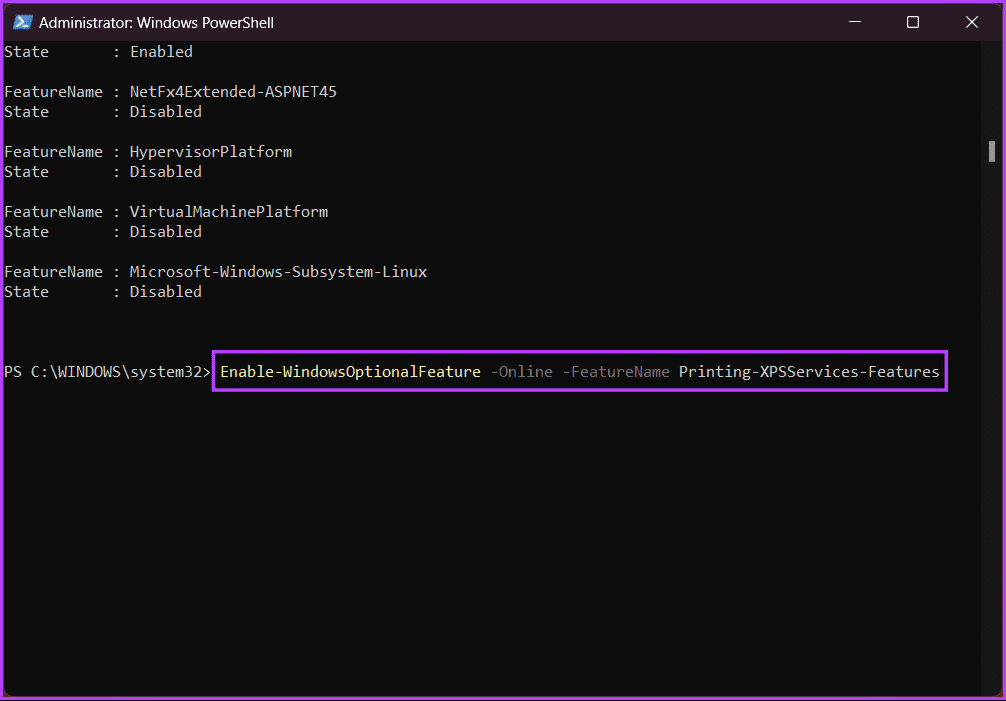
Get-WindowsOptionalFeature -Online
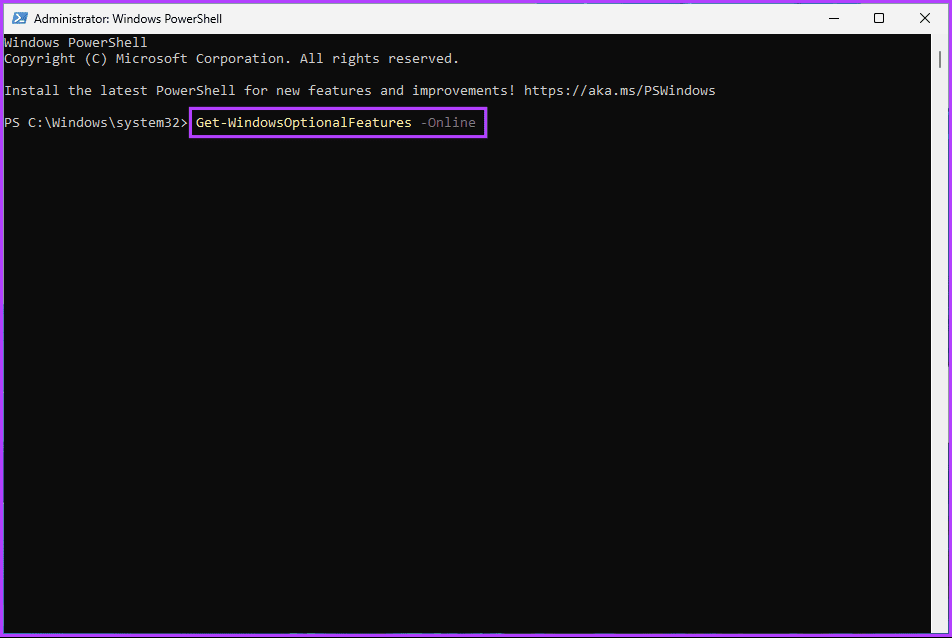
This command will display all the available FeatureName and their State that you can use.
Step 3: To turn certain features on, copy-paste the below command and press Enter.
Note: Replace FEATURENAME with the one you want to enable or disable.
Enable-WindowsOptionalFeature -Online -FeatureName FEATURENAME
And that’s that. Finally, restart your PC for the changes to take effect. Once your PC reboots, this feature will be added to your PC, which you can enable or disable in the features window. If none of the fixes above helped, move on to the final fix.
Also Read: How to hide or delete the Recycle Bin icon in Windows 11
9. Update Windows to the Latest Version
Utilizing the built-in Windows Update feature is convenient to fix the optional feature install failed issue. Updates often address bugs and compatibility issues that might be causing this problem. Follow the instructions below.
Step 1: Firstly, press the Windows key on your keyboard. Then, type Settings, and click Open.
Note: Alternatively, you can quickly press the ‘Windows key + I’ on your keyboard to open Windows Settings.
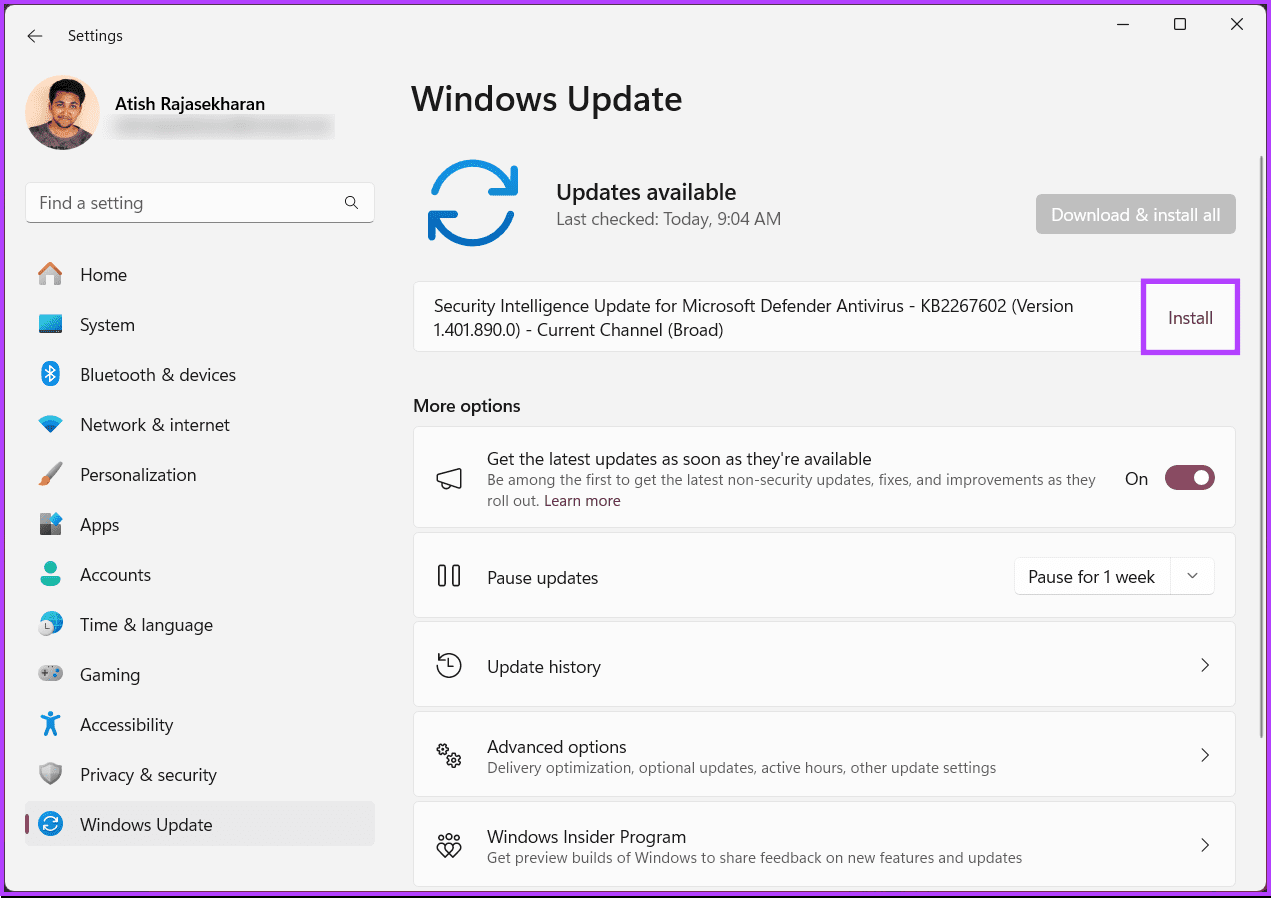
Step 2: Go to Windows Update.

Step 3: Now, click the ‘Check for updates’ button on the right pane.

Step 4: Finally, if an update is available, click the Download now button to download and install it.
Note: Depending on the size of the update and the speed of your internet connection, the update may take a few minutes to an hour to download and install.
Once you have installed the latest Windows update, restart your computer. Once you are back, all the issues pertaining to optional features not showing, install failure, or couldn’t install should be resolved. If the problem persists, you may consider performing a system restore or contacting Microsoft Support for further assistance.
If you have any queries we missed addressing, check out the FAQ section below.
FAQs on Fixing Optional Features Missing or Not Installing
Yes, you can manually download and install some optional features. Go to Settings > System > ‘Apps & features’ > Optional Features. Click on ‘Add a feature,’ select the feature you want, and click Install.
Free up disk space by uninstalling unnecessary programs, deleting temporary files, or moving files to an external drive. Ensure there’s enough space on the system drive (usually C:) for the installation to proceed.
Get All Optional Updates
Now that you know how to fix optional features missing or not installing errors in Windows 11, you can navigate through the error to fix it and, in turn, enhance the overall Windows experience. You may also want to read the top ways to adjust Windows 11 screen timeout settings.
Was this helpful?
Last updated on 26 February, 2024
1 Comment
Leave a Reply
Read Next
 How to Fix iCloud Missing Media Features Error on Windows 10
Even though iCloud doesn’t provide the best of experiences on PC, you’d at least expect the damn thing to install itself without any issues, right?
How to Fix iCloud Missing Media Features Error on Windows 10
Even though iCloud doesn’t provide the best of experiences on PC, you’d at least expect the damn thing to install itself without any issues, right?
 Top 8 Ways to Fix Windows 11 Updates Not Downloading or Installing
Regular Windows 11 updates ensure that your computer runs fine, and no bugs can disrupt your work or play.
Top 8 Ways to Fix Windows 11 Updates Not Downloading or Installing
Regular Windows 11 updates ensure that your computer runs fine, and no bugs can disrupt your work or play.
 Top 7 Ways to Fix DirectX Not Installing Error on Windows 11
DirectX installer often pops up when you try installing a game on Windows 11.
Top 7 Ways to Fix DirectX Not Installing Error on Windows 11
DirectX installer often pops up when you try installing a game on Windows 11.
 Top 6 Ways to Fix Windows Keeps Installing the Same Update
Windows updates are vital for the smooth and secure operation of your computer.
Top 6 Ways to Fix Windows Keeps Installing the Same Update
Windows updates are vital for the smooth and secure operation of your computer.
 3 Ways to Prevent Users From Installing New Software on Windows 11
Method 1: Turn Off Windows Installer via Group Policy The Group Policy Editor on Windows lets you make various administrative-level changes.
3 Ways to Prevent Users From Installing New Software on Windows 11
Method 1: Turn Off Windows Installer via Group Policy The Group Policy Editor on Windows lets you make various administrative-level changes.
 How to Stop a Specific Windows Update From Installing
Microsoft releases regular updates for Windows 10 and Windows 11 to improve performance, but sometimes they end up causing more problems than they solve.
How to Stop a Specific Windows Update From Installing
Microsoft releases regular updates for Windows 10 and Windows 11 to improve performance, but sometimes they end up causing more problems than they solve.
 Top 7 Fixes For ‘No Device Drivers Were Found’ While Installing Windows 10 or 11
Installing a fresh copy of Windows 11 or 10 is a fairly easy process.
Top 7 Fixes For ‘No Device Drivers Were Found’ While Installing Windows 10 or 11
Installing a fresh copy of Windows 11 or 10 is a fairly easy process.
 Top 14 Ways to Fix Apps Not Installing on Android
Google Play Store houses millions of apps and games.
Top 14 Ways to Fix Apps Not Installing on Android
Google Play Store houses millions of apps and games.
The article above may contain affiliate links which help support Guiding Tech. The content remains unbiased and authentic and will never affect our editorial integrity.


Optional feature has been relocated and can be found under System. Not Apps.