Getting better RAM or memory can improve your experience on a computer. But what contributes to this “better” part? Besides the type and capacity of the RAM, the speed of the RAM or bandwidth also affects how quickly your computer’s CPU can access new data to run apps smoothly.
Whether you plan to upgrade RAM (add more to your computer) or get a new computer with enough memory, you’ll need compatibility besides the speed to boost the overall performance.
There are a bunch of ways to check your computer’s hardware specifications, but very few give you details about the actual speed of the RAM in your Windows PC. Fortunately, you can employ these quick and easy methods to check RAM speed on Windows 11.
1. Check RAM Speed From the Task Manager
Besides revealing details of the apps and services, Task Manager is equipped to show details of the core hardware of your computer. Of course, you’ll need to visit the appropriate tab to view those details.
To check the RAM speed from the Task Manager in Windows 11, follow these steps:
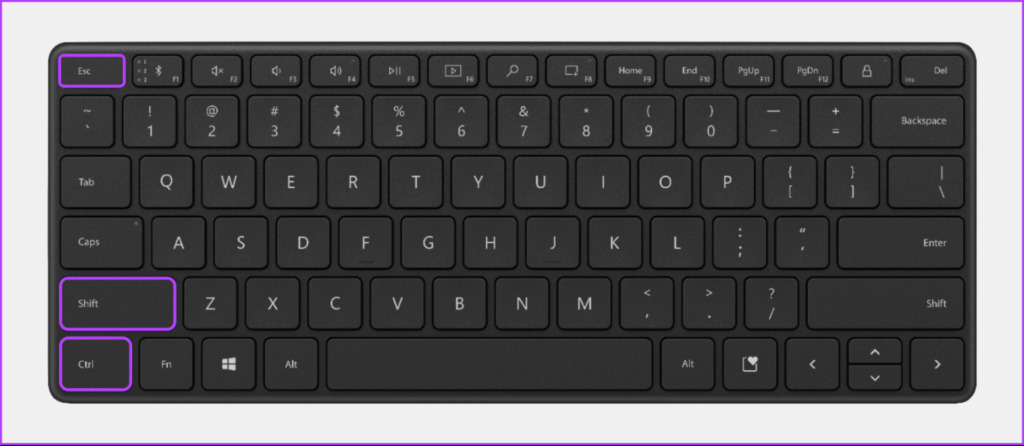
Step 1: Press the Ctrl + Shift + Esc keys shortcut to open the Task Manager.
Step 2: In the Task Manager, click on the Performance tab from the left sidebar.

Step 3: Under the Performance tab, click on the Memory section from the left pane. The right pane will share details like the slots used, form factor and the speed of the RAM. Note that this will be the actual speed that Windows uses your RAM.

Note that this will be the actual speed that Windows uses your RAM. You can use this information to overclock the RAM or use Intel XMP profile from the BIOS.
2. Check RAM Speed Using Command Prompt
The Command Prompt comes in handy when performing administrative tasks such as booting your computer into safe mode or managing apps installed on your computer. Besides that, you can also use the Command Prompt to check your computer’s RAM speed, among countless other things.
To check your computer’s RAM speed using Command Prompt, follow these steps:
Step 1: Press the Windows + S keys to open Windows Search, and type Command Prompt. Then, from the results for Command Prompt, click on Run as administrator.

Step 2: Click Yes when the User Account Control (UAC) prompt appears on the screen.

Step 3: Type the following command into Command Prompt and press Enter:
wmic memorychip get speed
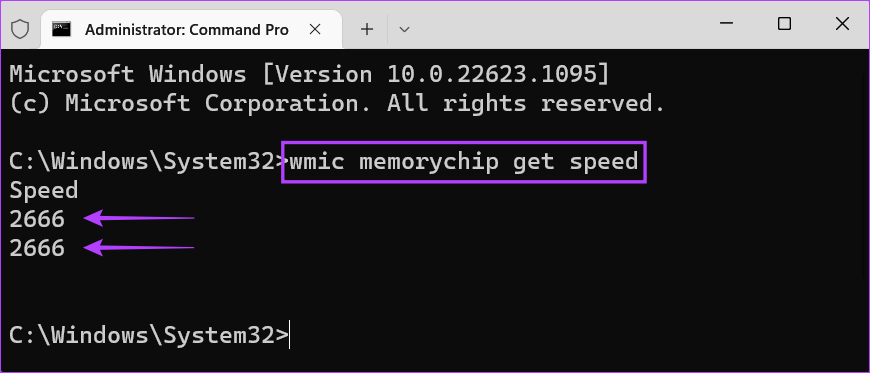
After you run the command, the Command Prompt window will show the memory speed for each module that’s in use on your computer.
3. Check RAM Speed Using Windows PowerShell
Besides Command Prompt, If you’re familiar with Windows PowerShell, you can quickly use it to check your RAM’s speed and other important specifications. For that, you will have to execute a command as detailed in the steps below:
Step 1: Press the Windows + S keys to open Windows Search, and type Windows PowerShell. Then, from the results for PowerShell, click on Run as administrator.

Step 2: When the User Account Control (UAC) prompt appears, click Yes.

Step 3: Type the following command and press Enter to find the RAM speed:
Get-WmiObject Win32_PhysicalMemory Speed
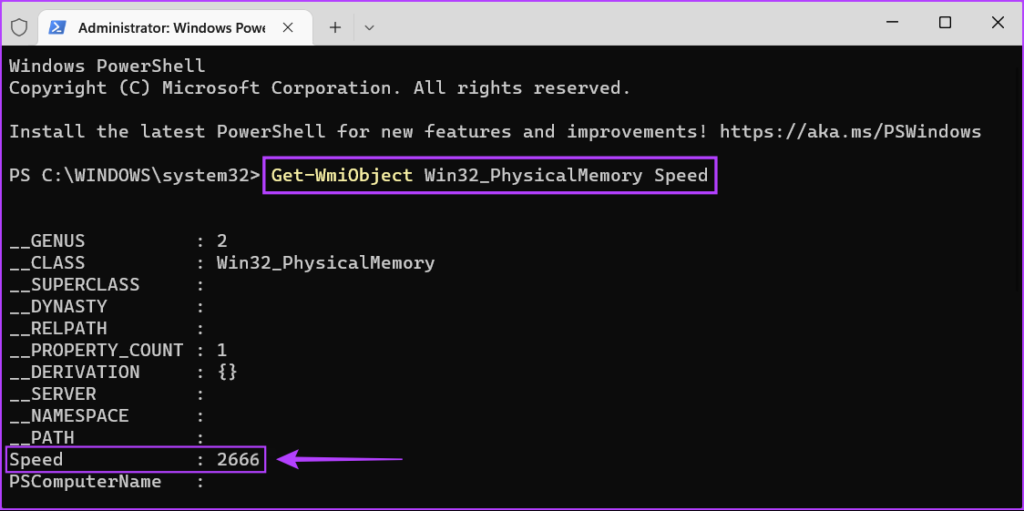
After that, the PowerShell window shows you a list of things. You can find your computer’s RAM speed listed next to Speed. Also, you can scroll down and find the RAM speed for other memory modules listed in a similar manner.
4. Check RAM Speed Using CPU-Z
Even though there are plenty of native ways to check RAM speed on Windows 11, nothing beats the ease of using third-party tools that displays all details about your computer in a concise manner. With that said, here’s how you can use a free tool called CPU-Z to check the RAM speed on your computer.
Step 1: Download CPU-Z by clicking the download button located below:
Step 2: When the download completes, click on the CPU-Z installer, and select Yes. Then follow the on-screen instructions to install CPU-Z on your PC.

Step 3: After you install it, press the Windows + S keys to open Windows Search and type CPU-Z. Then, from the results for CPU-Z, click on Open.

Step 4: In the CPU-Z window that appears, click on the SPD tab.
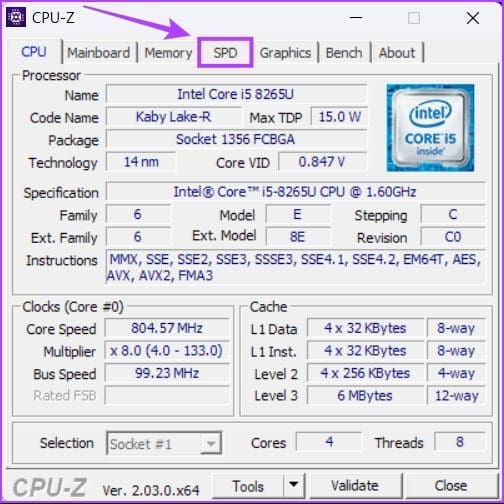
Step 5: Under the SPD tab, look for the value listed beside Max Bandwidth to check the RAM speed. Furthermore, you can click the drop-down above Max Bandwidth to select other memory modules installed on your Windows computer.

5. Check RAM Speed From the RAM Sticker
Besides the methods listed above, you can also check the speed of your RAM from its sticker. This method is purely optional and only applies if your computer doesn’t work. To check the details of the RAM sticks, you’ll need to open your computer.
Warning: Opening your computer at home might void its warranty. Be careful before you do that and at your own discretion.

Whether it’s a desktop or a laptop, you might have to remove the RAM sticks to check the sticker or markings on it.
Each RAM stick will have a sticker on it with information about its manufacturer, model number, and other details. Look for the information about the speed of the RAM. Usually, it’s listed as DDR4-2666 or DDR4-3200 on the sticker. You can perform a quick Google search for its model number to find more information about its speed.
Easily Check the Speed of RAM Installed on Your PC
Knowing more about the speed of your RAM can help you utilize it optimally by overclocking or upgrading them on your computer. Most importantly, it’ll save you the headache of ordering and trying to make incompatible RAM sticks run and that may harm your computer. Refer to our post on troubleshooting issues with RAM on Windows.
Was this helpful?
Last updated on 23 January, 2023
1 Comment
Leave a Reply
Read Next
 5 Best Ways to Check RAM Type in PC on Windows 10 and Windows 11
Whenever you try to upgrade or add more RAM to your PC, you start looking for the RAM type supported by your PC.
5 Best Ways to Check RAM Type in PC on Windows 10 and Windows 11
Whenever you try to upgrade or add more RAM to your PC, you start looking for the RAM type supported by your PC.
 3 Best Ways to Check Network Adapter Speed on Windows 11
A network adapter is a vital component that connects your computer to the internet.
3 Best Ways to Check Network Adapter Speed on Windows 11
A network adapter is a vital component that connects your computer to the internet.
 3 Best Ways to Clear RAM Cache on Windows 11
Would you like to improve your computer's performance?
3 Best Ways to Clear RAM Cache on Windows 11
Would you like to improve your computer's performance?
 Top 10 Ways to Fix Slow Internet Speed on Windows 11
A high-speed internet connection is now more of a necessity than a luxury.
Top 10 Ways to Fix Slow Internet Speed on Windows 11
A high-speed internet connection is now more of a necessity than a luxury.
 4 Ways to Fix Slow Download Speed in Microsoft Edge for Windows
Basic Yet Essential Fixes Check internet speed: If your internet speed is slow or bandwidth is less, all downloads will get slow.
4 Ways to Fix Slow Download Speed in Microsoft Edge for Windows
Basic Yet Essential Fixes Check internet speed: If your internet speed is slow or bandwidth is less, all downloads will get slow.
 6 Best Ways to Fix Slow Download Speed in Epic Games Launcher on Windows 11
Epic Games Launcher offers a vast catalog of free and paid games that you can download and play on your computer.
6 Best Ways to Fix Slow Download Speed in Epic Games Launcher on Windows 11
Epic Games Launcher offers a vast catalog of free and paid games that you can download and play on your computer.
 4 Ways to Fix Ethernet Speed Capped at 100Mbps on Windows 11
Basic Fixes: Ensure your router and plan can support 100Mbps: Connect to your Wi-Fi network and run a speed test via Fast.com.
4 Ways to Fix Ethernet Speed Capped at 100Mbps on Windows 11
Basic Fixes: Ensure your router and plan can support 100Mbps: Connect to your Wi-Fi network and run a speed test via Fast.com.
 Which Browser Uses the Least RAM and CPU on Windows
Selecting a primary web browser can be confusing given the wide variety of existing options.
Which Browser Uses the Least RAM and CPU on Windows
Selecting a primary web browser can be confusing given the wide variety of existing options.
The article above may contain affiliate links which help support Guiding Tech. The content remains unbiased and authentic and will never affect our editorial integrity.


3466 ram speed on all 5 checks! The most informative answer(s) I have found. Well laid out. Thx!
Reason I checked is because my bios says they are at 2100.
-kel