Window Services is a built-in application that lets you see what’s running on your computer. You may need to use it when you want to enable, disable, and configure Windows services manually. But how do you get to the Services app on Windows 11?
In this post, we will take you through eight different ways to open Services on Windows 11. So, let’s begin.
1. Open Services Using the Run Tool
The Run tool lets you quickly open apps, utilities, and files by entering their names or paths. To open Services using the Run tool, follow the below instructions:
Step 1: Press Windows + R keys to open the Run tool.
Step 2: In the text field, type services.msc and click OK.
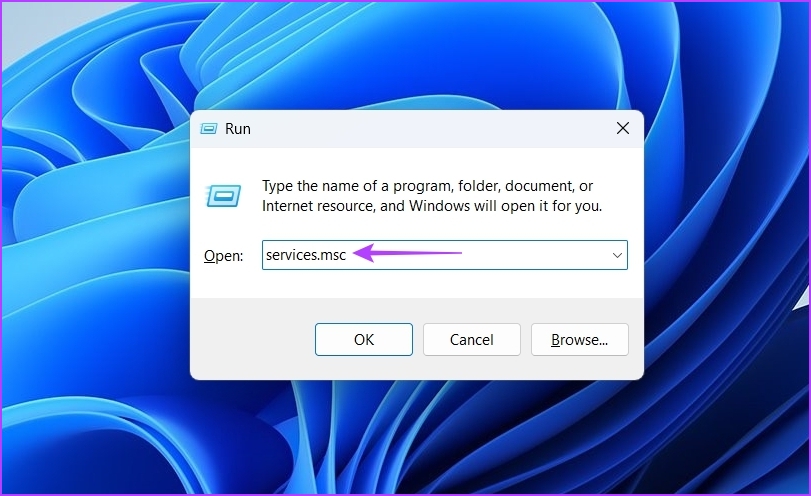
The Services window will crop up where you can make the changes you want.
2. Open Services Using the Windows Search
Windows search lets you look for folders, apps, documents, and settings on your computer. Here’s how to open Services using Windows search:
Step 1: Press Windows + S keys to open Windows search.
Step 2: Type Services in the search bar and click Open in the right pane.

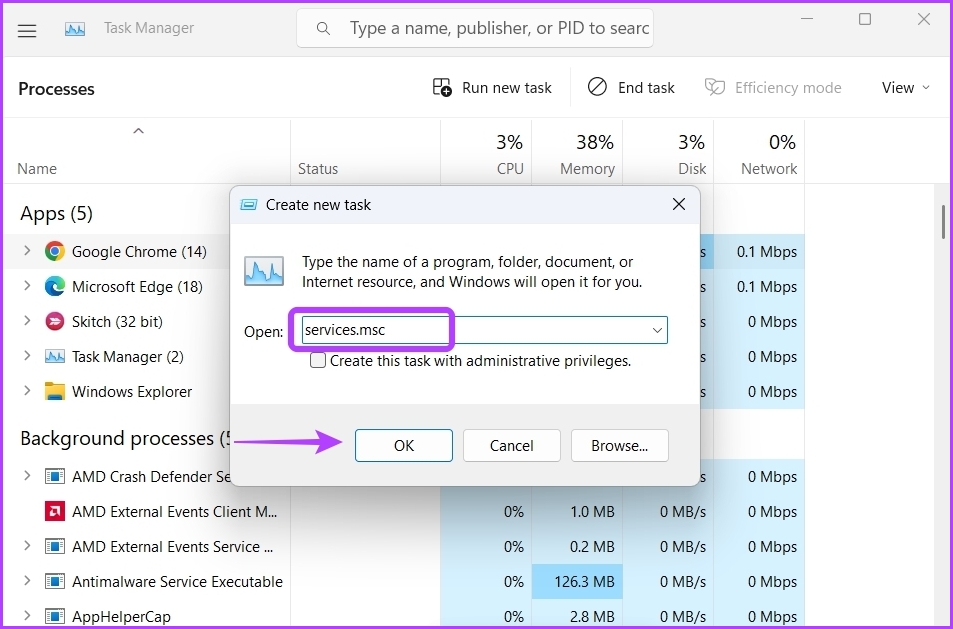
3. Open Services Using the Task Manager
The Task Manager is usually used to monitor computer performance, background running applications, and system resource usage. But you can also open built-in apps like the Services app.
Follow the below steps to open Services using the Task Manager:
Step 1: Press Windows + R keys to open the Run tool, type taskmgr in the text field, and click OK.

Step 2: In the Task Manager, click the Run new task option.
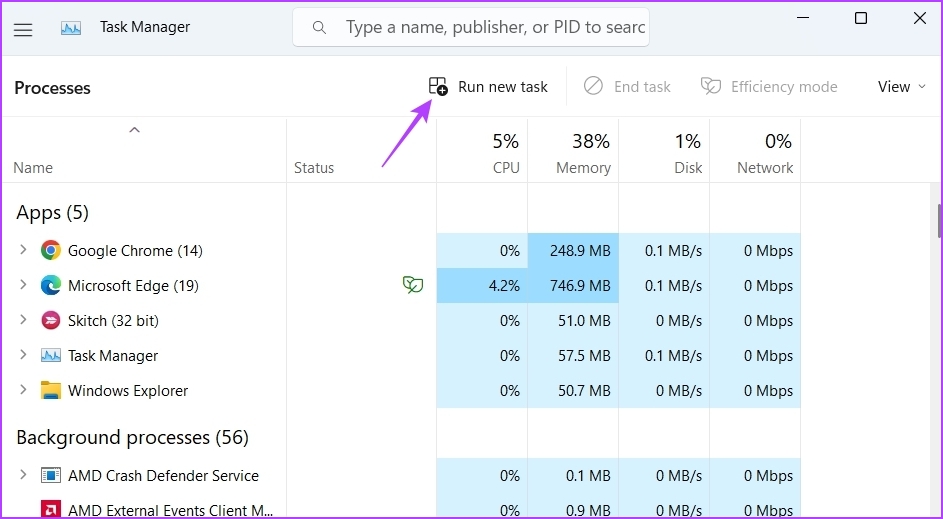
Step 3: Type services.msc in the text field and click OK to open Services.
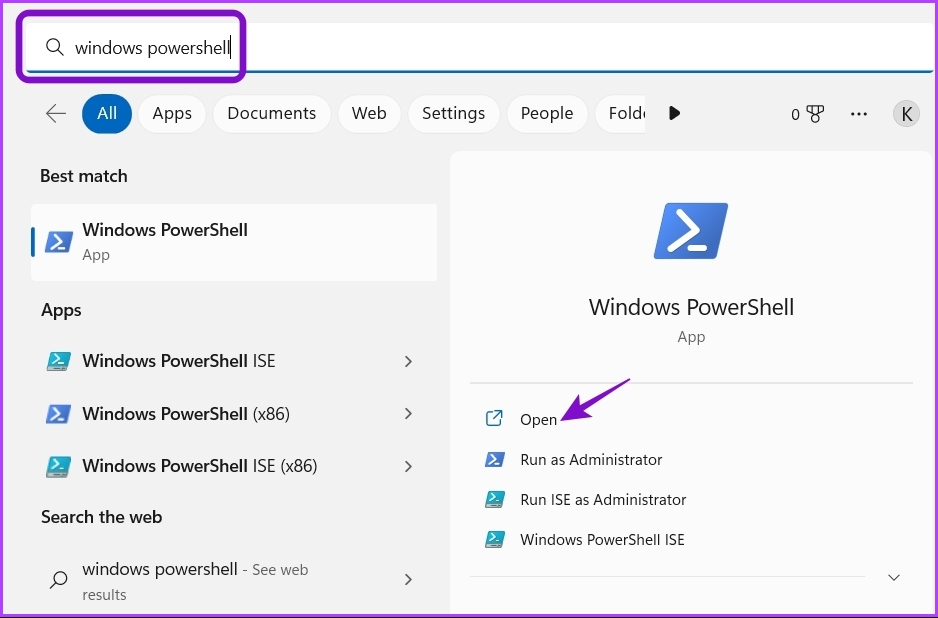
4. Open Services Using Command-Line Tools
Windows offers several command-line tools that you can use to perform different tasks. To open Services, you can use Command Prompt and Windows PowerShell.
Here’s how to open Services using the Command prompt:
Step 1: Press Windows + S keys to open Windows search, type Command Prompt in the text field, and click the Open option in the right pane.

Step 2: In the Command Prompt window, type services.msc and press Enter.

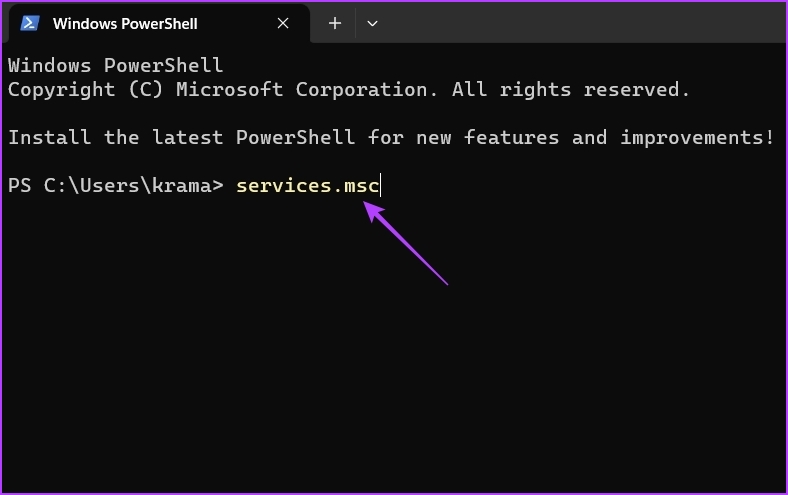
To access Services using the Windows PowerShell, follow the below instructions:
Step 1: Press Windows + S keys to open Windows search, type Windows PowerShell in the search bar and click Open.
Step 2: In the console, type services.msc and press Enter to access the Services app.
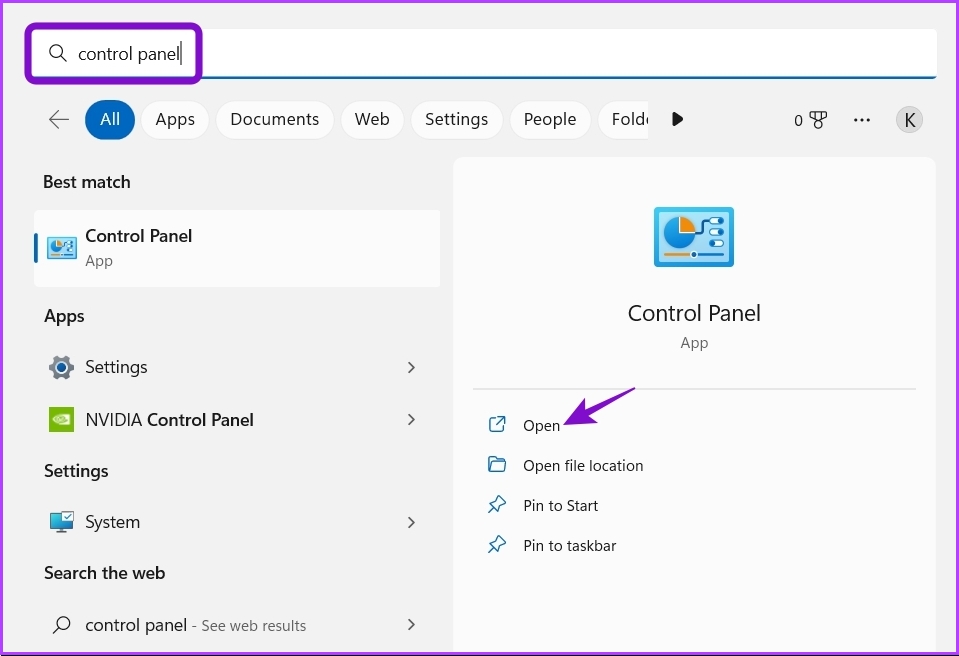
5. Open Services Using the Control Panel
The Control Panel is the central hub of a Windows operating system. It’s the place to access and configure system settings. You can also use it to open the Services app. Here’s how:
Step 1: Launch Windows Search, type Control Panel in the search bar, and click Open.
Step 2: In the Control Panel, choose the System and Security option.

Step 3: Select Windows Tools.
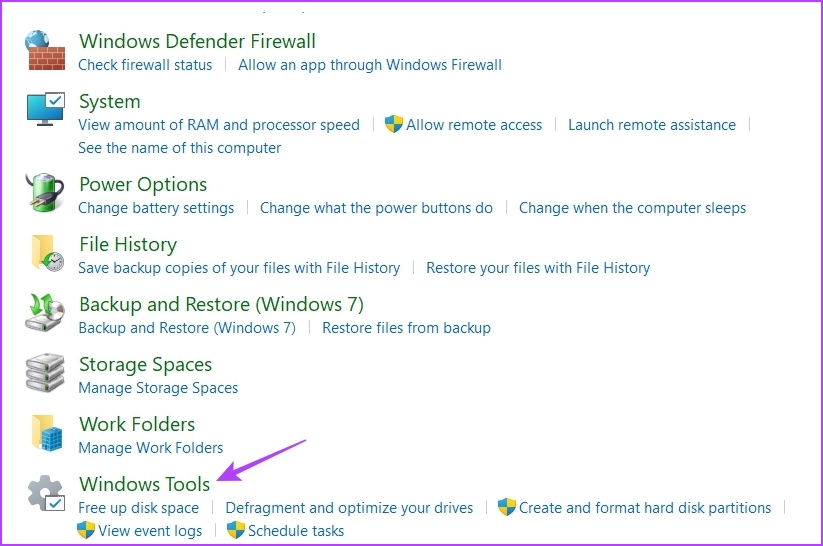
Step 4: Double-click on the Services option to open it.

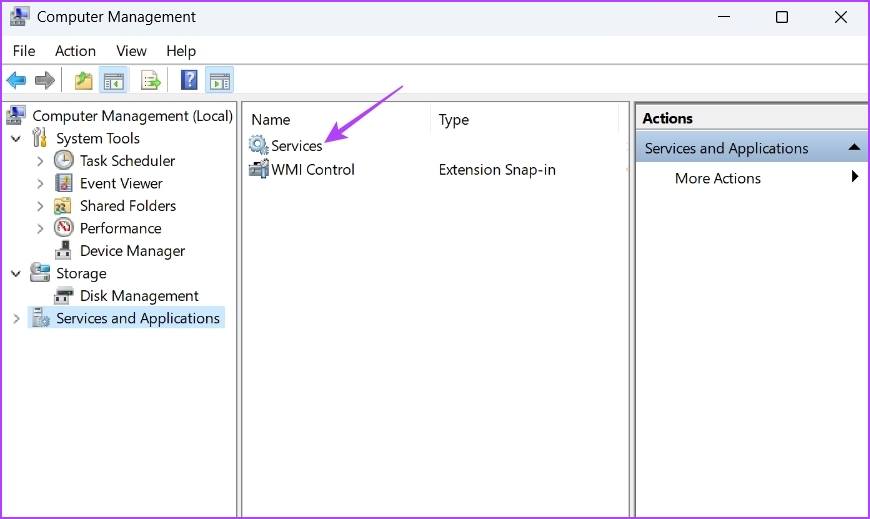
6. Open Services Using the Computer Management App
The Computer Management app is another Windows utility that allows you to access important tools and features like Disk Management, Event Viewer, Services, Performance Monitor, and Device Manager. Here’s how to access Services using the Computer Management app:
Step 1: Open the Run tool, type compmgmt.msc, and press Enter.

Step 2: Choose Services and Applications from the left sidebar.
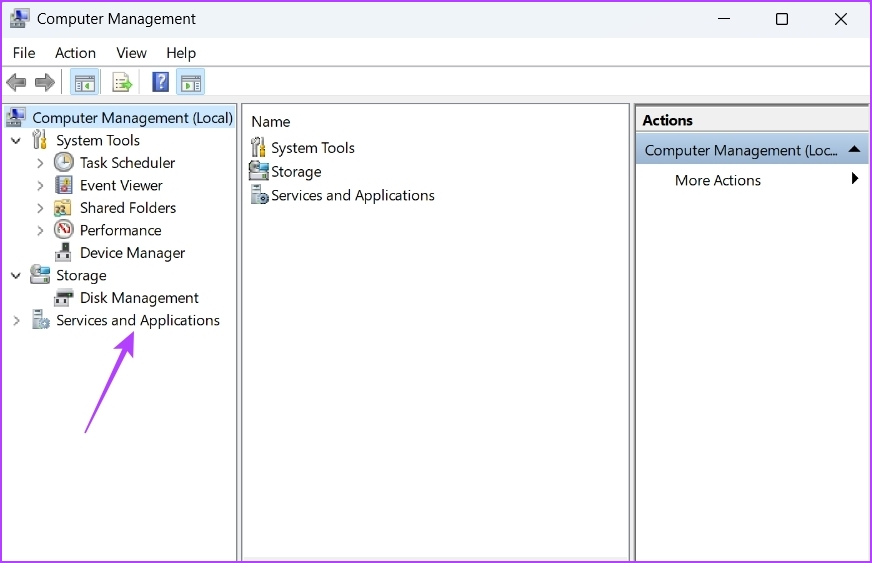
Step 3: Double-click the Services option in the right pane.
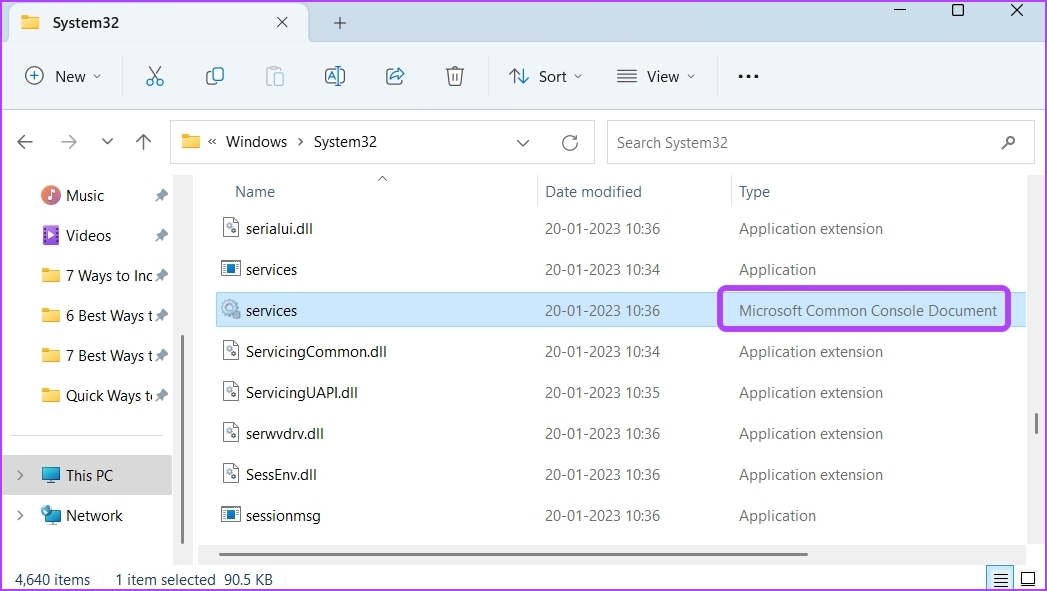
7. Open Services Using the File Explorer
The File Explorer is the go-to place to view and open files and folders stored on your computer. It can also come in handy in accessing the Services app. You’ll need to ensure File Explorer opens properly before you proceed. Here’s how:
Step 1: Press the Windows + E key to open File Explorer.
Step 2: Open the drive in which you have installed the OS. Usually, it’s the C drive for most users.
Step 3: Search for the Windows folder and open it.

Step 4: Locate the System32 folder and double-click on it to access its content.

Step 5: In the System32 folder, search for and double-click on the services file to open the Services app.

Note that there might be two services files in the System32 folder. Make sure to open the file that has Microsoft Common Console Document written under the Type section.
8. Open Services With a Shortcut
Windows lets you create shortcuts for apps that you access very frequently. To create the shortcut of the Services app, follow the below steps:
Step 1: On your desktop, right-click on the blank space, hover the cursor to New, and choose Shortcut from the context menu.

Step 2: In the Type the location of the item field, type services.msc and click Next.

Step 3: Type services in the name field and then click Finish.
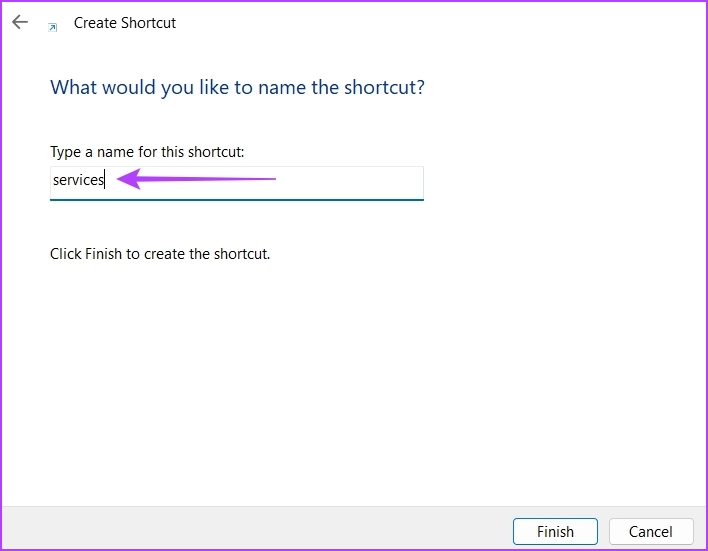
That’s it! Now you can access the Services app by double-clicking on its shortcut on your desktop.
Quickly Access Services on Windows 11
These were all the methods to open Services on Windows 11. Although all the methods work fine, the fastest way to access Services is through the Run tool.
However, if none of the above methods worked, check out our guide on how to fix Services when it’s not opening on Windows 11.
Was this helpful?
Last updated on 31 January, 2023
Read Next
 9 Quick Ways to Open Device Manager in Windows 11
The Device Manager can help when you're adding new hardware to your computer or updating drivers of the existing one.
9 Quick Ways to Open Device Manager in Windows 11
The Device Manager can help when you're adding new hardware to your computer or updating drivers of the existing one.
 8 Quick Ways to Open Computer Management on Windows 11
Computer Management is a system management utility that offers access to several administrative tools to manage the resources of your Windows computer.
8 Quick Ways to Open Computer Management on Windows 11
Computer Management is a system management utility that offers access to several administrative tools to manage the resources of your Windows computer.
 7 Quick Ways to Open Credential Manager in Windows 11
Are you looking for a password manager to save your login credentials securely?
7 Quick Ways to Open Credential Manager in Windows 11
Are you looking for a password manager to save your login credentials securely?
 8 Quick Ways to Open Remote Desktop Connection Tool in Windows 11
AnyDesk and Teamviewer are the two popular apps to remotely connect to and control a computer.
8 Quick Ways to Open Remote Desktop Connection Tool in Windows 11
AnyDesk and Teamviewer are the two popular apps to remotely connect to and control a computer.
 7 Quick Ways to Open Resource Monitor in Windows 11
Microsoft bundles a Resource Monitor tool in its operating system since the Windows Vista release.
7 Quick Ways to Open Resource Monitor in Windows 11
Microsoft bundles a Resource Monitor tool in its operating system since the Windows Vista release.
 8 Quick Ways To Open Ease of Access Center on Windows 11
Windows has accessibility settings to make things like display, magnifier, narrator, and other features to help you use it better.
8 Quick Ways To Open Ease of Access Center on Windows 11
Windows has accessibility settings to make things like display, magnifier, narrator, and other features to help you use it better.
 Top 5 Ways to Fix Location Services Grayed Out on Windows 11
A bunch of apps on your Windows 11 computer rely on the location services to determine your location.
Top 5 Ways to Fix Location Services Grayed Out on Windows 11
A bunch of apps on your Windows 11 computer rely on the location services to determine your location.
 Top 6 Ways to Fix Services Not Opening on Windows 11
Windows Services is a system app that allows you to enable, disable, and configure various services installed on your computer.
Top 6 Ways to Fix Services Not Opening on Windows 11
Windows Services is a system app that allows you to enable, disable, and configure various services installed on your computer.
The article above may contain affiliate links which help support Guiding Tech. The content remains unbiased and authentic and will never affect our editorial integrity.