Microsoft Teams is an outstanding team collaboration app pre-installed on Windows. It allows users to communicate, collaborate, or host video meetings. Unfortunately, the Microsoft Teams app can turn out to be a resource hog at times, consuming much more CPU resources which can slow down your computer.

While you might not notice the increase in CPU usage when your computer is idling, it can prevent other applications from running smoothly. But don’t fret; we’ve listed out the best ways to help fix Microsoft Teams’ high CPU usage on Windows and restore your computer’s performance.
1. Disable Teams Auto-Start
Microsoft Teams, by default, is configured to start automatically whenever you start your Windows computer. While this is great for saving time, doing this may cause the app to eat up more CPU resources in the background.
To stop Microsoft teams from starting automatically, follow the steps listed below:
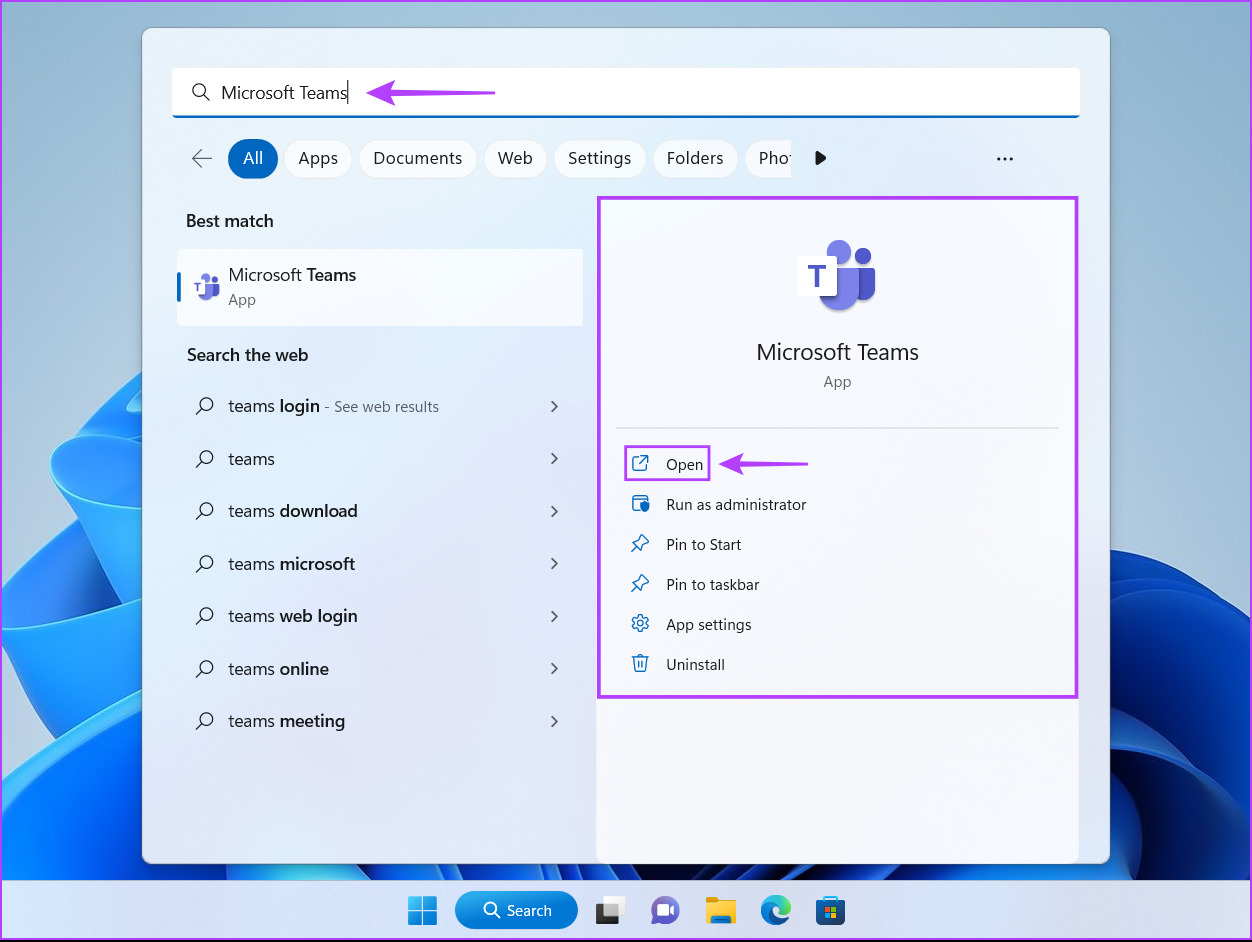
Step 1: Click the Windows Search icon on the taskbar and type Microsoft Teams. Click on Open to launch Microsoft Teams.
Step 2: Click on the three-dot menu next to your profile picture.

Step 3: From the context menu, click on Settings.

Step 4: Deselect the Auto-start application option by clicking on the check box beside it.

2. Update Microsoft Teams
There’s a chance that a bug in Microsoft Teams is causing it to utilize more CPU than usual. In such cases, you should check if there’s any new update available for Microsoft Teams that might fix the bug for you.
To manually check for updates In Microsoft Teams, follow the steps listed below:
Step 1: Click on the Windows Search icon on the taskbar and type Microsoft Teams. Click on Open to launch Microsoft Teams.
Step 2: Click on the three-dot menu next to your profile picture.
Step 3: From the context menu that appears, click on Settings.
Step 4: Click on the About Teams option from the left sidebar. Then on the right pane, check if you have the latest version of Teams installed.

3. Turn Off Animations in the Teams App
Although the animations in Teams add to the overall visual appeal of the app, these visual effects might be causing the increase in Microsoft Teams’ CPU usage on Windows. Hence, it’s recommended you disable visual effects in Teams if you want to reduce its CPU usage.
Step 1: Click on the Windows Search icon on the taskbar and type Microsoft Teams. Click on Open to launch Microsoft Teams.
Step 2: Click on the three-dot menu next to your profile picture.
Step 3: From the context menu, click on Settings.
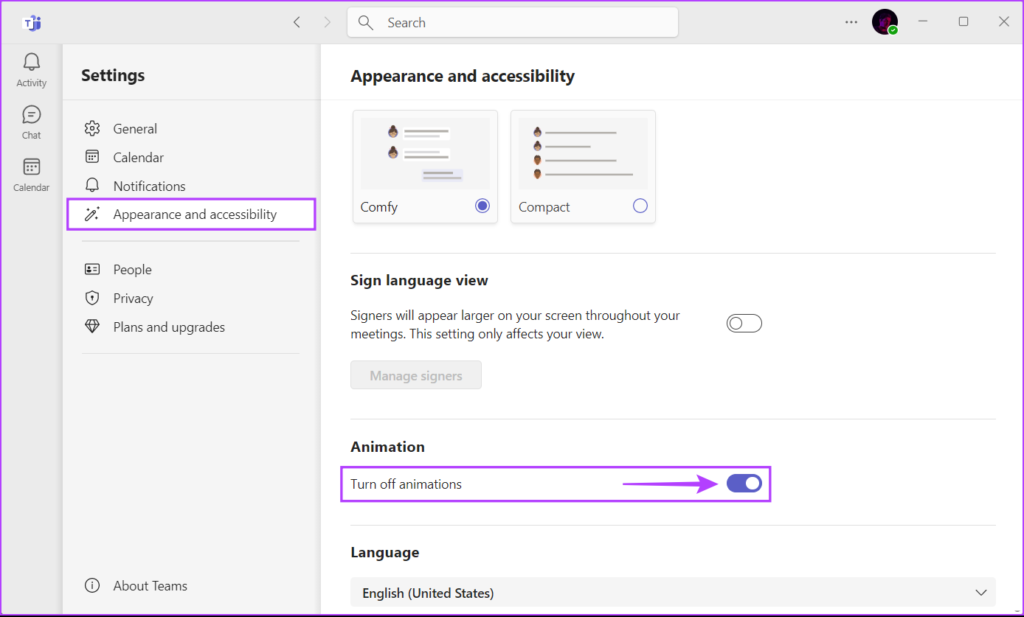
Step 4: Click on the Appearance and accessibility option from the sidebar. In the right pane, scroll down and enable the toggle for ‘Turn off animations’.
4. Disable Read Receipts
Yet another solution that can help reduce Teams’ CPU usage includes disabling the read receipts feature. The read receipts feature, which gives a visual indication when the recipient reads a message, is known to use more CPU resources, especially if you’re on a lower-end computer.
To turn off read receipts in Microsoft Teams, follow the steps listed below:
Step 1: Click the Windows Search icon on the taskbar and type Microsoft Teams. Click on Open to launch Microsoft Teams.
Step 2: Click on the three-dot menu next to your profile picture.
Step 3: From the context menu, click on Settings.
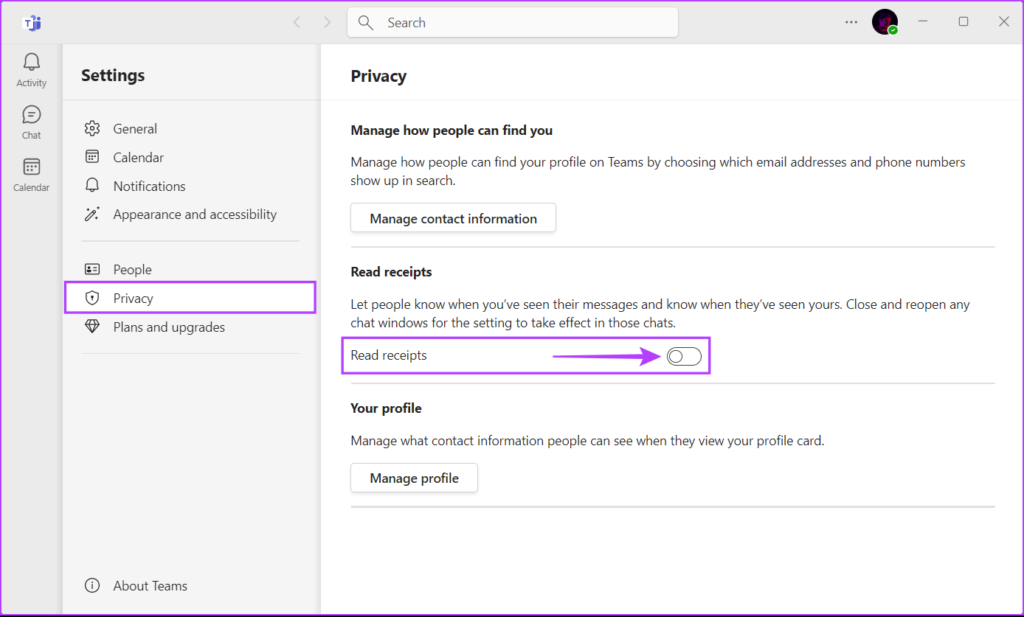
Step 4: Click on the Privacy option from the left sidebar. Then on the right pane, scroll down and disable the toggle for Read receipts.
5. Remove Microsoft Teams Cache
Excessive cached data can also cause Microsoft Teams to use more CPU resources than usual. If you have never cleared the cache for Microsoft Teams, it’s recommended you do so to give the app a fresh start and resolve unfavorable issues.
To clear the cached data for the Teams app on Windows, follow the steps:
Step 1: Close the Teams app if it is currently open. Then, press the Windows + R keys to open the Run dialog.

Step 2: Type or copy the below text in the field and press Enter.
%appdata%\Microsoft\teams

Step 3: When a File Explorer window opens, select the folders for blob_storage, Cache, databases, GPUCache, and Local Storage.

Step 4: Now, hit the delete button in the toolbar.

6. Disable GPU Hardware Acceleration
The Microsoft Teams app uses GPU hardware acceleration to improve its speed and performance. However, this feature can consume too much processing power, leading to Microsoft Teams’ high CPU usage on Windows.
If you want to prevent this, you’ll need to disable GPU hardware acceleration in Teams. Follow these steps:
Step 1: Click the Windows Search icon on the taskbar and type Microsoft Teams. Click on Open to launch Microsoft Teams.
Step 2: Click on the three-dot menu next to your profile picture.
Step 3: From the context menu, click on Settings.
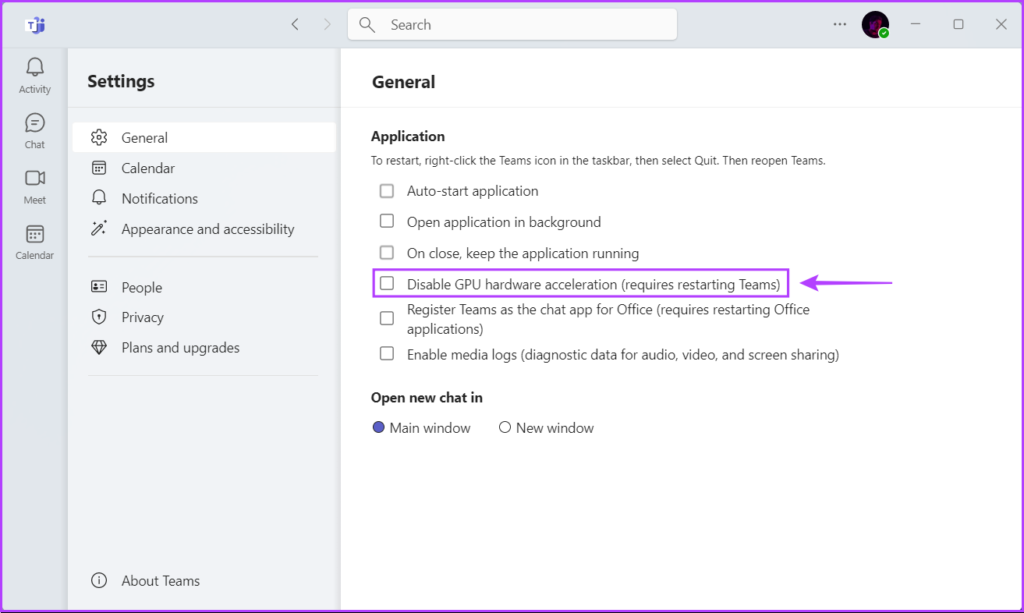
Step 4: Stay on the General tab and deselect the check box for ‘Disable GPU hardware acceleration’.
7. Repair or Reset Microsoft Teams
Often, Microsoft Teams may not work as expected if it’s outdated or its configuration files are corrupted. Thankfully, Windows lets you quickly repair or reset apps without a hassle, helping fix such issues.
To reset or repair the Microsoft Teams app, follow the steps listed below:
Step 1: Press the Windows + I keys to open the Settings app.

Step 2: When the Settings app opens, click on the Apps option in the left sidebar.

Step 3: On the Apps page, click on the option that says Installed apps from the right pane.

Step 4: Type Microsoft Teams in the search box at the top.

Step 5: From the search results, click the horizontal three dots menu next to Microsoft Teams. Then, select Advanced options.
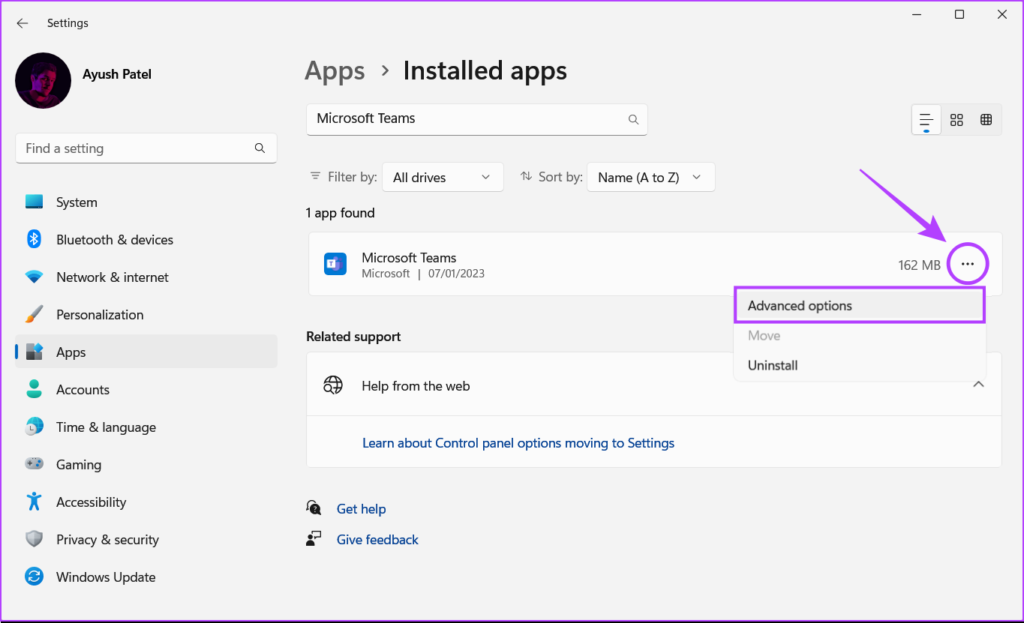
Step 6: Under Microsoft Teams’ Advanced options, scroll down and click the Repair button. If repairing doesn’t do the trick, click on the reset button.

After that, Windows will attempt to repair or reset the app and show a checkmark next to the button you clicked, denoting that the process is complete.
8. Reinstall Microsoft Teams
If none of the above solutions works, there might be an issue with your installation of Teams that’s causing it to consume more CPU resources than usual. In such cases, you can remove Microsoft Teams and reinstall it from scratch. Here’s how you can do the same on your Windows computer:
Step 1: Press the Windows + I keys to open the Settings app.
Step 2: When the Settings app opens, click on the Apps option in the left sidebar.
Step 3: On the Apps page, click on the Installed apps option from the right pane.
Step 4: Type Microsoft Teams in the search box at the top.
Step 5: From the search results, click the horizontal three dots menu next to Microsoft Teams. Then, select Uninstall.

Step 6: Click the download button below to download and install Microsoft Teams on Windows 11.
Keep CPU Usage Under Control
Thanks to the solutions mentioned above, you can easily fix Microsoft Teams’ High CPU Usage on Windows. This will help ensure that your computer keeps running other important applications without breaking a sweat, even when you have Microsoft Teams running in the background.
Was this helpful?
Last updated on 24 January, 2023
Read Next
 7 Best Ways to Fix Microsoft Edge High CPU Usage on Windows 11
Microsoft Edge is the go-to web browser for many users since it comes pre-installed with Windows 11.
7 Best Ways to Fix Microsoft Edge High CPU Usage on Windows 11
Microsoft Edge is the go-to web browser for many users since it comes pre-installed with Windows 11.
 Top 8 Ways to Fix Windows Explorer High CPU Usage on Windows 11
Windows Explorer is the file manager application on Windows to view the data and also access the Control Panel options.
Top 8 Ways to Fix Windows Explorer High CPU Usage on Windows 11
Windows Explorer is the file manager application on Windows to view the data and also access the Control Panel options.
 Top 10 Ways to Fix High CPU Usage on Windows 11
When a PC appears sluggish, users often open the Task Manager and are baffled to view higher CPU usage.
Top 10 Ways to Fix High CPU Usage on Windows 11
When a PC appears sluggish, users often open the Task Manager and are baffled to view higher CPU usage.
 Top 8 Ways to Fix Google Chrome High CPU Usage on Windows 11
Windows users often complain about Google Chrome's abnormal CPU usage.
Top 8 Ways to Fix Google Chrome High CPU Usage on Windows 11
Windows users often complain about Google Chrome's abnormal CPU usage.
 6 Ways to Fix Windows Modules Installer Worker High CPU Usage
If you've ever found your computer's fan working overtime and the CPU usage going sky-high, you're not alone.
6 Ways to Fix Windows Modules Installer Worker High CPU Usage
If you've ever found your computer's fan working overtime and the CPU usage going sky-high, you're not alone.
 Windows Audio Device Graph Isolation: Fix High CPU Usage
The productivity of your work can be easily influenced by how your Windows PC performs.
Windows Audio Device Graph Isolation: Fix High CPU Usage
The productivity of your work can be easily influenced by how your Windows PC performs.
 Top 8 Ways to Fix Google Chrome High CPU Usage on Mac
Google Chrome is infamous for high RAM and CPU usage on Windows and Mac.
Top 8 Ways to Fix Google Chrome High CPU Usage on Mac
Google Chrome is infamous for high RAM and CPU usage on Windows and Mac.
 Top 7 Fixes for Discord’s High CPU Usage on Windows
Is Discord using too much CPU on your Windows 10 or 11 computer?
Top 7 Fixes for Discord’s High CPU Usage on Windows
Is Discord using too much CPU on your Windows 10 or 11 computer?
The article above may contain affiliate links which help support Guiding Tech. The content remains unbiased and authentic and will never affect our editorial integrity.

