Windows Security is a built-in security application that safeguards your computer from viruses, malware, and hacking attempts. However, like any Universal Windows Platform (UWP) app, it has its share of flaws.

For many users, the Windows Security app fails to launch or shows a white screen. If you’re struggling with the latter problem, then this is the place where you need to be. This guide features all the working ways to fix Windows Security white screen issue on Windows 11. So, let’s check them out.
1. Restart Your Computer
To fix the Windows Security white screen issue, your first port of call is to restart your computer. As it turns out, built-in applications like Windows Security start misbehaving due to bugs or glitches within the system. And the best way to get rid of such a glitch is to restart the system.
After restarting, launch Windows Security and check if the problem continues. If yes, then probably your current Windows build is causing the issue. The solution, in this case, is to download the latest Windows update.
2. Update Windows
It’s recommended to regularly update Windows as not only it introduces new features but also eliminates bugs and glitches. You can download the latest Windows 11 update by following the below instructions:
Step 1: Press the Windows + I keys to open the Settings app.
Step 2: Choose Windows Update from the left sidebar.

Step 3: Click the ‘Check for updates’ option from the right pane.
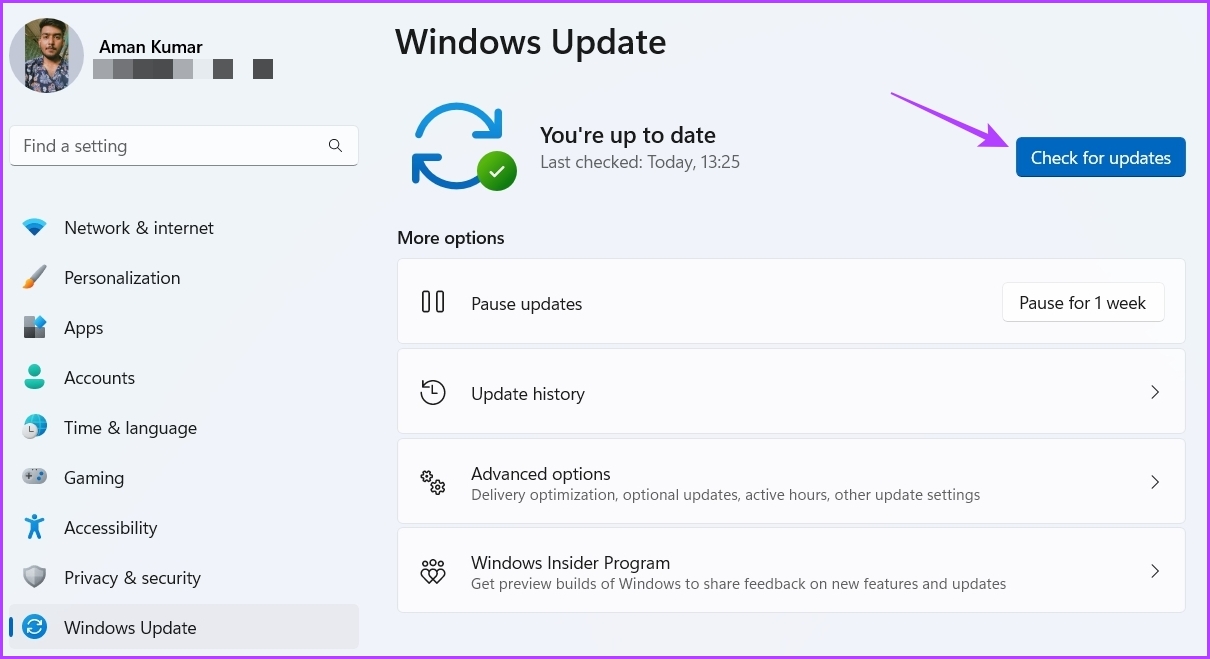
Windows will search for and download any available updates. After downloading, you might need to restart your computer to complete the update installation.
3. Disable or Uninstall Any Third-Party Security Program
You will likely see a white screen on the Windows Security app if you have a third-party security application installed on your computer. The reason behind it is that running two security (anti-virus) programs on Windows 11 often results in conflicts concerns.
So, disable the security application installed on your computer and check if it fixes the issue. If that helps, then you may want to uninstall that security app from your computer.
4. Check the Status of the Security Center Service
The Security Center Service is an important Windows service that starts automatically when you boot your computer. But, if this service is disabled or fails to launch on the boot, you might see the issue at hand.
The solution, in this case, is to restart the Security Center service. Here’s how to do that:
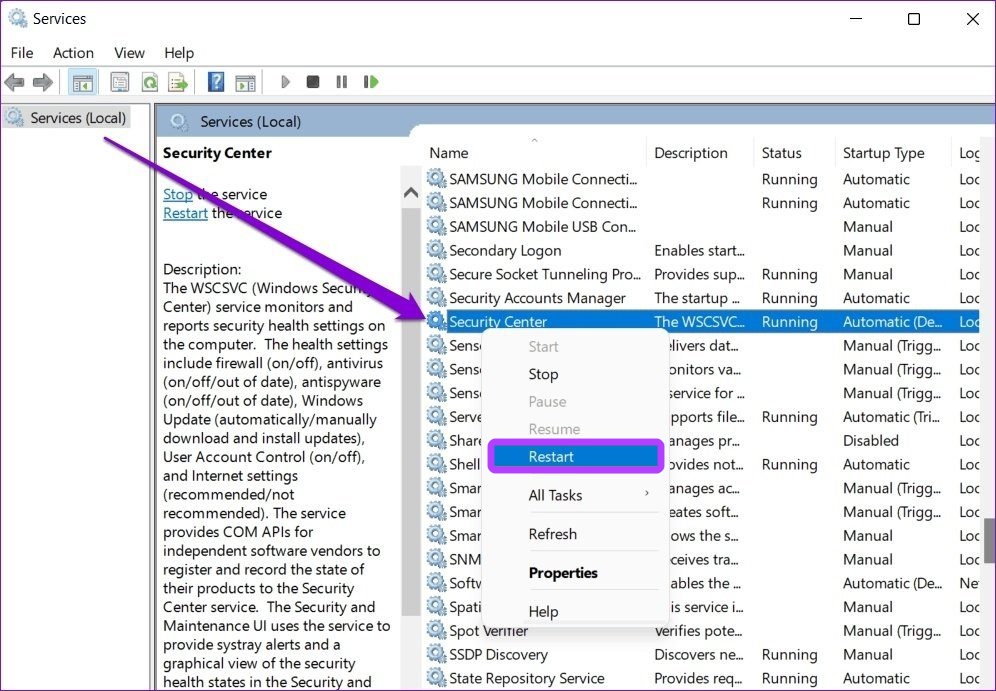
Step 1: Press Windows + R keys to open the Run dialog box, type services.msc, and click OK.
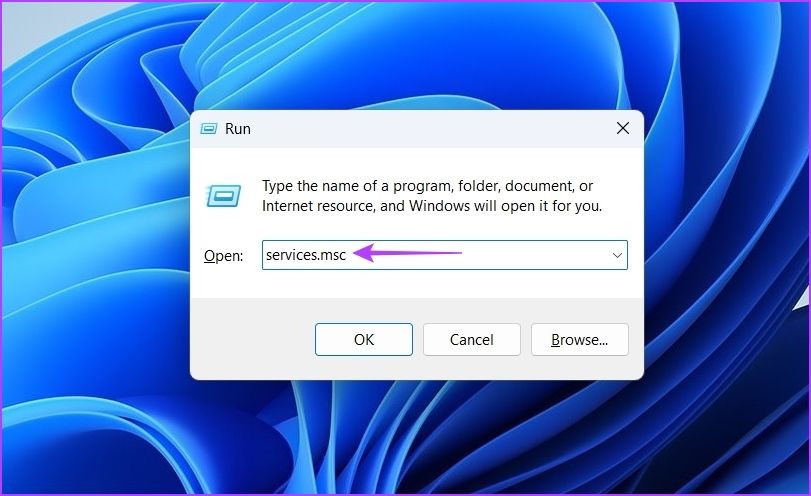
Step 2: Search for the Security Center service from the list and right-click on it. Then, choose Restart from the context menu.
Give your computer a couple of seconds and open Windows Security again to check if the problem is fixed.
5. Repair and Reset the Windows Security App
Another quick way to fix the issue is to repair the Windows Security app. You can do that by following the steps:
Step 1: Press Windows + I keys to open Settings and then choose Apps from the left sidebar.

Step 2: Choose Installed apps from the right pane.
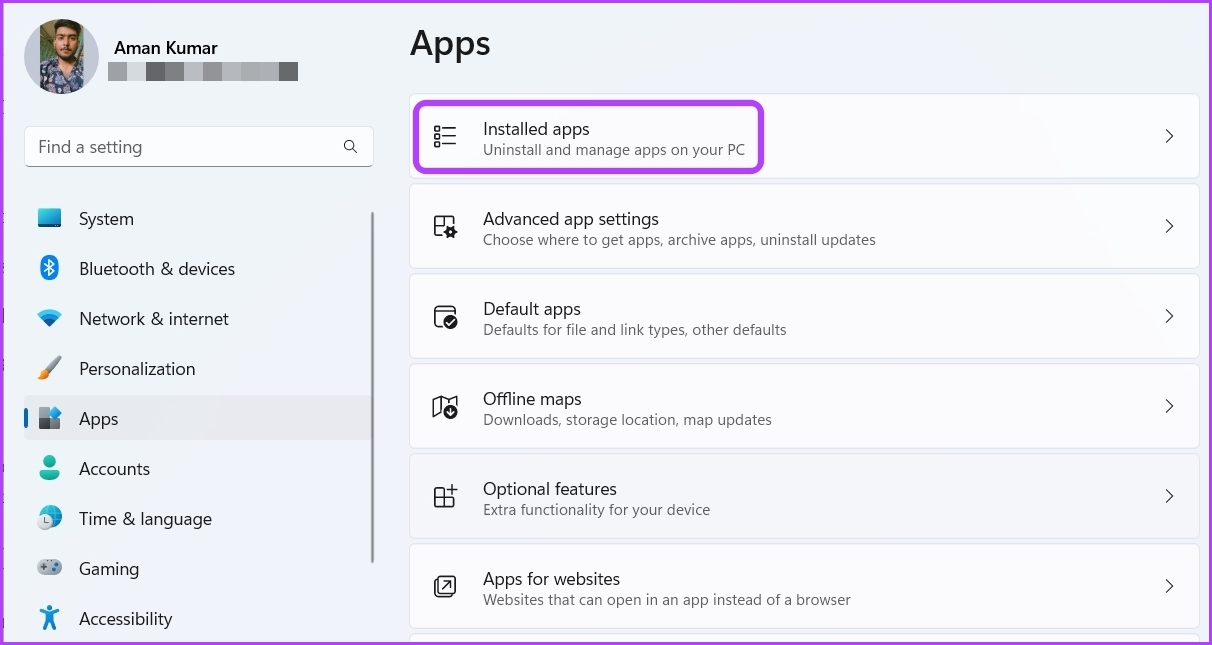
Step 3: Click the three horizontal dots next to Windows Security and choose Advanced options from the context menu.

Step 4: From the next screen, click the Repair button.
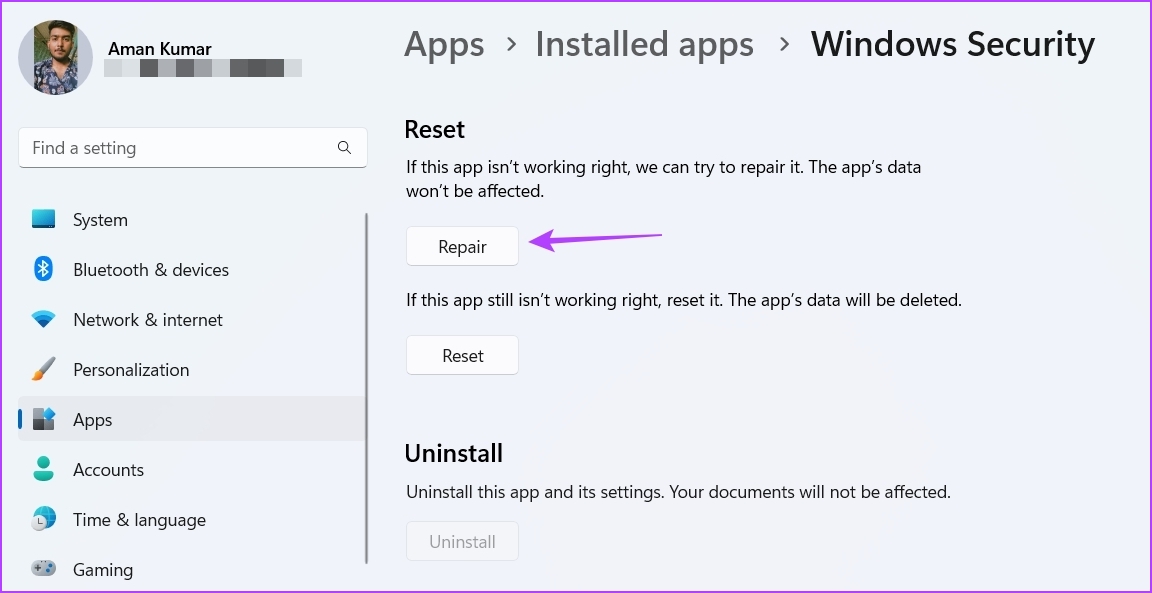
Windows will start repairing the app. After the process completes, you’ll see a checkmark next to the Repair option.
Next, launch Windows Security to check if it still shows a black screen. If the issue persists, you can follow the same steps and click on Rest button. Resetting the Windows Security app will do the trick if improper configurations cause the problem. However, resetting the app means you’ll lose all the tweaks and settings you’ve made in the app.

6. Edit the Registry
Security Health Service is an essential part of the Windows Security app. It ensures you get the latest information about the protection status on the endpoint. However, if it is disabled in the Registry Editor, you might see a white screen upon accessing the Windows Security app.
You’ll have to manually enable it by accessing its entry in the Registry Editor. Here’s how to do that:
Step 1: Press Windows + R to open a Run dialog box, type regedit, and click OK.
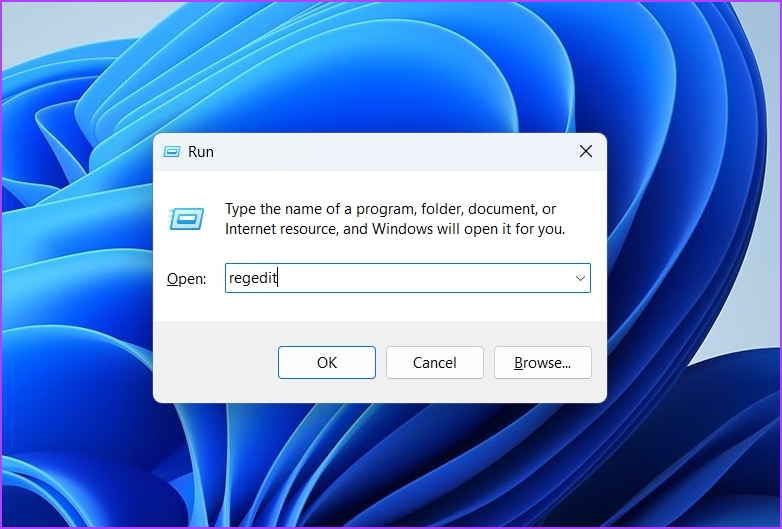
Step 2: In the Registry Editor, navigate to the following location:
Computer\HKEY_LOCAL_MACHINE\SYSTEM\CurrentControlSet\Services\SecurityHealthService
Step 3: Double-click on Start in the right pane.

Step 4: Type 1 in the Value data and click OK.
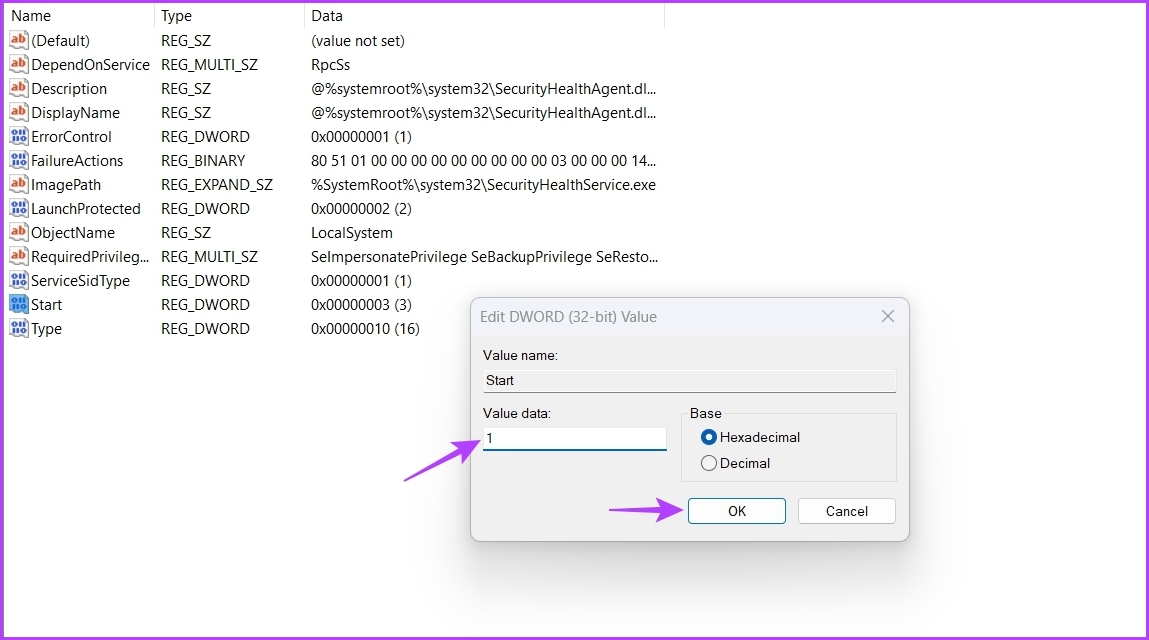
Restart your computer and check for the issue.
7. Reinstall Windows Security App
Are you still seeing a white screen on launching the Windows Security app? If yes, then you’re left with no option other than to reinstall the Windows Security app. Here’s how:
Step 1: Press the Windows key to open the Start Menu, type Windows PowerShell in the Windows Search, and when the results show up, click ‘Run as administrator.’

Step 2: Type the following command and press Enter:
Get-AppxPackage Microsoft.SecHealthUI -AllUsers | Reset-AppxPackage
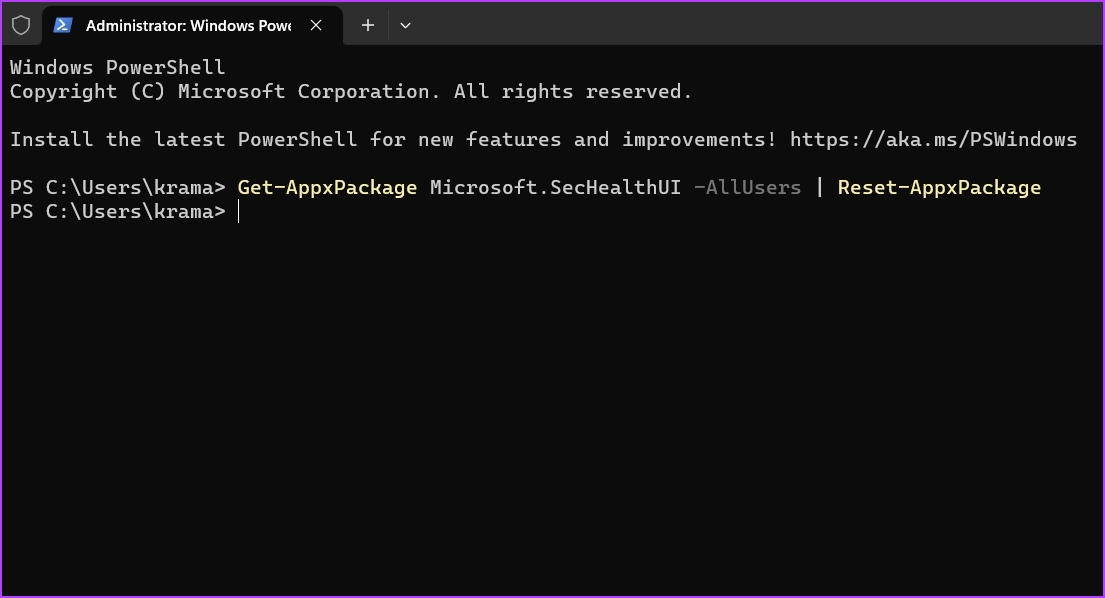
During reinstallation, you might see a Deployment operation process message. After the process is complete, launch Windows Security, and you’ll see you’re no longer facing the white screen issue.
Keep Computer Safe
It’s very common for UWP apps to run into issues, and Windows Security is no different. Windows Security’s white screen issue is very common on Windows 11. Fortunately, you can quickly troubleshoot this problem by applying the above fixes.
Was this helpful?
Last updated on 06 February, 2023
1 Comment
Leave a Reply
Read Next
 8 Ways to Fix Windows Security Not Opening or Working on Windows 11
Windows Security is a built-in security app that offers real-time protection against viruses and malware for your computer.
8 Ways to Fix Windows Security Not Opening or Working on Windows 11
Windows Security is a built-in security app that offers real-time protection against viruses and malware for your computer.
 Windows Guest Account Not Showing on Login Screen: How to Get It Back on Windows 10/11
The Windows operating system featured the ability to sign in as a guest user for the longest time.
Windows Guest Account Not Showing on Login Screen: How to Get It Back on Windows 10/11
The Windows operating system featured the ability to sign in as a guest user for the longest time.
 6 Ways to Fix Login Screen Not Showing in Windows 11
Common Fixes Press Ctrl + Alt + Delete - This shortcut refreshes the login interface to bring up the login screen.
6 Ways to Fix Login Screen Not Showing in Windows 11
Common Fixes Press Ctrl + Alt + Delete - This shortcut refreshes the login interface to bring up the login screen.
 9 Ways to Fix Camera Showing a Black Screen on Windows 11
Work from home and online meetings go hand in hand.
9 Ways to Fix Camera Showing a Black Screen on Windows 11
Work from home and online meetings go hand in hand.
 How to Fix Windows Security Center Is Turned off Error
The Windows Security Center comes preinstalled with all versions of Windows 10 computers.
How to Fix Windows Security Center Is Turned off Error
The Windows Security Center comes preinstalled with all versions of Windows 10 computers.
 8 Ways to Open Local Security Policy in Windows 10 and 11
As a Windows user, you may have encountered a situation where you needed to change your system's security settings.
8 Ways to Open Local Security Policy in Windows 10 and 11
As a Windows user, you may have encountered a situation where you needed to change your system's security settings.
 6 Ways to Disable Virtualization-Based Security (VBS) in Windows
Virtualization-based security (VBS) is a feature in Windows to prevent unsigned or suspicious programs from accessing the resources in your system.
6 Ways to Disable Virtualization-Based Security (VBS) in Windows
Virtualization-based security (VBS) is a feature in Windows to prevent unsigned or suspicious programs from accessing the resources in your system.
 8 Fixes for “Your Device Is Missing Important Security and Quality Fixes” on Windows
Is there anything more frustrating than seeing the "Your Device Is Missing Important Security and Quality Fixes" message when waiting for your Windows updates to complete?
8 Fixes for “Your Device Is Missing Important Security and Quality Fixes” on Windows
Is there anything more frustrating than seeing the "Your Device Is Missing Important Security and Quality Fixes" message when waiting for your Windows updates to complete?
The article above may contain affiliate links which help support Guiding Tech. The content remains unbiased and authentic and will never affect our editorial integrity.

I have tried all the solutions on a clients computer none of them work!